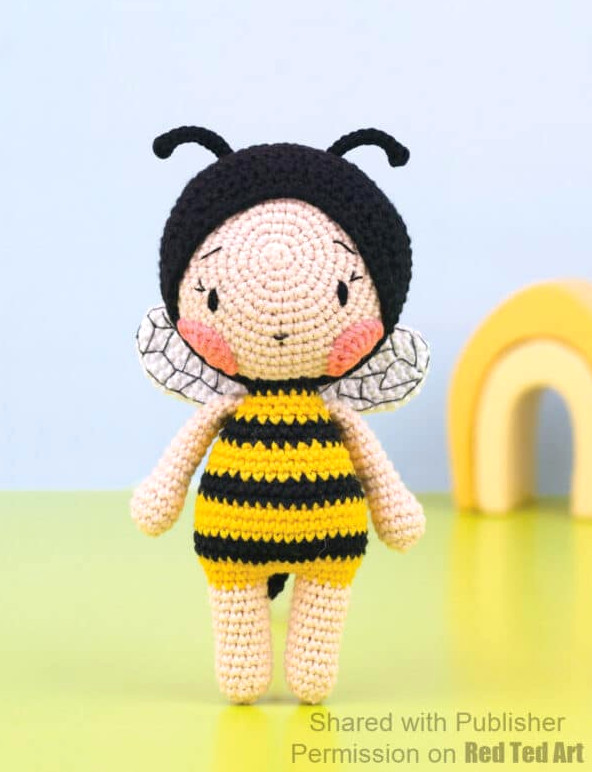
How can we resist an extra adorable Amigurumi Bee Crochet Pattern.. but hold on.. bees are charming… yet Bee Crochet Dolls are even more delightful! Blending two of our beloved themes—doll crafting and sweet little creatures—we’re excited to bring you this precious sample project from the wonderful Amigurumi Adventures by Clare Cooper today. Practice and develop your amigurumi abilities with this beautiful design.
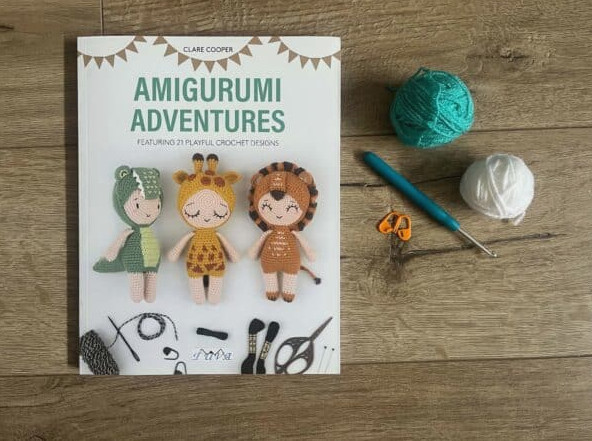
Amigurumi Adventures… where should I even start? It is filled from cover to cover with incredible sweetness. Honestly, I wish I had owned this book when my children were small.. it is absolutely charming. I’m certain my kids would have adored these tiny dolls when they were younger – although I say younger because my daughter is now old enough to create them all by herself. But that’s not quite the same, is it?
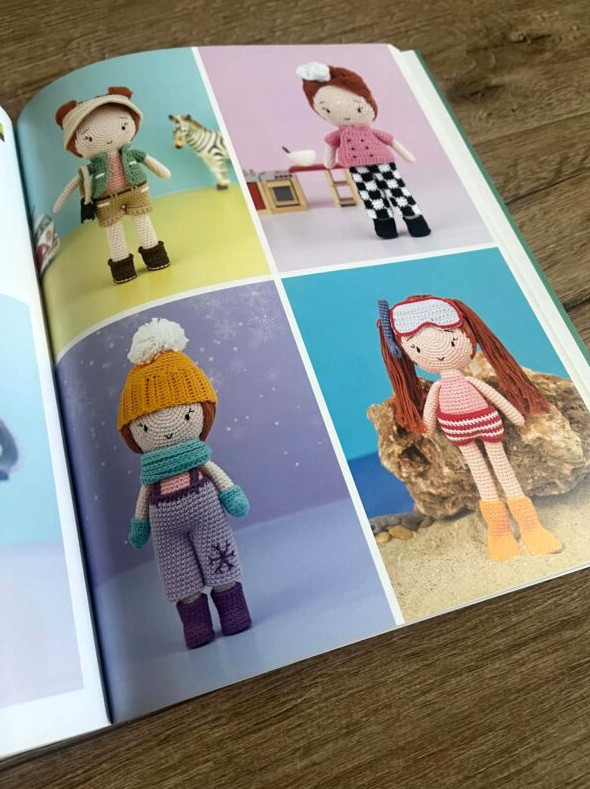
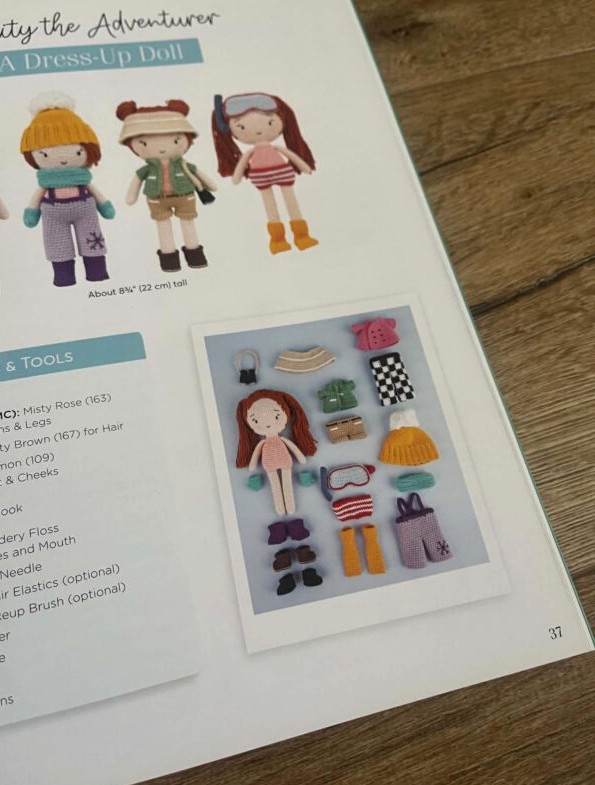
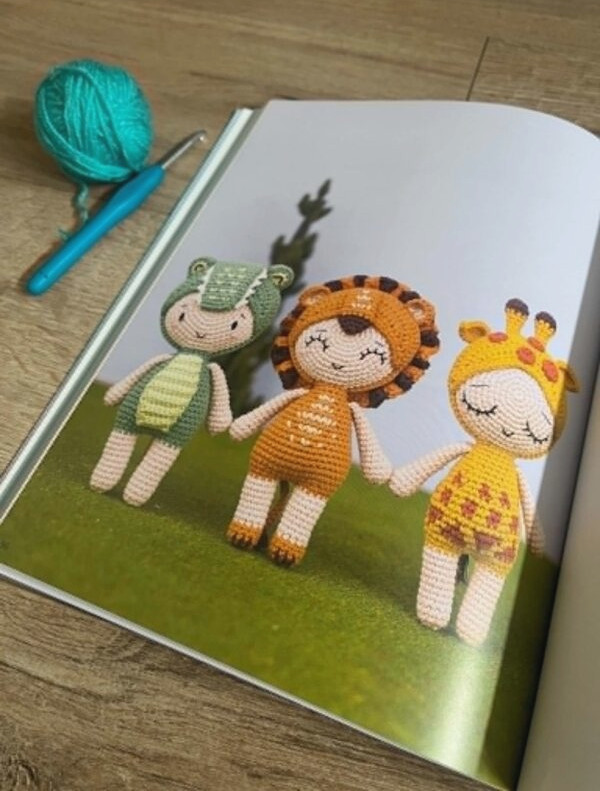
This book features 21 doll patterns, broadly arranged into three categories. First, there is the dress-up doll – which has a wonderful “rag doll” appearance – a companion you can carry everywhere and cherish! The best part? There are plenty of accessories to create for every season. You can continue expanding the crochet doll’s wardrobe with new outfits. Then come the “critter dolls,” as I like to call them—character-themed dolls such as the adorable Crochet Bee Doll featured here today.. along with several lovely cultural dolls dressed in traditional national clothing.
Naturally, the book also includes an extensive section of thorough stitch tutorials to help ensure your crochet projects turn out beautifully. What an excellent resource!
Be sure to order your copy today! Especially while this wonderful reader offer is available (it would make a lovely Christmas present for your favourite crocheting friend!):
You can purchase Amigurumi Adventures from Gifts to Me for just £12 (+P&P)! The regular RRP is £15.99
Go to giftstome.co.uk and enter the offer code R6128
Offer finishes on 12th December 2026
You can also purchase a copy through Amazon
Materials used for crocheting your Amigurumi Bee Doll
YARN: HELLO Cotton
- Main color (MC): Misty Rose (163) – for Face, Arms & Legs
- Color A: Yellow (123) – for Bodysuit
- Color B: Black (160) – for Bodysuit, Hood, Antenna & Stinger
- Color C: White (154) – for Wings
- Color D: Dark Salmon (112) – for Cheeks
HOOK SIZE: 2.5 mm hook
Finished Size
Approximately 6¾” (17 cm) tall
SPECIAL STITCHES & TECHNIQUES
Single Crochet Spike Stitch (sc-sp): Place hook into the indicated stitch one round beneath the current
round, draw up a loop to match the height of the stitches in the current round, yarn over and pull through both loops on the hook. (single crochet spike stitch made)
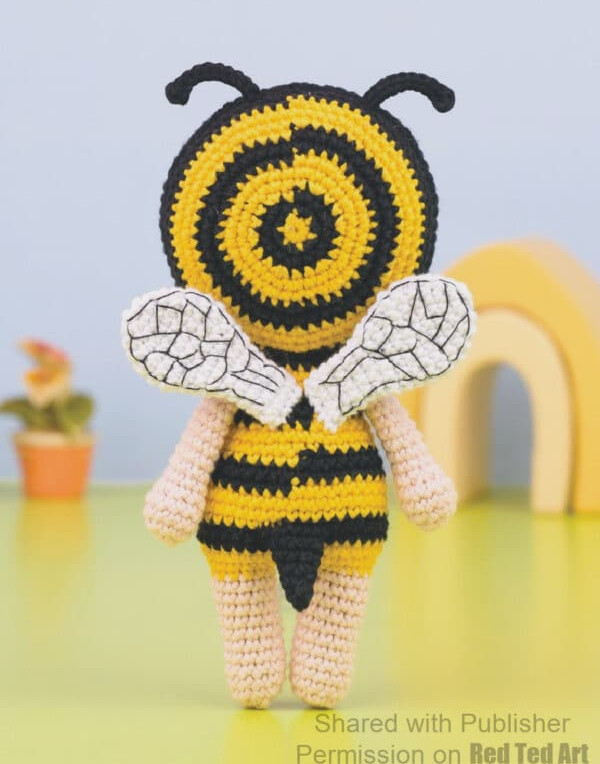
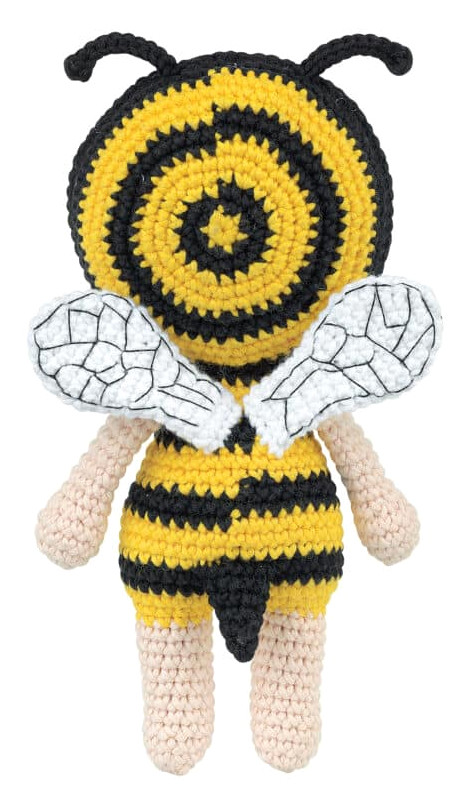
MYRTLE The Bee Crochet Doll
created by Clare Cooper
HEAD
Front (Face)
Round 1: Using MC, create a magic ring and work 6 sc into the ring. (6 sc)
Round 2: Inc in every st around. (12 sc)
Round 3: [Sc in next st, inc in next st] 6 times. (18 sc)
Round 4: [Sc in next st, inc in next st, sc in next st] 6 times. (24 sc)
Round 5: [Sc in each of next 3 sts, inc in next st] 6 times. (30 sc)
Round 6: [Sc in each of next 2 sts, inc in next st, sc in each of next 2 sts] 6 times. (36 sc)
Round 7: [Sc in each of next 5 sts, inc in next st] 6 times. (42 sc)
Round 8: [Sc in each of next 3 sts, inc in next st, sc in each of next 3 sts] 6 times. (48 sc)
Round 9: [Sc in each of next 7 sts, inc in next st] 6 times. (54 sc)
Round 10: [Sc in each of next 4 sts, inc in next st, sc in each of next 4 sts] 6 times. (60 sc)
Round 11: [Sc in each of next 9 sts, inc in next st] 6 times. (66 sc)
Rounds 12-13: Sc in every st around. (66 sc)
Cut yarn and fasten off.
Back (Hood)
Round 1: With Color A, form a magic ring and crochet 6 sc into the ring. (6 sc)
Switch to Color B
Round 2: Inc in every st around. (12 sc)
Round 3: [Sc in next st, inc in next st] 6 times. (18 sc)
Switch to Color A
Round 4: [Sc in next st, inc in next st, sc in next st] 6 times. (24 sc)
Round 5: [Sc in each of next 3 sts, inc in next st] 6 times. (30 sc)
Round 6: [Sc in each of next 2 sts, inc in next st, sc in each of next 2 sts] 6 times. (36 sc)
Switch to Color B
Round 7: [Sc in each of next 5 sts, inc in next st] 6 times. (42 sc)
Round 8: [Sc in each of next 3 sts, inc in next st, sc in each of next 3 sts] 6 times. (48 sc)
Switch to Color A
Round 9: [Sc in each of next 7 sts, inc in next st] 6 times. (54 sc)
Round 10: [Sc in each of next 4 sts, inc in next st, sc in each of next 4 sts] 6 times. (60 sc)
Round 11: [Sc in each of next 9 sts, inc in next st] 6 times. (66 sc)
Switch to Color B
Rounds 12-13: (2 Rounds) Sc in every st around. (66 sc) Do not fasten off. Proceed to Head Assembly.
Head Assembly
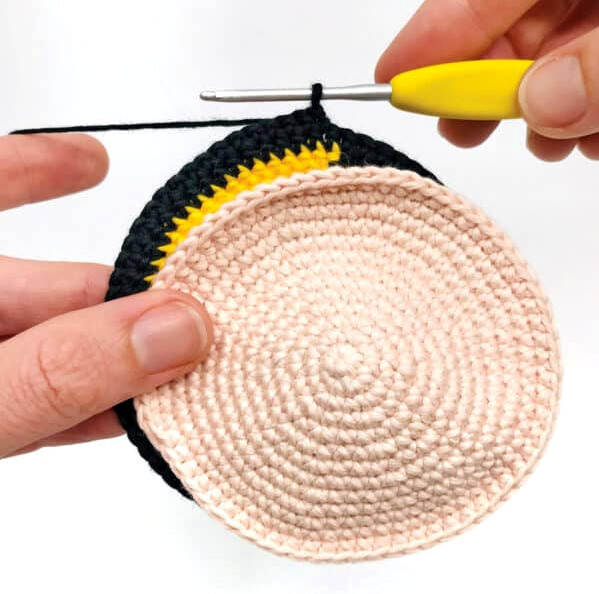
- Place the Front and Back together with their right sides facing outward, keeping the Front of Head toward you. (image left)
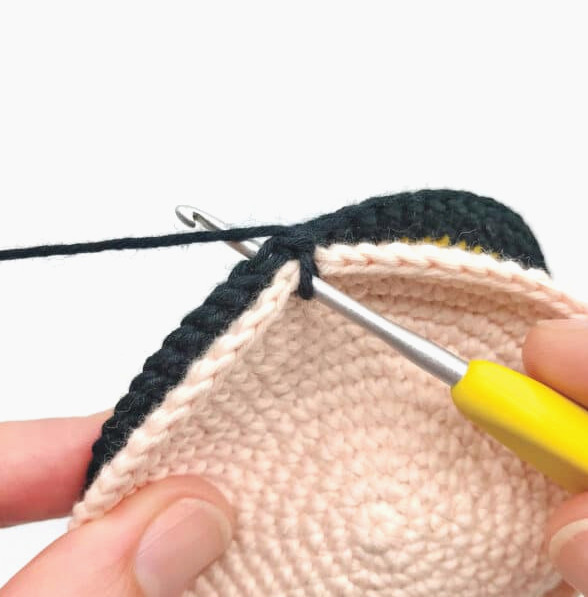
- Using Color B, insert the hook through the next stitch of the Front and the matching stitch of the Back (image right), then make a single crochet. This creates the opening stitch of the “Hoodline”.
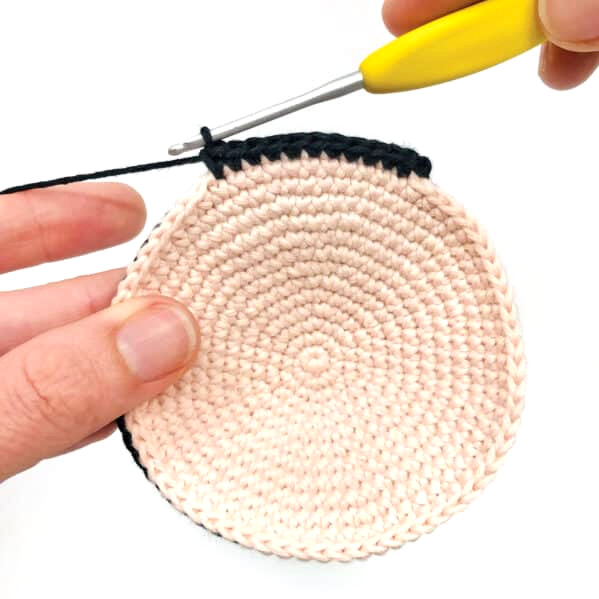
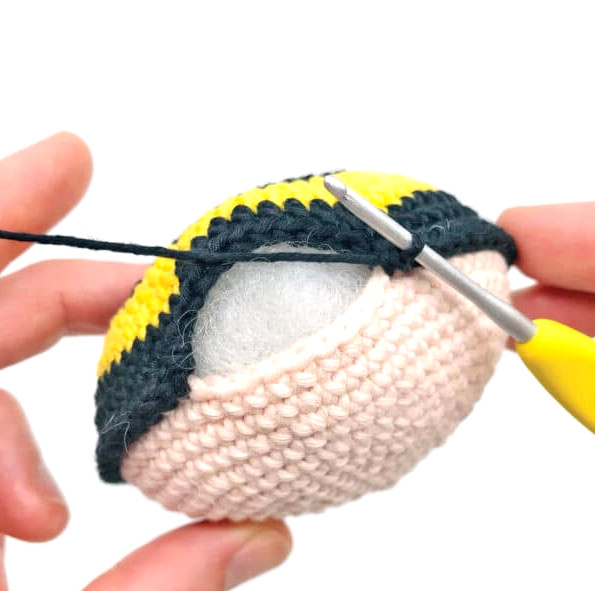
3. Working through the Front and Back at the same time, single crochet across the next 65 stitches to finish the Hoodline (66 stitches) (image left), firmly filling the Head before completing the round. (image right)
4. Close the round by making a slip stitch into the first single crochet.
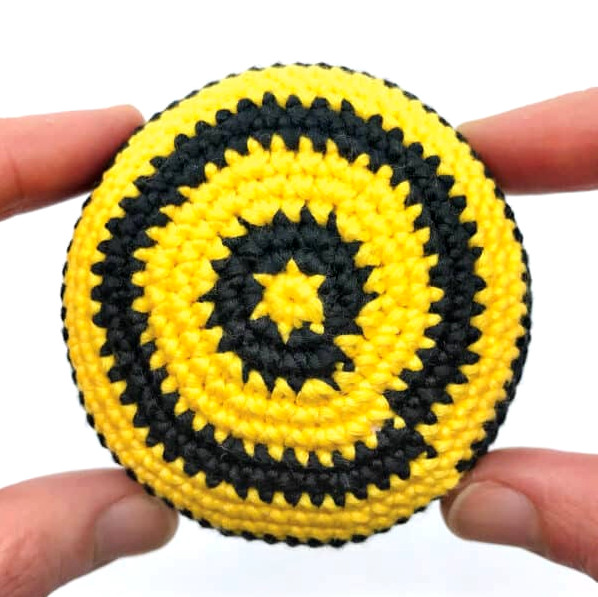
5. Cut the yarn and weave the ends in. (image above)
6. Put the Head to one side.
ARMS
Round 1: With MC, create a magic ring and work 6 sc into the ring. (6 sc)
Round 2: Increase in every stitch around. (12 sc)
Rounds 3-4: (2 rounds) Work sc in each stitch around. (12 sc)
Round 5: Sc in each of the next 6 sts, then [dec] 3 times. (9 sc)
Rounds 6-14: (9 rounds) Sc in every stitch around. (9 sc)
Round 15: Dec, then sc in each of the next 7 sts. (8 sc) Sc in the next 3 sts to place the decreases on the outer Arm.
Cut the yarn and fasten off.
LEGS & BODY
First Leg
Round 1: With MC, form a magic ring and make 6 sc in the ring. (6 sc)
Round 2: Inc in every stitch around. (12 sc)
Rounds 3-12: (10 rounds) Sc around in each stitch. (12 sc)
Fasten off.
Second Leg
Rounds 1-12: (12 rounds) With MC, work Rounds 1-12 again as for the First Leg.
Switch to Color A and proceed with the Body.
Body
Round 1: (Joining Legs) Beginning from the Second Leg in Color A, ch 3; on the First Leg, sc in the next st and then in each of the following 11 sts; along the ch-3, sc in each of the next 3 ch; on the Second Leg, sc in all 12 sts; along the opposite side of the ch-3, sc in each of the next 3 ch. (30 sc)
Round 2: Sc in each of the next 6 sts, inc in the following st, sc in each of the next 14 sts, inc in the next st, then sc in each of the next 8 sts. (32 sc)
Round 3: Work [sc in each of the next 3 sts, inc in the next st] 8 times. (40 sc)
Change to Color B.
Fill the Legs with stuffing.
Rounds 4-5: (2 rounds) Sc in every stitch around. (40 sc)
Switch to Color A.
Rounds 6-8: (3 rounds) Sc around in each stitch. (40 sc)
Change to Color B.
Round 9: Sc in each of the next 8 sts, dec, sc in each of the next 18 sts, dec, then sc in each of the next 10 sts. (38 sc)
Round 10: Sc in each of the next 8 sts, dec, sc in each of the next 17 sts, dec, then sc in each of the next 9 sts. (36 sc)
Change to Color A.
Round 11: Repeat [sc in each of the next 4 sts, dec] 6 times. (30 sc)
Rounds 12-13: (2 rounds) Sc in each stitch around. (30 sc)
Change to Color B.
Round 14: Repeat [sc in each of the next 3 sts, dec] 6 times. (24 sc)
Round 15: Sc in every stitch around. (24 sc)
Change to Color A.
Begin filling the Body.
Round 16: Repeat [sc in each of the next 4 sts, dec] 4 times. (20 sc)
Note: To attach each Arm, flatten its top and position it against the Body, with the decrease stitches from Arm Round 5 facing outward. Stitch through both Arm layers and the Body together for the “attaching” stitches.
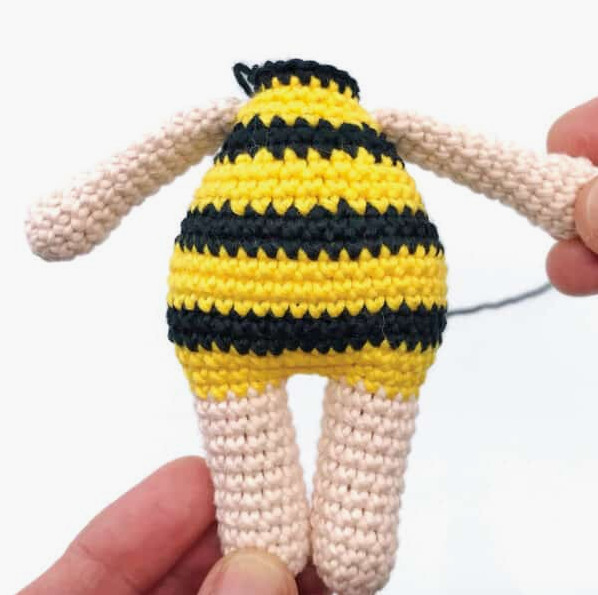
Round 17: (Attaching Arms) Sc in each of the next 4 sts; across the First Arm and Body, sc in each of the next 4 sts to attach the First Arm; on the Body alone, sc in each of the next 8 sts; across the Second Arm and Body, sc in each of the next 4 sts to attach the Second Arm. (20 sc)
Round 18: Sc in each of the next 4 sts, [dec] 2 times, sc in each of the next 8 sts, then [dec] 2 times. (16 sc) Change to Color B.
Round 19: (Neck) Sc in every stitch around. (16 sc) (image above)
Fasten off, keeping a long tail for stitching.
DOLL ASSEMBLY
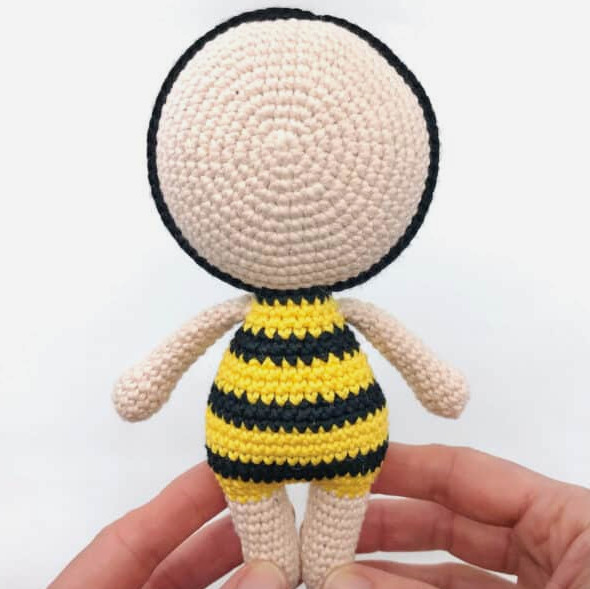
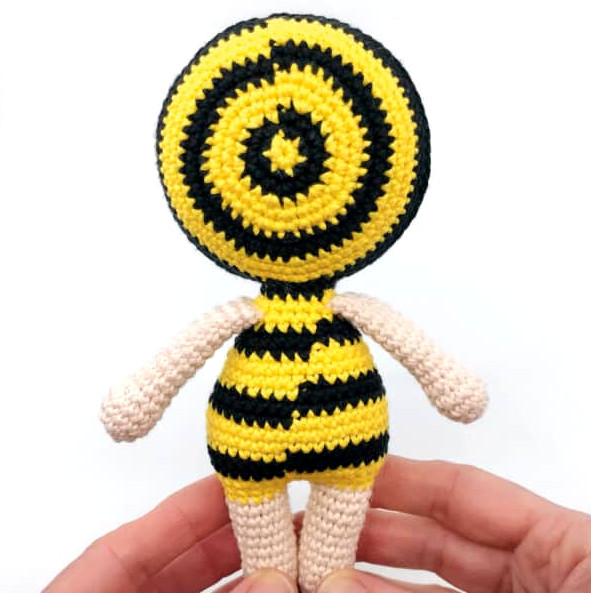
- Complete the stuffing of the Body.
- With the long tail and a yarn needle, stitch the Body to the Head through all 16 stitches around the Neck. (images above)
TIP: Keep the Neck opening broad and circular, placing in additional stuffing before closing it.
HOOD
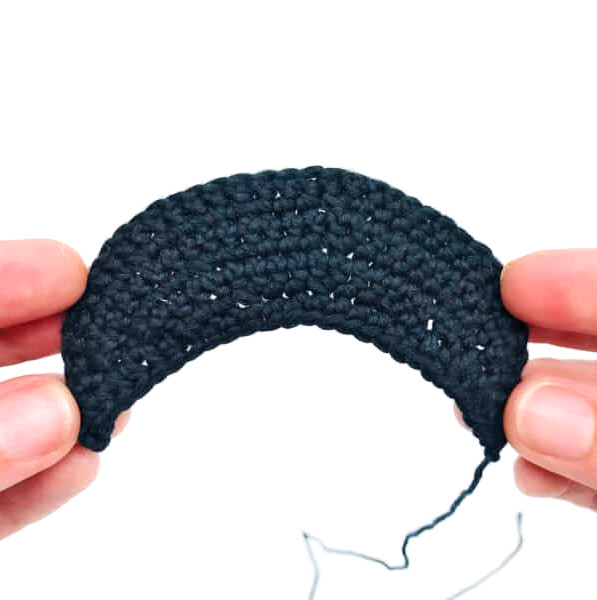
Row 1: (Wrong Side) Using Color B, ch 36, sc into the 2nd ch from the hook, then sc in each of the next 34 ch. (35 sc)
Row 2: (Right Side) Ch 1, turn, skip the first st, dec using the next 2 sts, then [sc in each of the next 4 sts, dec, sc in each of the next 4 sts] 3 times, and dec using the final 2 sts. (29 sc)
Row 3: Ch 1, turn, skip the first st, dec, sc in each of the next 24 sts, then dec. (26 sc)
Row 4: Ch 1, turn, skip the first st, dec, sc in each of the next 3 sts, [dec, sc in each of the next 5 sts] 2 times, dec, sc in each of the next 2 sts, then dec. (20 sc)
Row 5: Ch 1, turn, skip the first st, dec, sc in each of the next 15 sts, then dec. (17 sc)
Row 6: Ch 1, turn, skip the first st, sc in each of the next 3 sts, [dec, sc in each of the next 2 sts] 3 times, and sl st into the final st. (13 sts)
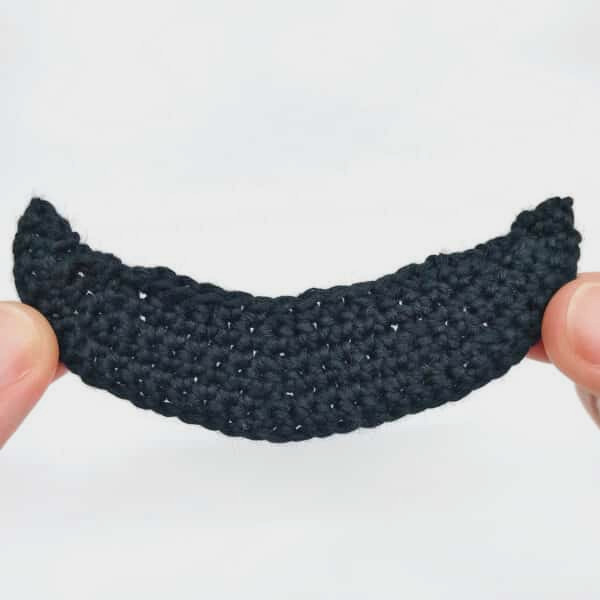
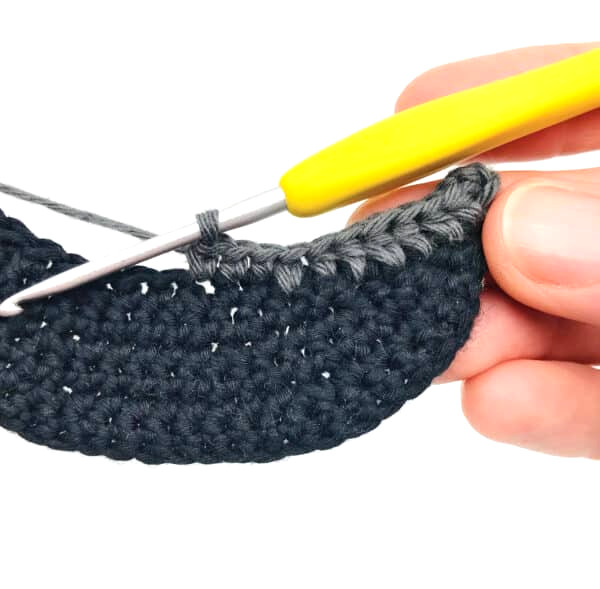
Fasten off, then weave in the ends. (image left)
Edging: With the right side facing, attachColor B to finish Row 1; ch 2 (counts as first hdc), working into the row sides, hdc in same Row 1, hdc in each of following 5 rows; working across Row 6, sc-sp in first st, sc in each of next 11 sts (image right), sc-sp in final st; working into the row sides, hdc in each of following 5 rows, 2 hdc in Row 1. (14 hdc, 11 sc, & 2 sc-sp)
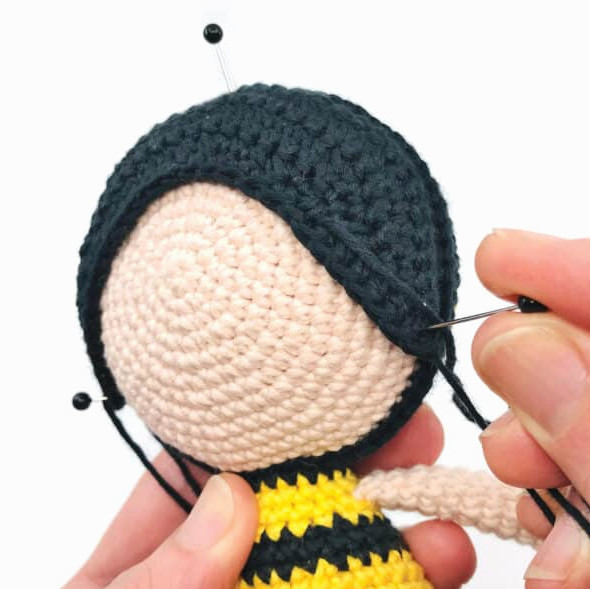
Fasten off, keeping a long tail for stitching. (image left)
- Center the Hood along the top of the Head. Gently pull the Hood so it fits around the face, then pin it into position. (image right)
- Using the long tail and a yarn needle, whipstitch the Hood’s starting chain to the Hoodline.
FACE – refer to photos for guidance
TIP: Place straight pins to indicate the facial-feature positions according to your preferred arrangement.
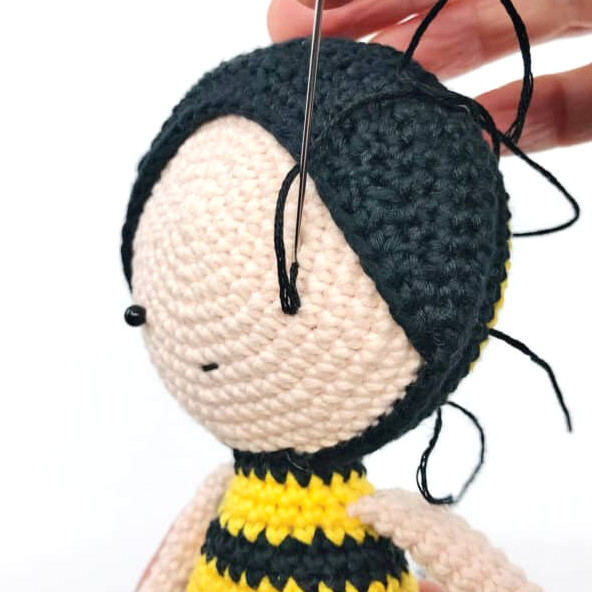
- With Black Floss (using 4 to 6 strands, according to the desired thickness), embroider the Mouth over Round 8 on the Face.
- Create the Eyes with several vertical straight stitches (over 2 stitches each). (image above)
- Add the eyelashes and eyebrows with 2 strands of Floss
Cheek (Make 2)
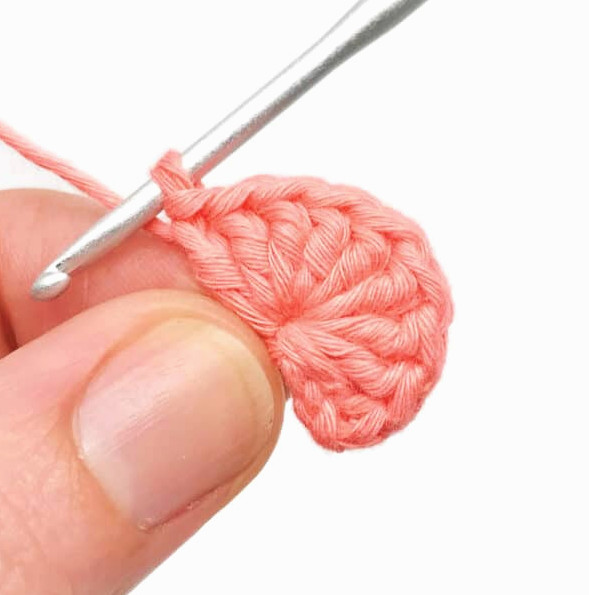
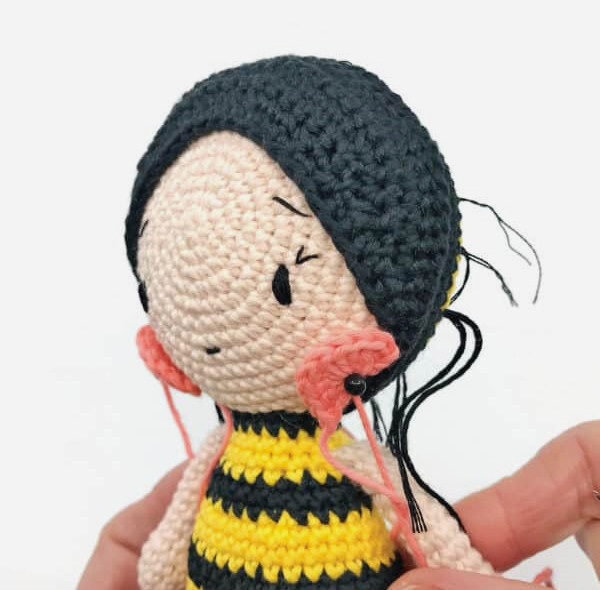
Row 1: With Color D, form a magic ring, ch 3, 9 dc in ring. (9 dc) Pull the ring tight but leave the round unjoined, shaping the cheeks into half-circles. (image left)
Fasten off, retaining a long tail for sewing.
- Place the Cheeks just beneath the Hood’s end, keeping the straight edge beside the Hoodline. (image right)
- Sew the Cheeks into place with the long tails and yarn needle.
ANTENNA (Make 2)
Row 1: With Color B, ch 12; working through the back bumps of the chain stitches, hdc in 2nd ch from hook, sl st in each of next 10 ch. (1 hdc & 10 sl sts)
Fasten off, keeping a long tail for sewing.
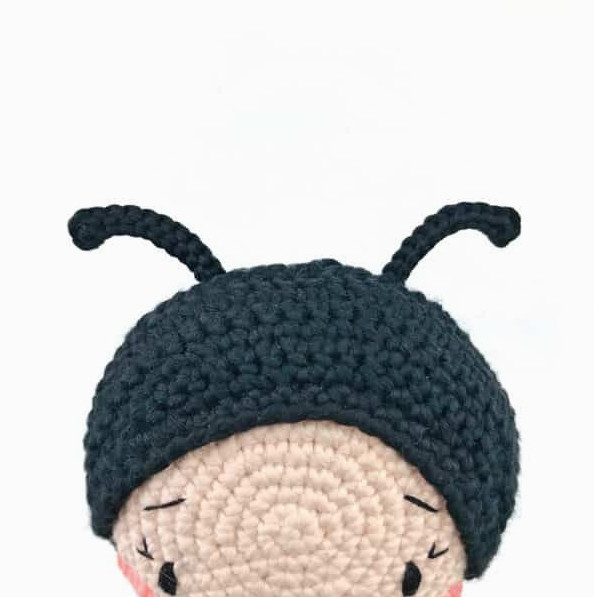
- Attach the Antennae to the top of the Head, directly behind the Hoodline, leaving around 8 stitches between them. (image above)
WING (Make 2)
Round 1: With Color C, form a magic ring, 6 sc in ring. (6 sc)
Round 2: Inc in every st around. (12 sc)
Round 3: Sc in every st around. (12 sc)
Round 4: [Sc in next st, inc in next st] 6 times. (18 sc)
Rounds 5-7: (3 rounds) Sc in every st around. (18 sc)
Round 8: [Sc in next st, dec] 6 times. (12 sc)
Rounds 9-10: (2 rounds) Sc in every st around. (12 sc)
Round 11: [Sc in each of next 2 sts, dec] 3 times. (9 sc)
Rounds 12-15: (4 rounds) Sc in every st around. (9 sc)
Fasten off, leaving an extended tail for sewing.
Wing Detail – refer to photos for guidance
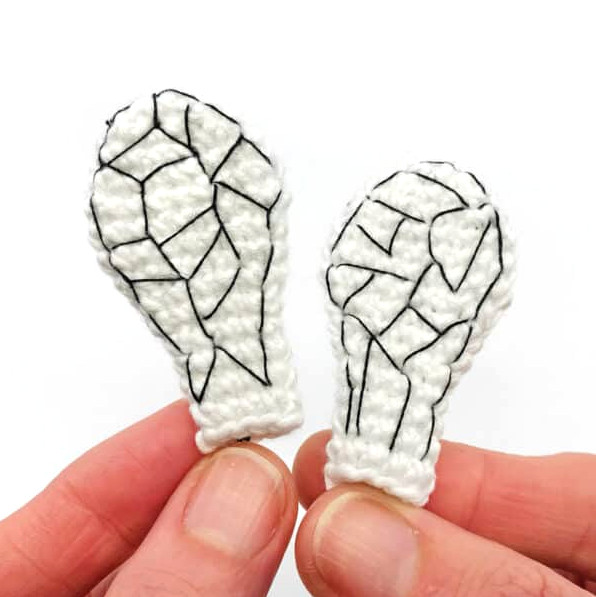
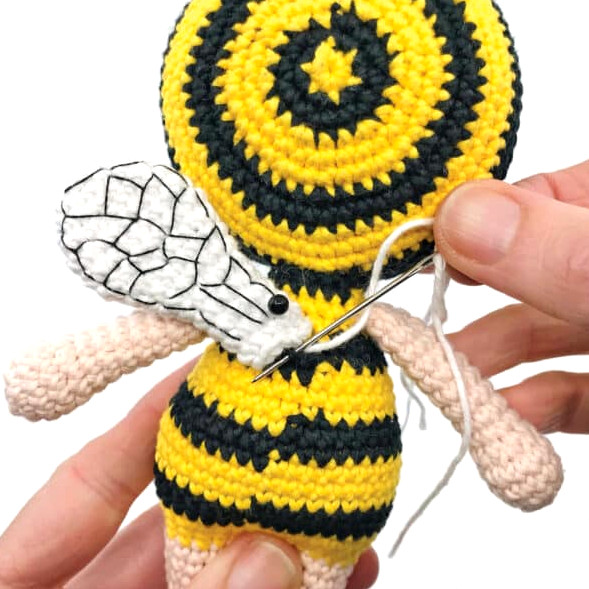
- Press the Wings flat and stitch the Wing Veins with one strand of Black Floss. Begin with a loose outline around one side of the Wing, then fill the outline with a random arrangement of geometric shapes made with straight stitches.
- Do the same on the opposite side of the Wing.
- Repeat steps 1 & 2 for the second Wing. (image left)
- With the long tails and yarn needle, attach the Wings to the Body’s back (between the Arms), over Rounds 14 to 17. (image right)
STINGER
Round 1: With Color B, form a magic ring, 5 sc in ring. (5 sc)
Round 2: Sc in each of next 2 sts, inc in next st, sc in each of next 2 sts. (6 sc)
Round 3: Sc in every st around. (6 sc)
Round 4: [Inc in next st, sc in next st] 3 times. (9 sc)
Round 5: Sc in every st around. (9 sc)
Fasten off, retaining a long tail for sewing.
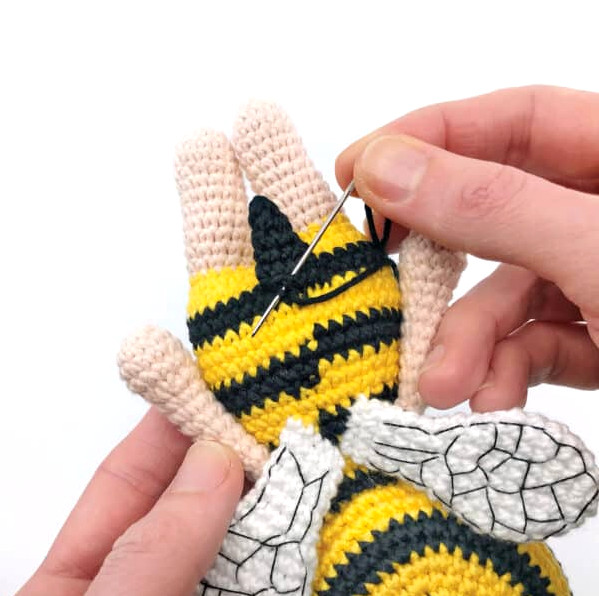
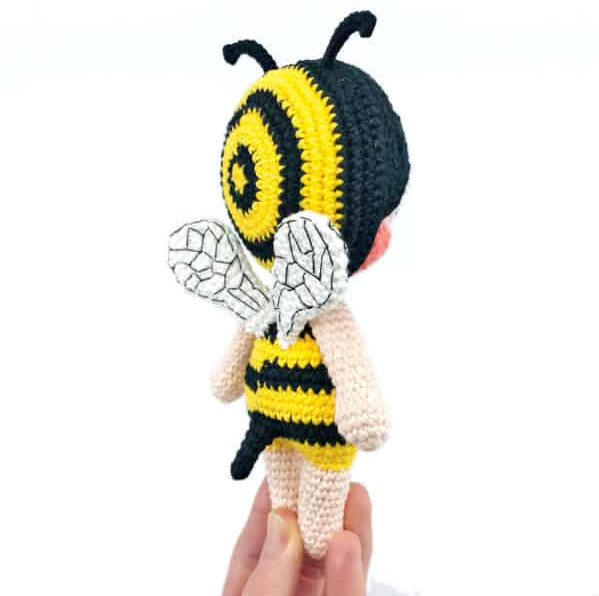
- Flatten the Stinger and stitch it to the Body’s center back with a yarn needle, over Round 5. (images above)
Your charming Bee Crochet Doll by Clare Cooper is now complete!! Isn’t she delightful? This perfectly shows how adorable Clare’s projects can be! It also demonstrates the organization and layout of the patterns in her wonderful book, along with the excellent collection of supporting photos!
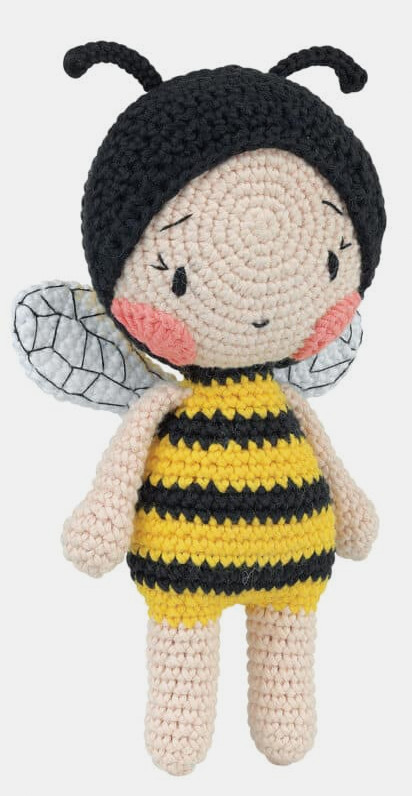
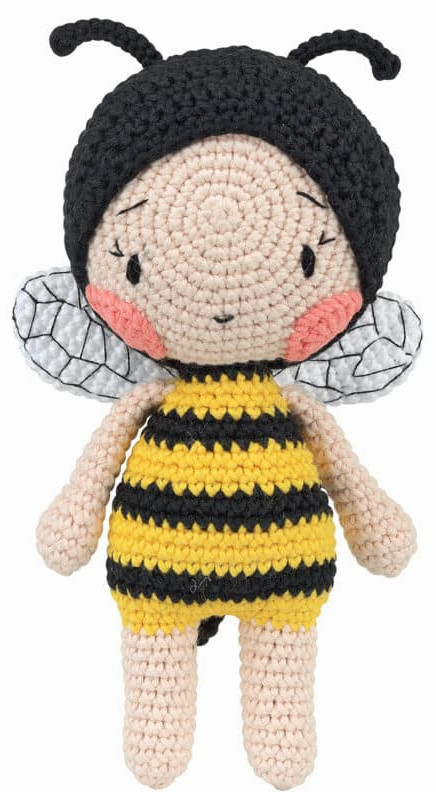
The biggest challenge will be deciding which delightful doll to create first! Make sure to order your copy today:
You can purchase Amigurumi Adventures from Gifts to Me for just £12 (+P&P)! Standard RRP £15.99
Go to giftstome.co.uk and enter the offer code R6128
Offer finishes 30th September 2026
Or purchase your copy from Amazon