
Discover how to construct your own farmhouse sink base cabinet.
Even when you are not creating a farmhouse-style home, an apron front sink makes an excellent choice for any contemporary kitchen. You can find my main reason and additional information in this article, “What to know before buying a farmhouse sink”.
One of the questions I am asked most often about our kitchen renovation is how to construct the cabinet for a farmhouse sink! So today, I am addressing all of your questions.
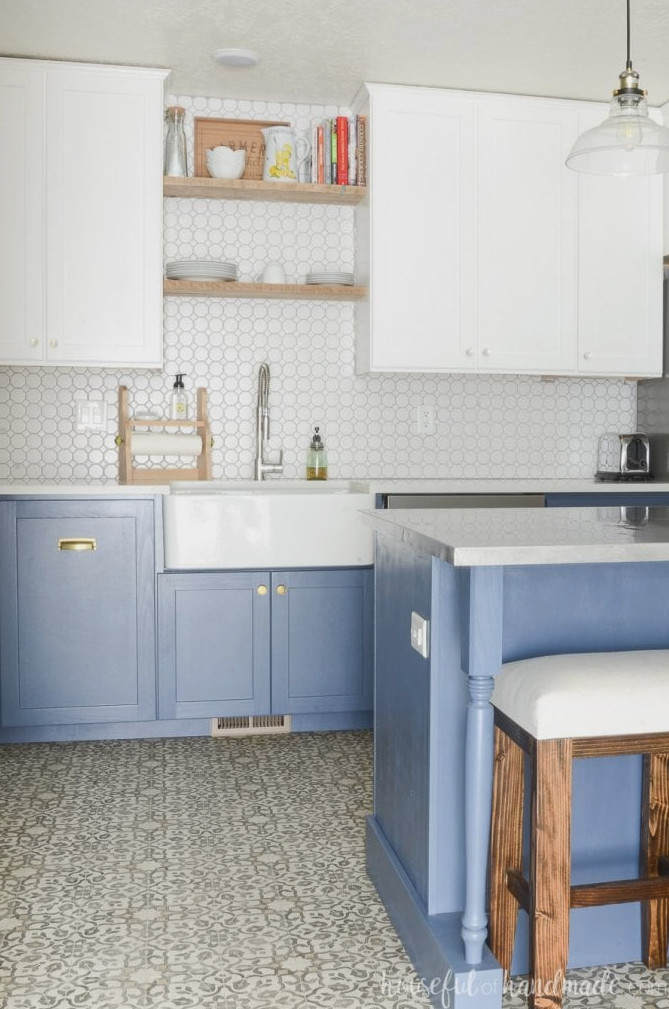
What Is a Farmhouse Sink
A farmhouse sink is formally known as an apron front sink. It may be made from fireclay (such as the one we own), porcelain, stainless steel, or other interesting metals. However, each one features a visible apron across the front.
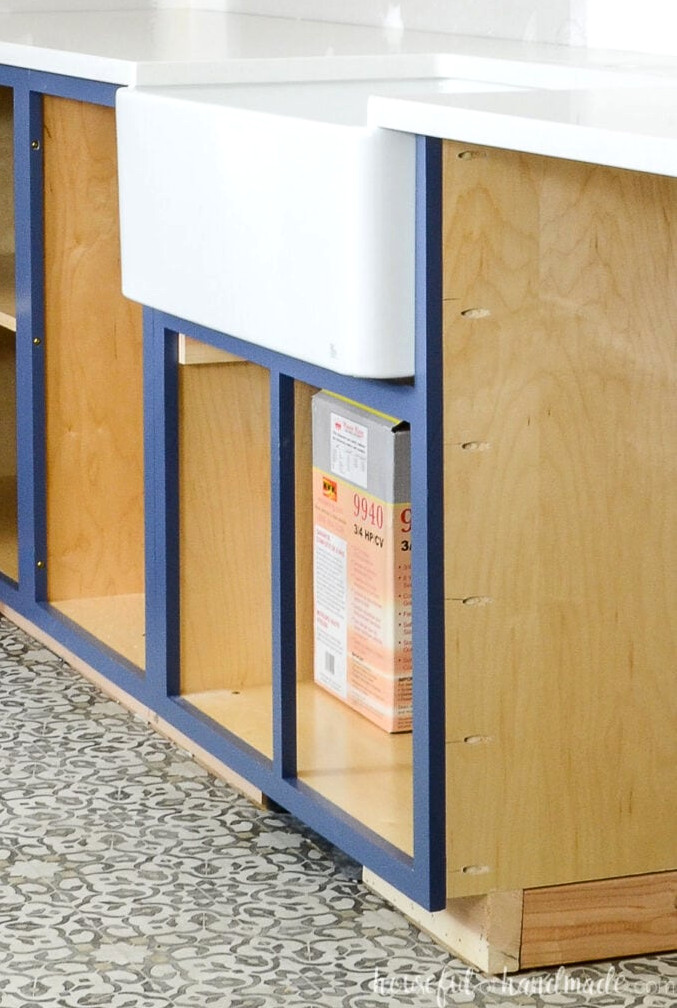
Standard sinks are positioned inside the cabinet and generally include a false drawer front on the cabinet face in front of them. Apron front sinks extend beyond the cabinet, displaying their front apron.
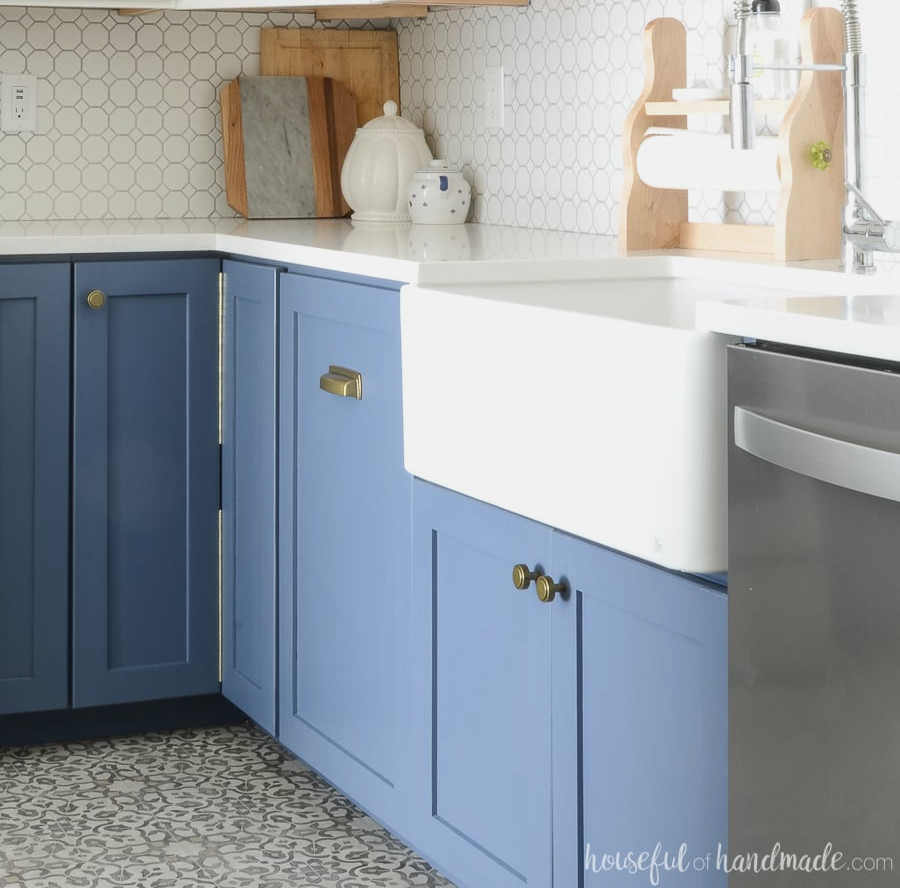
Apron Front Sink Base Cabinet Requirements
This article belongs to my How to Build Cabinets Series.
This article provides plenty of information on constructing base cabinets. Be sure to read it for additional advice and answers concerning your toe kick, which you must determine before drafting your own sink base cabinet plans.
Here, the focus is on the particular details of an apron front sink base cabinet.
Face Frame Compared with Frameless Cabinets
For a farmhouse sink base cabinet, I would advise against choosing a frameless, or European-style, cabinet. This is because the sides of most apron front sinks are not entirely straight. They may narrow slightly toward the bottom.
Using a face frame allows you to cut the precise outline of your sink into the frame, giving you a clean fit around it. Because frameless cabinet sides are straight, a sink with even a minor slope will leave a gap that you must find a solution for.
In addition, the face frame supplies support for the front of your sink. These sinks are weighty, particularly fireclay models. When they are filled with water, they require substantial reinforcement.
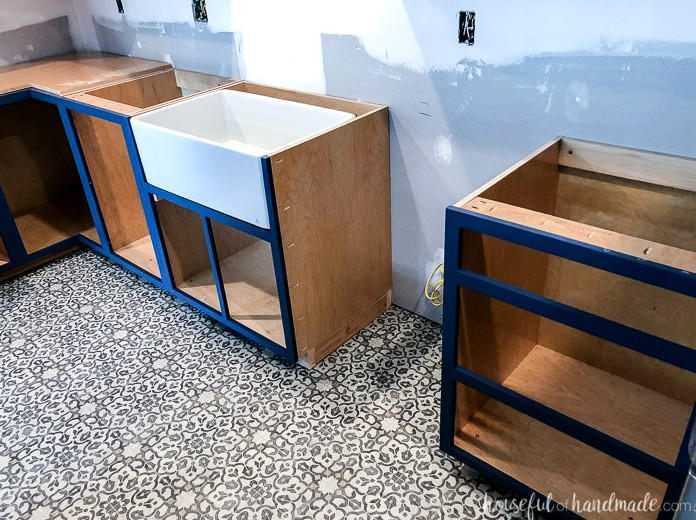
Construct the Cabinet Around the Sink
I would strongly suggest waiting until you have the sink available before building your cabinet.
As noted earlier, the sink sides will not necessarily be perfectly straight. Also, dimensions listed in online shop descriptions are often rounded. More exact measurements are needed to ensure your sink fits properly.
Measure the sink carefully. Record each dimension to the nearest 1/16”. If a measurement falls between markings on the tape, round slightly upward. An opening that is too narrow will prevent the sink from fitting.
- Height: When the sink is positioned beneath the countertop, measure the complete distance from its highest point to its lowest point. When the sink rests above the countertop, measure from just below the upper lip down to the bottom.
- Width: Measure across the sink from one side to the opposite side. Record both the measurement at the top and the measurement at the bottom. This reveals whether the sink sides are completely straight.
- Depth: Measure from the front of the sink to its back. This dimension mainly concerns cabinet depth and support placement and does not change the cabinet’s shape.
Your cabinet width will depend on the width of your farmhouse sink and the width of your cabinet face frames. Standard contemporary face frames measure 1 1/2” thick, equal to the width of a 1×2 board. Older kitchens, however, may feature considerably broader face frames.
Apply the formula below to determine the width of your sink base cabinet.
SW + (FW x 2) = CW
- SW = Sink Width
- I selected the narrowest width of my sink, which was the bottom measurement, as the sink’s overall width because I knew I could trim the face frame to accommodate the wider section without leaving gaps.
- FW = Face Frame Board Width
- CW = Cabinet Width
While designing your kitchen, reserve this cabinet size for the sink base.
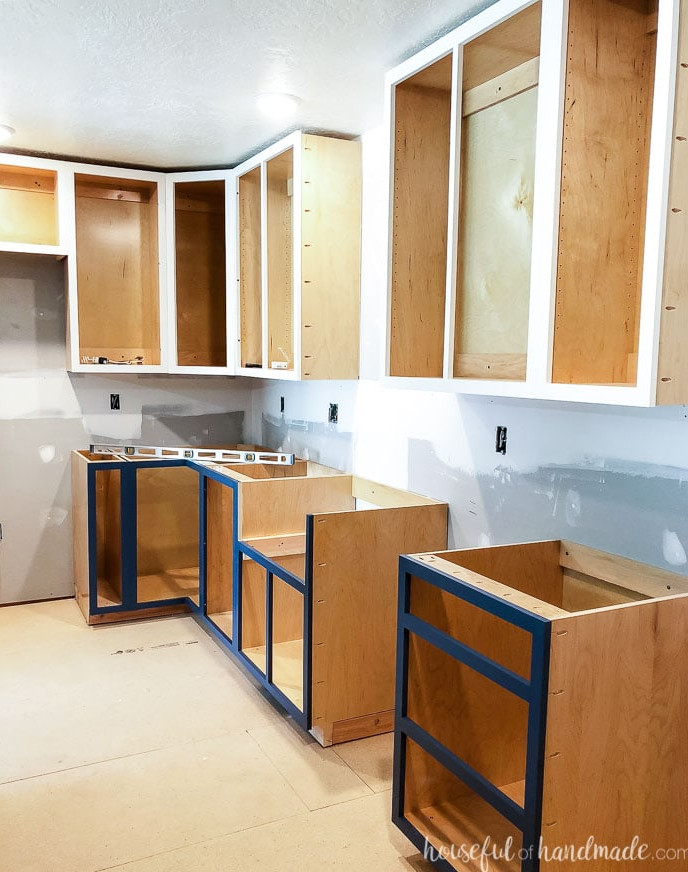
If you plan to install a farmhouse sink in an existing kitchen, replace CW with the width of your current cabinet and FW with the width of its existing face frame. This will indicate the largest apron front sink you can purchase.
FARMHOUSE SINK BASE CABINET PLANS
You are now prepared to build your new sink base for the ideal apron front sink you discovered! I willguide you through creating plans for your own farmhouse sink cabinet.
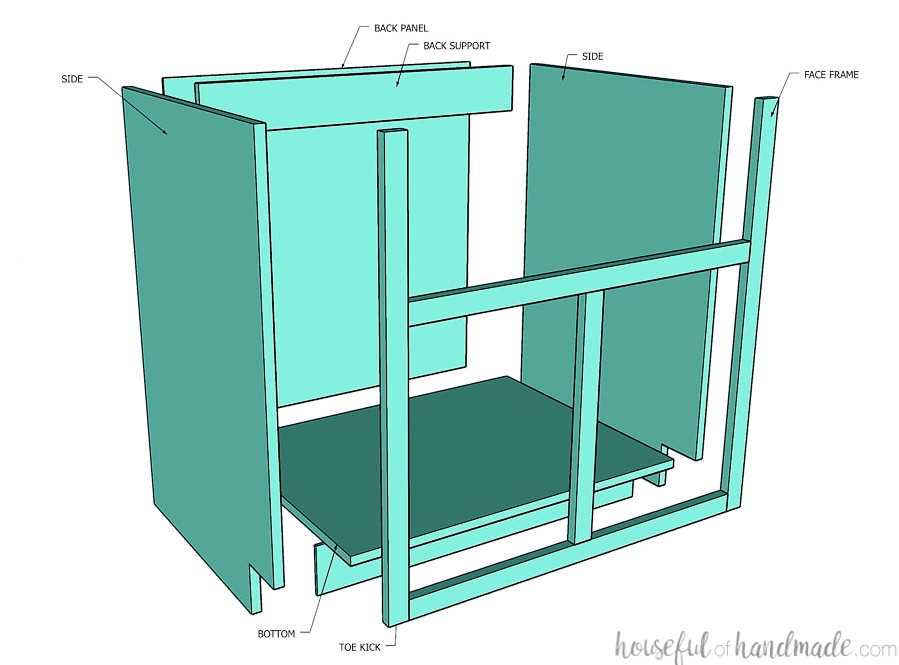
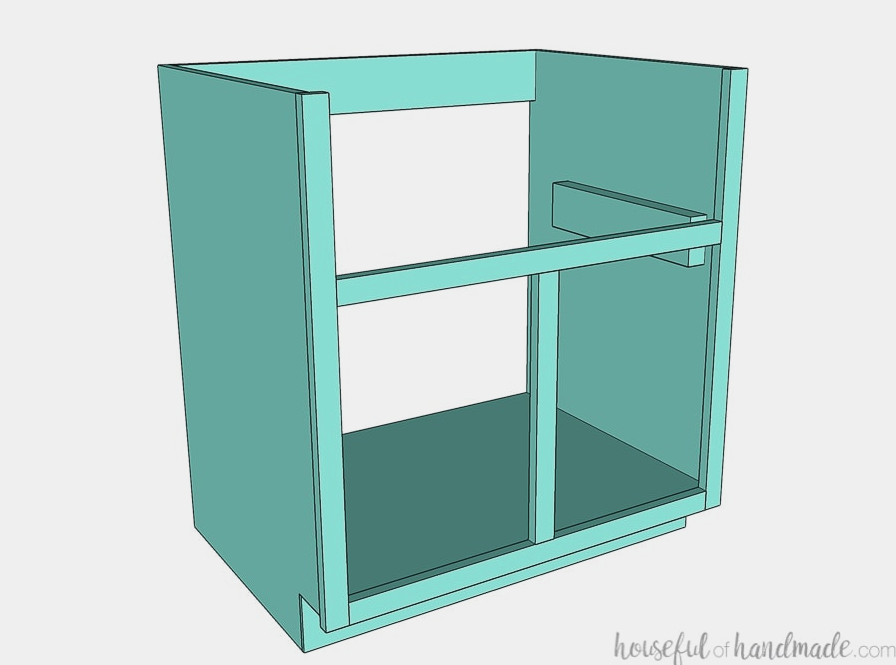
The sink base cabinet consists of the following components:
- 2 side panels
- 1 bottom panel
- 1 support panel
- Optional: 1 back panel
- Toe kick
- Be sure to read the complete section about toe kicks in the How to Build Base Cabinets post. You should also ensure that your toe kick dimensions match those of the other base cabinets in your kitchen.
- Face frame
- 2 face frame stiles
- 2 face frame rails
- Optional: center stile
For most of the cabinet box, use 3/4” plywood when constructing your sink cabinet. Should you decide to include a back panel, make it from 1/4” plywood.
The back panel is optional because the sink base can be constructed without one, eliminating the need to cut plumbing openings during installation. Be sure to paint the wall behind the cabinet to help shield the drywall from water that will inevitably splash onto it.
The face frame provides the front of your cabinet with an attractive finished appearance. If you decide to make a frameless farmhouse sink cabinet, you will need to complete the front edges of the cabinets.
Apron Front Sink Base Cabinet Cut List
Refer to the chart below to determine the measurements for every cabinet component.
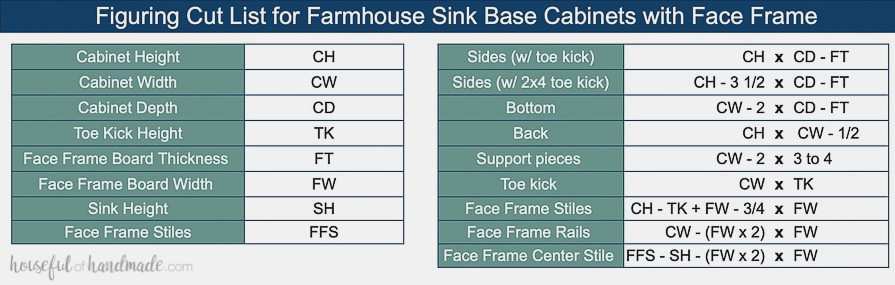
Key notes for face frame cabinets:
- The face frames extend 1/4″ beyond the cabinet sides. This simplifies installation, but when the side of your base cabinet will be exposed, you must either add a side panel (use 1/4″ plywood cut to the precise dimensions of the base sides and tack it in place) or modify your measurements to account for the additional 1/4″ on one side.
- When using a back panel, do not install it in a rear groove; simply nail it to the back instead. Since the cabinet is built in, the back panel will only be visible when a cabinet side is exposed. Address this by adding the side panel mentioned above (cut it 1/4″ deeper so it covers the back panel), or route grooves and alter the back panel dimensions so it fits within them.
After determining the measurements for each piece, cut all of them out.
How to Build A Sink Base Cabinet Box
With all the pieces cut, you can begin putting them together.
Tools needed(I explain in detail how to construct cabinets without costly tools here)
- Circular saw with guide track or table saw
- Pocket hole jig
- Drill
- Impact driver
- Jig saw
- Squares
- Measuring tape
- Clamps
- Corner clamps and face frame clamps can be especially useful
Supplies needed
- Wood materials:
- 3/4″ plywood
- 1/4″ plywood
- 1x boards for face frame
- 2×4 boards for sink support
- Optional: 2×4 boards for toe kick base
- Wood glue
- When working with pre-finished plywood, choose melamine glue for durable joints
- 1 1/4″ pocket hole screws
CUT THE TOE KICK
When constructing base cabinets with a toe kick, cut the opening from the front of both side panels using a circular saw or jig saw.
For a 2×4 cabinet base, there is no need to notch the sides. Instead, shorten them by 3 1/2″ so the cabinet can rest on top. Rather than building numerous small bases, I prefer creating one large base for all adjoining cabinets.
ASSEMBLE THE CABINET BOX
For useful advice, be sure to review the Tips for a Perfect Cabinet Box section in this post.
Make pocket holes designed for 3/4″ material along the sides of the bottom piece. For sturdy cabinet boxes, space the pocket holes every 4-5 inches.
You should also drill pocket holes along the front of the bottom piece and both side panels so the face frame can be attached later.
Position the bottom piece so it aligns with the top of the toe kick (or the bottom of the side panel when using a 2×4 toe kick base). Apply wood glue, then fasten it with pocket hole screws. Use corner clamps or jigs to ensure the joint forms a 90 degree angle.
Do the same on the opposite side.
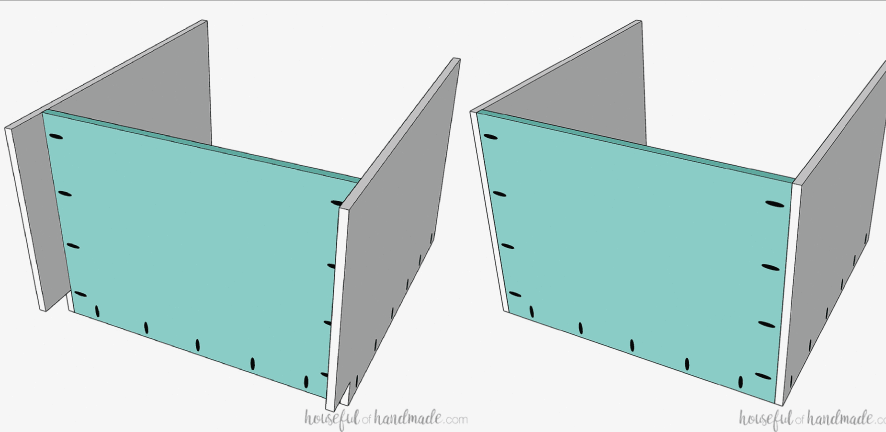
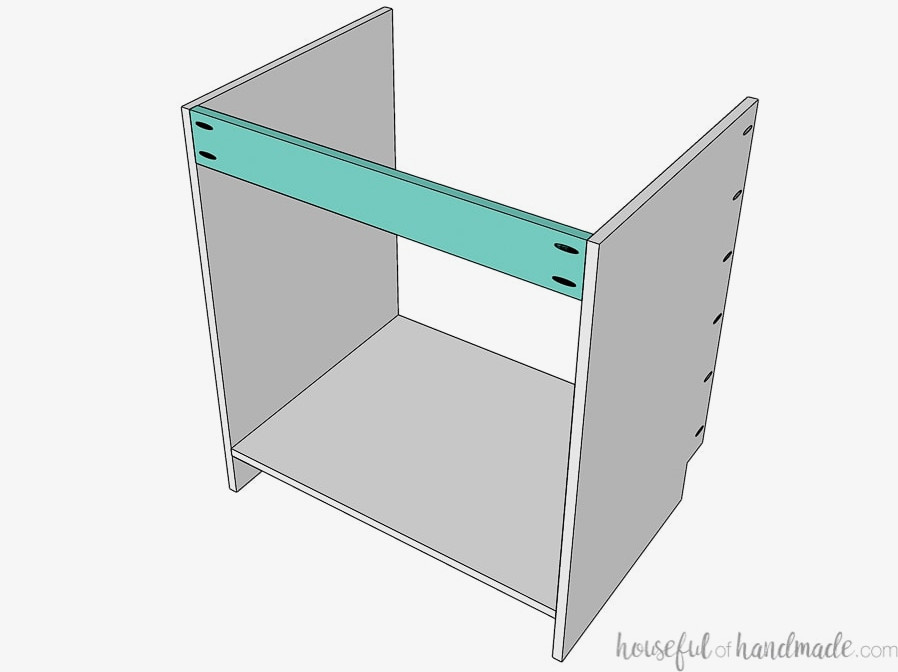
Install the support piece across the upper back of the cabinet box. It will help keep the box square while providing additional reinforcement. Cut the pieces from plywood scraps; they should be 3-4 inches wide.
Apply glue and fasten it with pocket holes and 1 1/4″ pocket hole screws.
If you are adding the back panel, attach it with wood glue and finishing nails.
When the cabinet sides will be visible, consider routing a groove into the rear so the panel can sit inside it. Alternatively, make a side panel slightly larger so it conceals both the sides and the back panel.
You may also install the toe kick front at this stage, or cut one oversized piece to cover an entire row of cabinets.
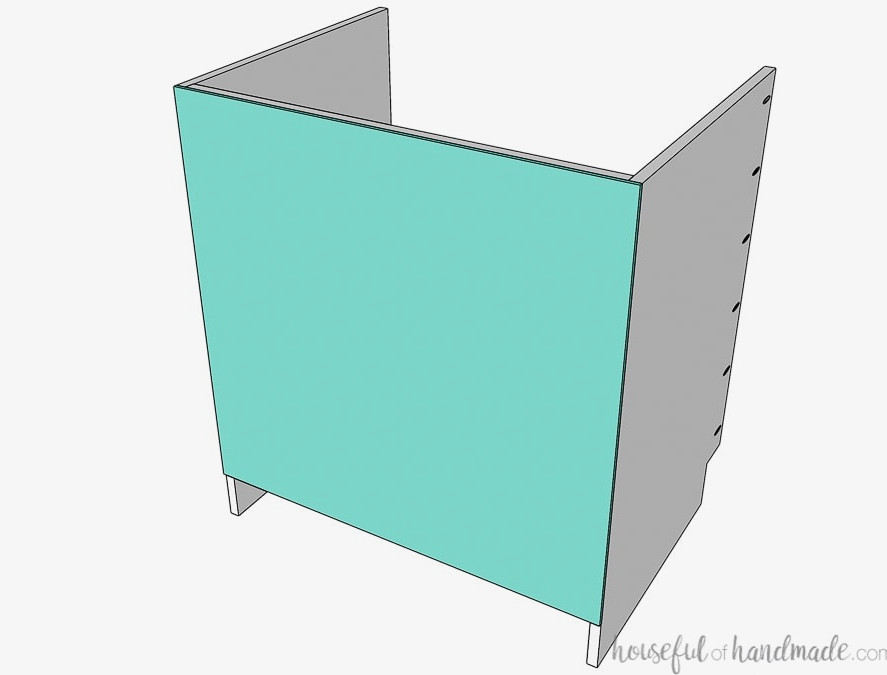
Your base cabinet carcass is now complete!
ASSEMBLE THE FACE FRAME
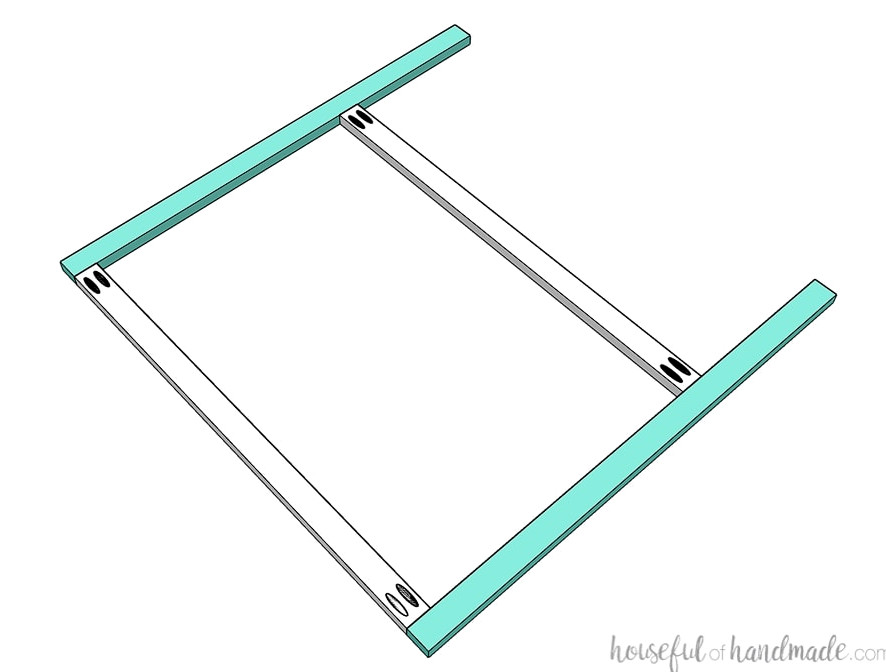
Prepare the rails and stiles for the face frame. At each end of the rails, drill holes intended for 3/4″ material.
Fit the rails between the stiles, positioning the lower rail flush with the bottom of the stiles and placing the upper rail down from the stile tops by the height of your sink. Fasten everything with wood glue and 1 1/4″ pocket hole screws.
While securing the pieces, use a face frame clamp to keep the front of the frame aligned and firmly joined.
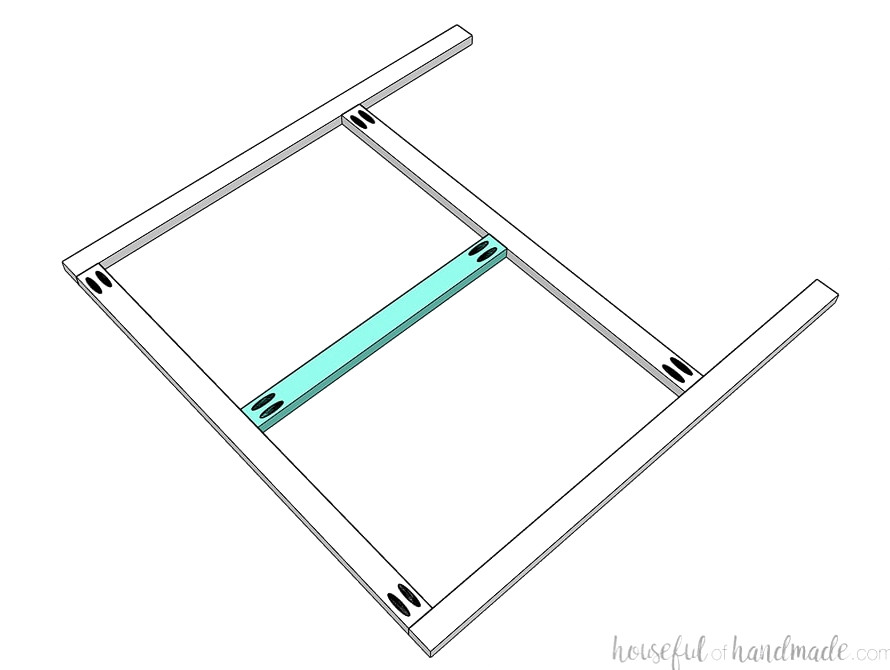
To include a center stile in the lower cabinet, it willprovide a little extra reinforcement for your wide sink. Center stiles also make aligning and installing cabinet doors somewhat easier.
Secure the center stile using pocket holes, 1 1/4″ screws, and glue.
Before fastening the face frame to the cabinet box, you may need to cut the sink opening into the frame.
Measure the sink’s top width and transfer that measurement to the top of your face frame. Next, draw lines from those marks down to the rail, which should match the width of the sink’s bottom.
Use your jig saw to cut along the marked lines. Test-fit the frame around your sink and make any necessary adjustments until it rests properly.
Attach the Face Frame
The face frame should extend 1/4″ beyond both sides of the cabinet. Confirm that its top aligns flush with the cabinet box, and that the bottom rail’s upper edge is even with the top of the bottom piece.
Apply a small amount of wood glue to the plywood’s front, then fasten the face frame using the pocket holes previously drilled into the cabinet’s sides and base.
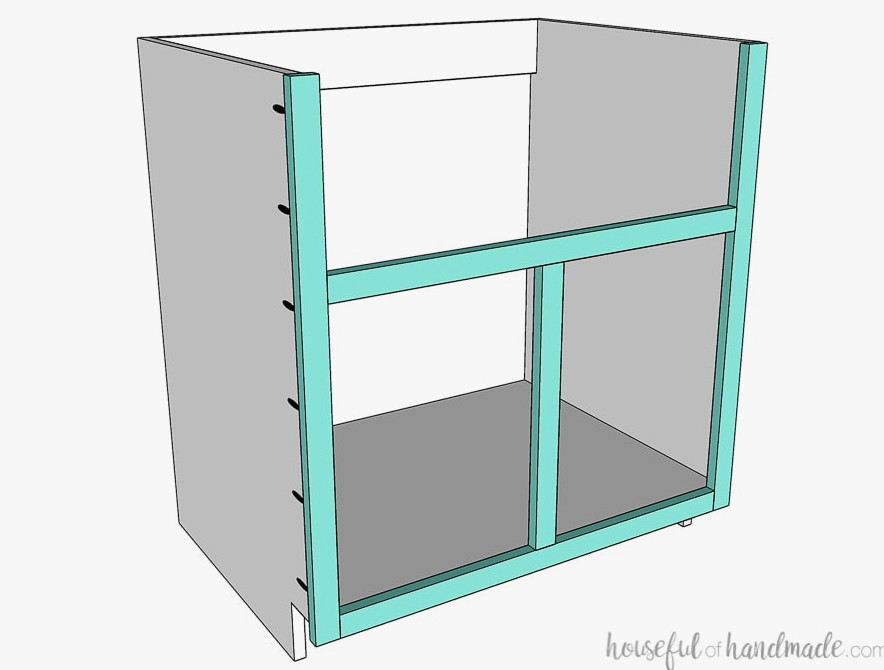
Your cabinet is complete and ready for installation.
Installing the Farmhouse Sink Supports
Once the cabinet has been installed, add the sink support pieces. Installing them afterward allows you to make sure the sink sits perfectly level!
The sink supports should reach the top of the face frame rail, provided your cabinet is completely level. Take extra care while setting up the sink base to ensure everything is properly leveled.
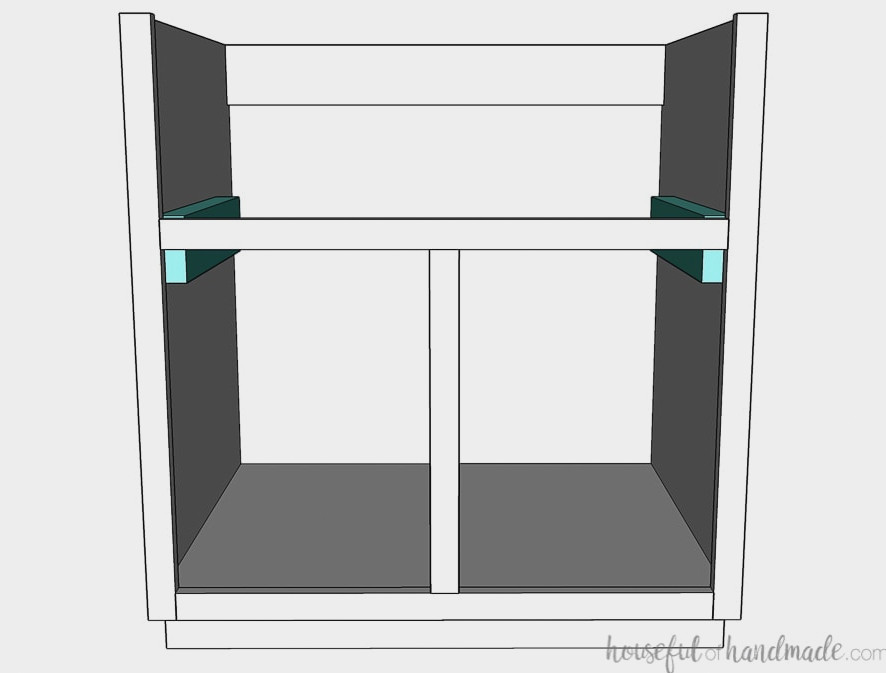
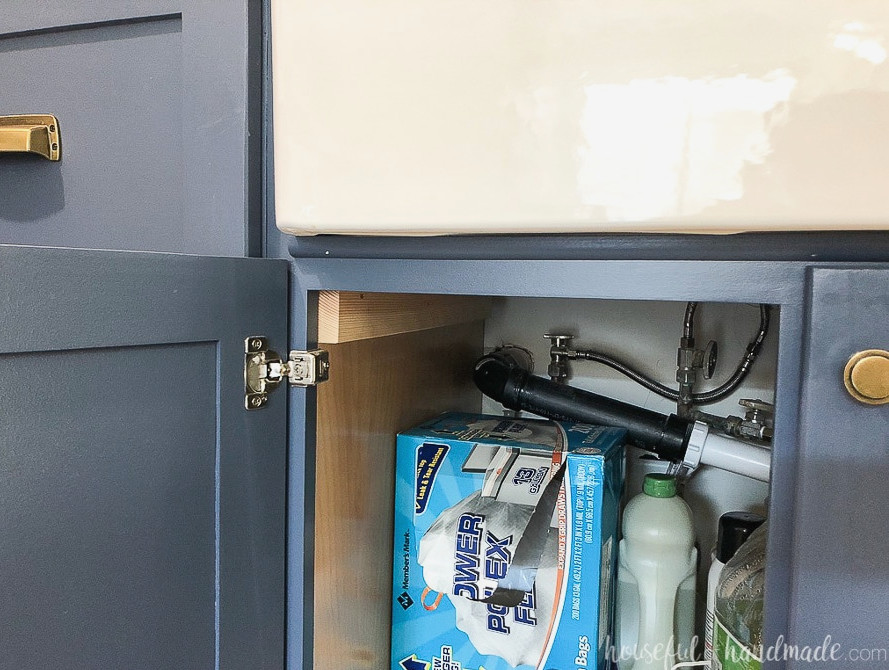
You can see the front corner of the 2×4 when the cabinets are open. However, the apron’s overhang conceals it enough that I do not notice it during everyday use.
If desired, cut the corner of the 2×4 at an angle to make it less noticeable. You could also paint it to coordinate with the face frame. Still, keep the 2×4 near the front since that area bears considerable weight from the heavy sink.
Adding a Farmhouse Sink to an Existing Kitchen Cabinet
A simple method for adding a farmhouse sink to an existing kitchen is to replace only the face frame of the sink cabinet.
Use the formulas above along with the current cabinet dimensions to build a replacement face frame that fits your cabinet.
You will also need to take off the existing countertop and have it modified for the new sink. Alternatively, this is an excellent opportunity to replace it!
Remove the Existing Face Frame
Next, remove the existing face frame without taking out the cabinet. Begin by checking the sides of the face frames for screws running from the cabinet or neighboring cabinets. These fasteners hold cabinets securely together during installation.
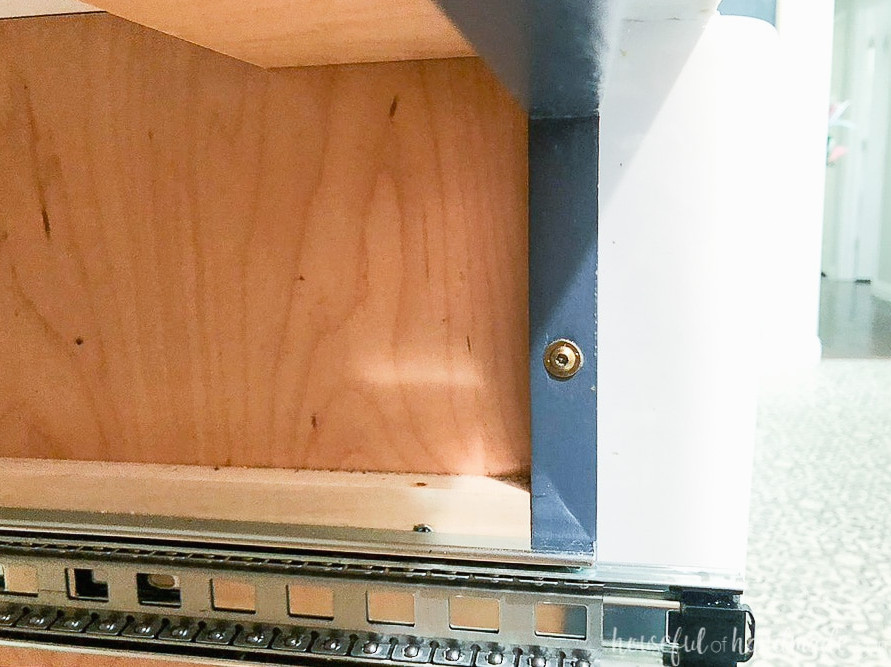
When the face frame is attached only with nails, a few taps from a hammer inside the cabinet should loosen it.
When screws hold it in place, as in the tutorial above, you will need to break the face frame away around them. Afterward, use a saw to trim off the screw tips.
Construct the replacement face frame according to the existing cabinet dimensions. Complete the finish, then paint or stain it.
Attach the New Face Frame
There are 2 ways to fasten a new face frame to an existing cabinet:
- Attach the face frame to the cabinet box with wood glue and finish nails. Fill the nail holes afterward and touch up the paint or stain.
- Make pocket holes inside the cabinet and use them to secure the frame. Although the pocket holes will remain visible within the cabinet, you will not need to repair the face frame’s finish.
Regardless of the method you select, position the frame with its top flush against the cabinet top.
At this point, install the 2×4 sink supports as described above. Then place the farmhouse sink before arranging for the new countertop installation.
Be sure to explore the rest of the How to Build Cabinets series as well. It contains plenty of tips and techniques to help you create professional-quality cabinets for a fraction of the price!