
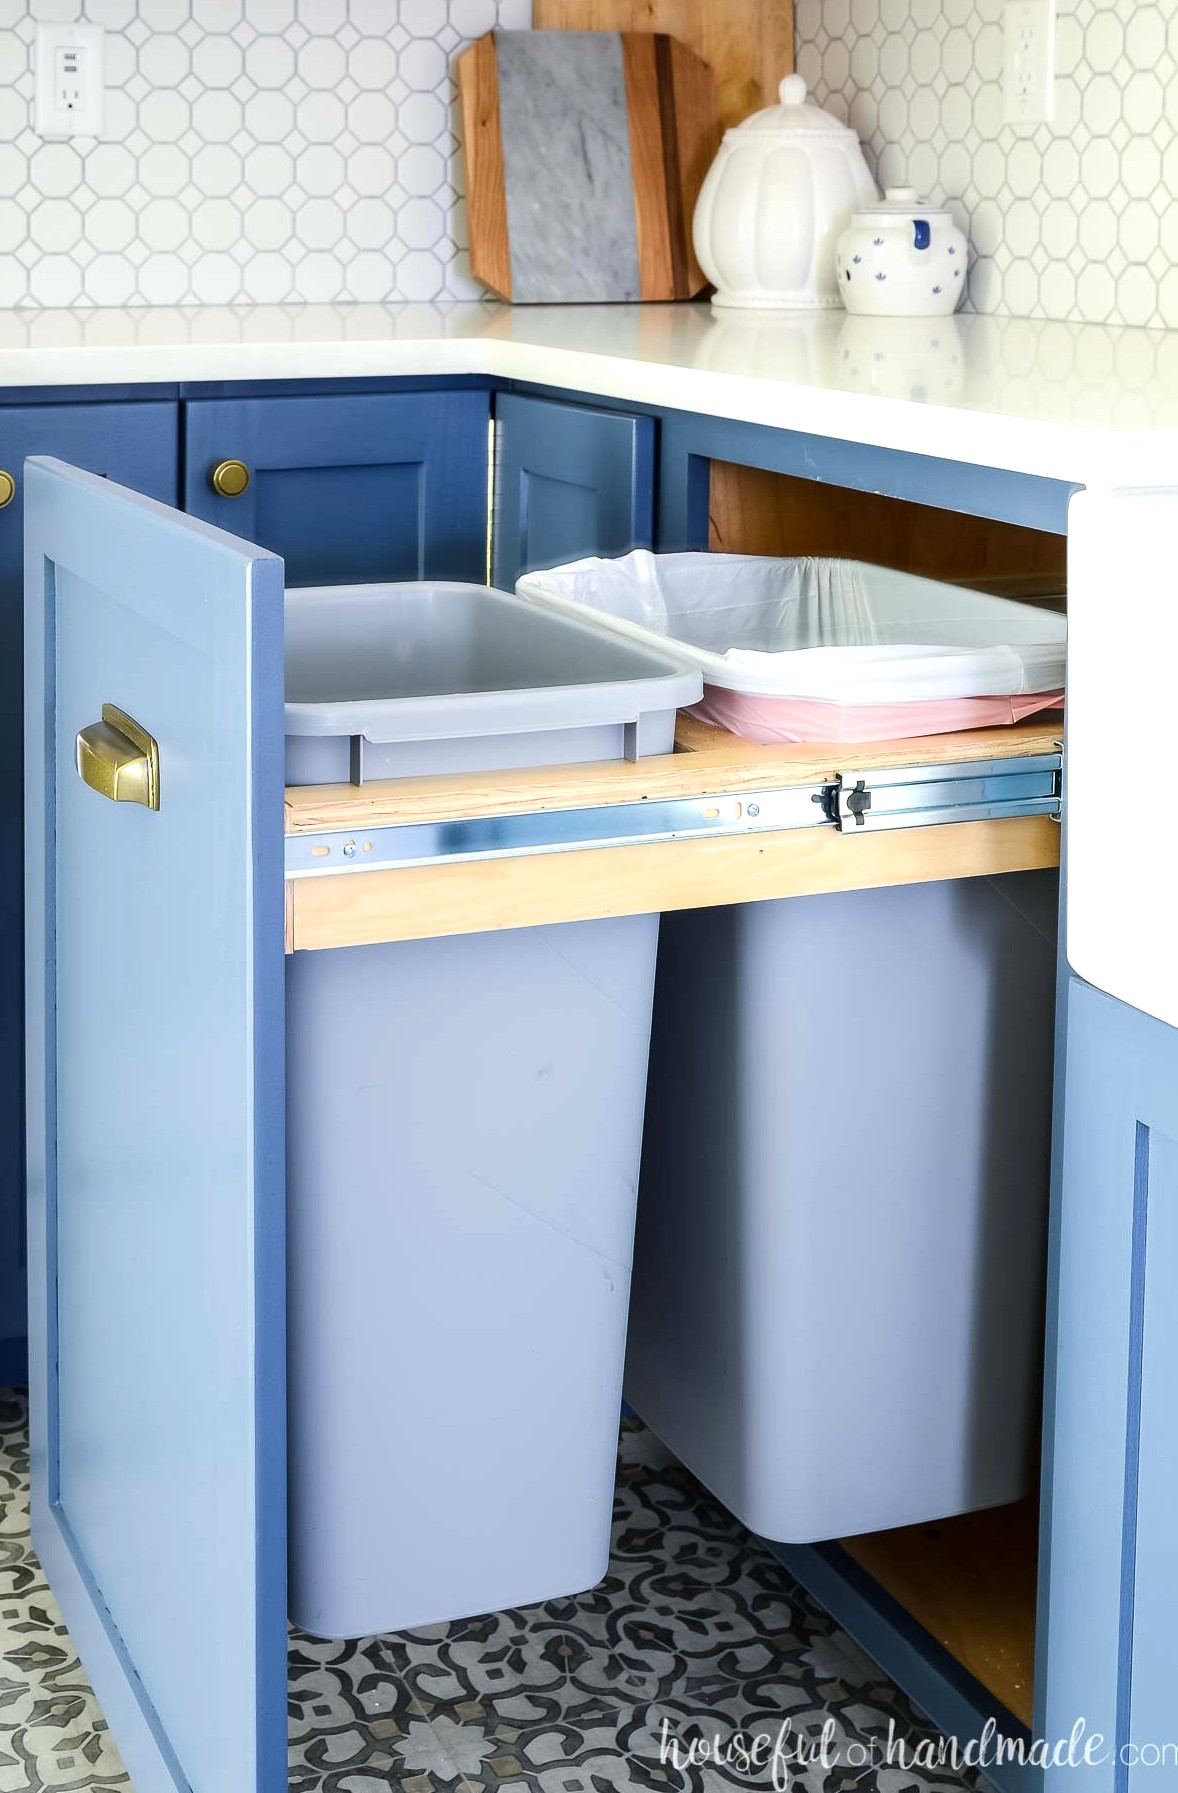
Enhance your kitchen with a DIY pull-out garbage can cabinet.
Concealing your trash can behind a kitchen cabinet is a convenient upgrade anyone can enjoy! The unattractive garbage container stays out of sight, and the cabinet also helps contain unpleasant odors.
Constructing a trash can cabinet does involve a bit of measuring to ensure there is enough room for your bins. Alternatively, you can use one of my pre-designed trash cabinet plans!
A pull-out garbage cabinet uses the same basic setup as the rest of your base cabinets.
Be sure to read this post about building base cabinets to determine your toe-kick dimensions, cabinet height, and depth. You should also review the difference between face-frame and frameless (or European) cabinets in the How to Build Cabinets post.
Prefabricated Trash Cabinet Insert vs. Constructing Your Own
You can buy pull-out trash can cabinet inserts in many different styles. They can be installed in either new or existing cabinets.
However, I decided to construct my own garbage can cabinet for three reasons:
- To reduce the cost of our kitchen renovations even further.
- To create the ideal trash can arrangement for our home.
- The drawer slides included with prefab inserts I have seen in other people’s homes are lower quality (particularly considering their cost), and they do not keep the cabinet door firmly against the cabinet.
Even if you are not making your own cabinets or renovating your kitchen, this information can help you create a trash can holder for an existing cabinet.
Very little wood is required to make an insert for one or two trash cans. Both inserts I constructed used plywood offcuts remaining from the cabinet boxes.
Plywood is durable and straightforward to use, though it leaves the edges exposed. If desired, you can finish those edges with edge banding. Another option is to use leftover face-frame wood to build your insert.
Which Drawer Slides Are Needed for Pull-Out Trash Cabinets?
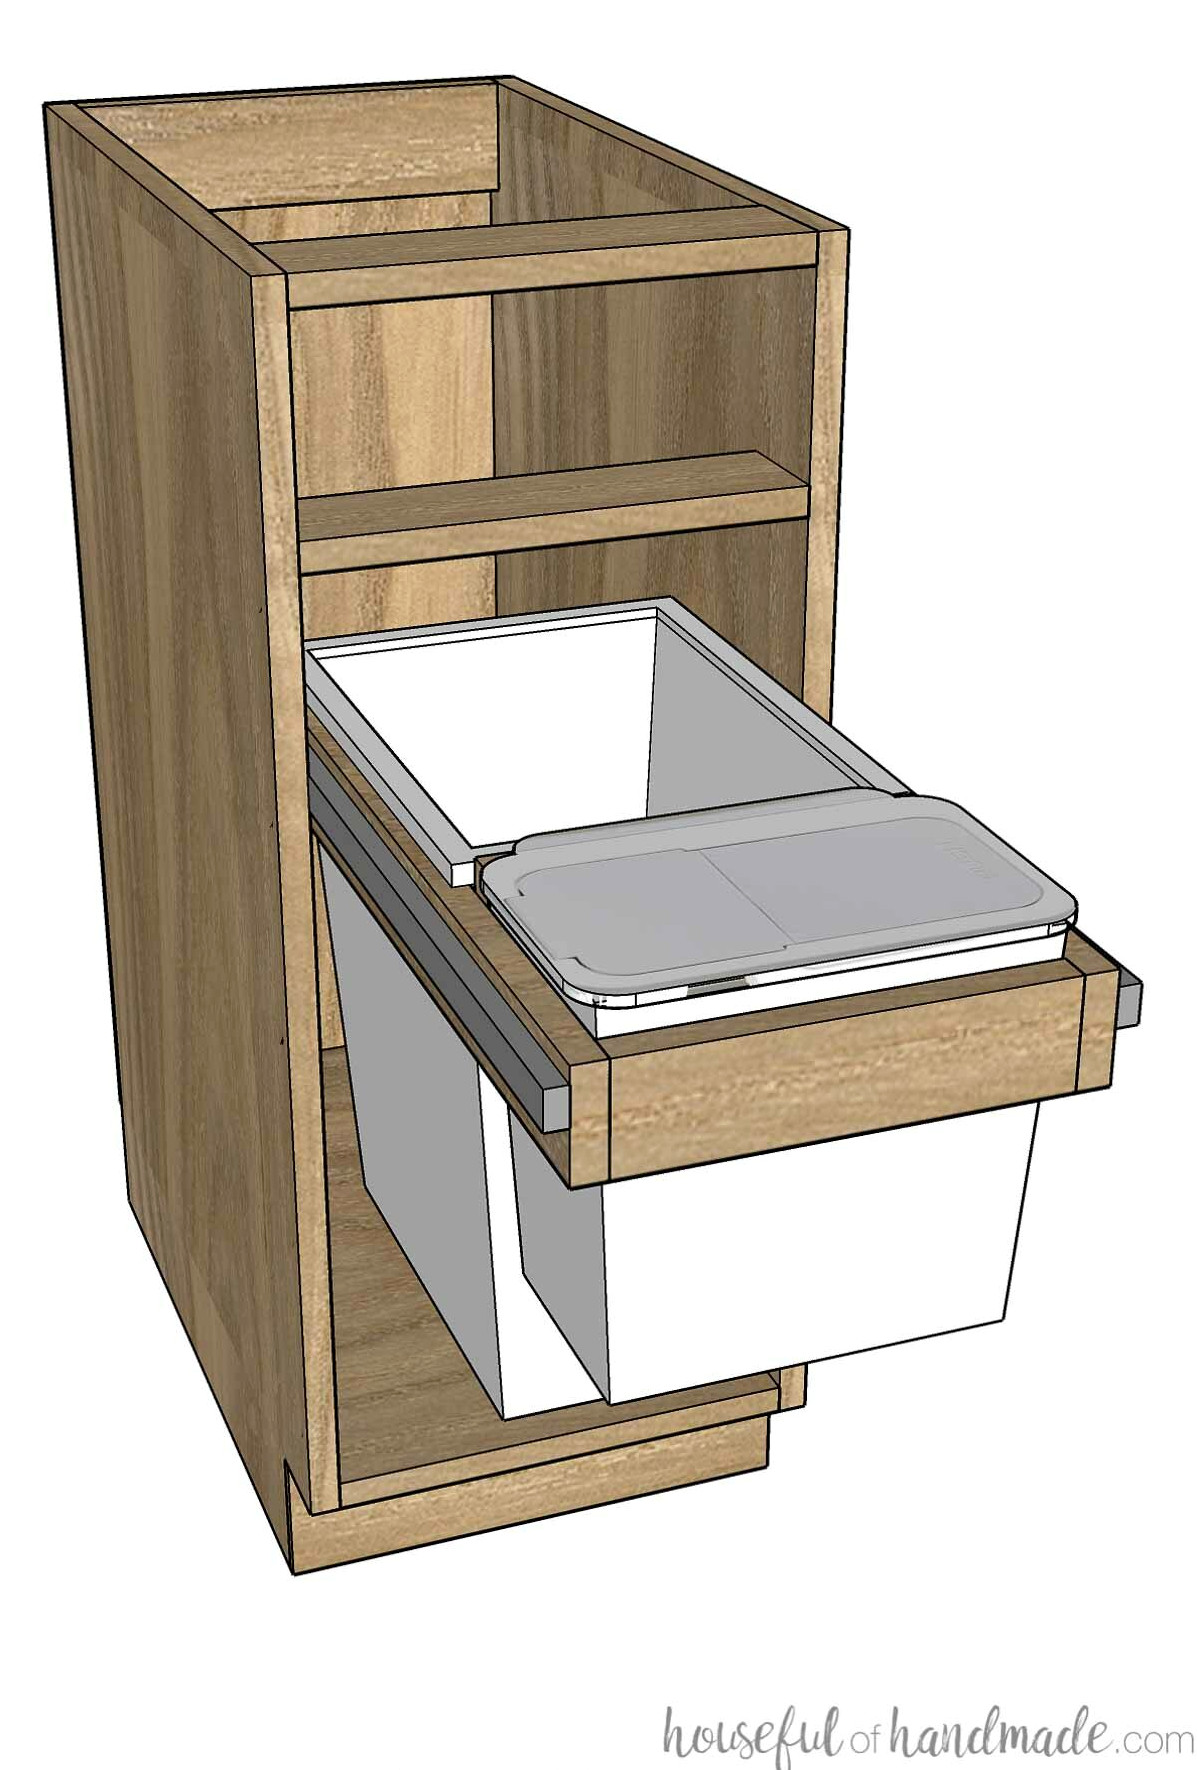
To make your trash can readily accessible, install drawer slides on both sides of the cabinet. The cabinet front uses a conventional cabinet door, but the whole assembly moves in and out like a drawer. I explain drawer slides in more detail in this How to Build Drawer Base Cabinets post.
For the best performance and convenience from a pull-out trash cabinet, I recommend over-extension drawer slides. These allow the cabinet to extend up to 1” beyond the cabinet opening.
For the first pull-out trash cabinet I made, I installed standard full-extension drawer slides. After the countertop went in, I could still reach the rear trash bin. However, removing the bin required disconnecting the drawer slides so the cabinet could extend another inch.
This happens because countertops are generally installed with an overhang extending beyond the cabinet fronts. With full-extension slides, the back few inches of the cabinet become covered by that overhang.
You can still toss garbage into the bin and remove a filled trash bag without much trouble. However, the complete bin cannot come out unless it moves beyond the countertop overhang.
Over-extension drawer slides let you extend the cabinet beyond the cabinet box. As a result, the trash can comes farther forward and the countertop overhang no longer blocks it.
Is a special trash can required for a pull-out cabinet?
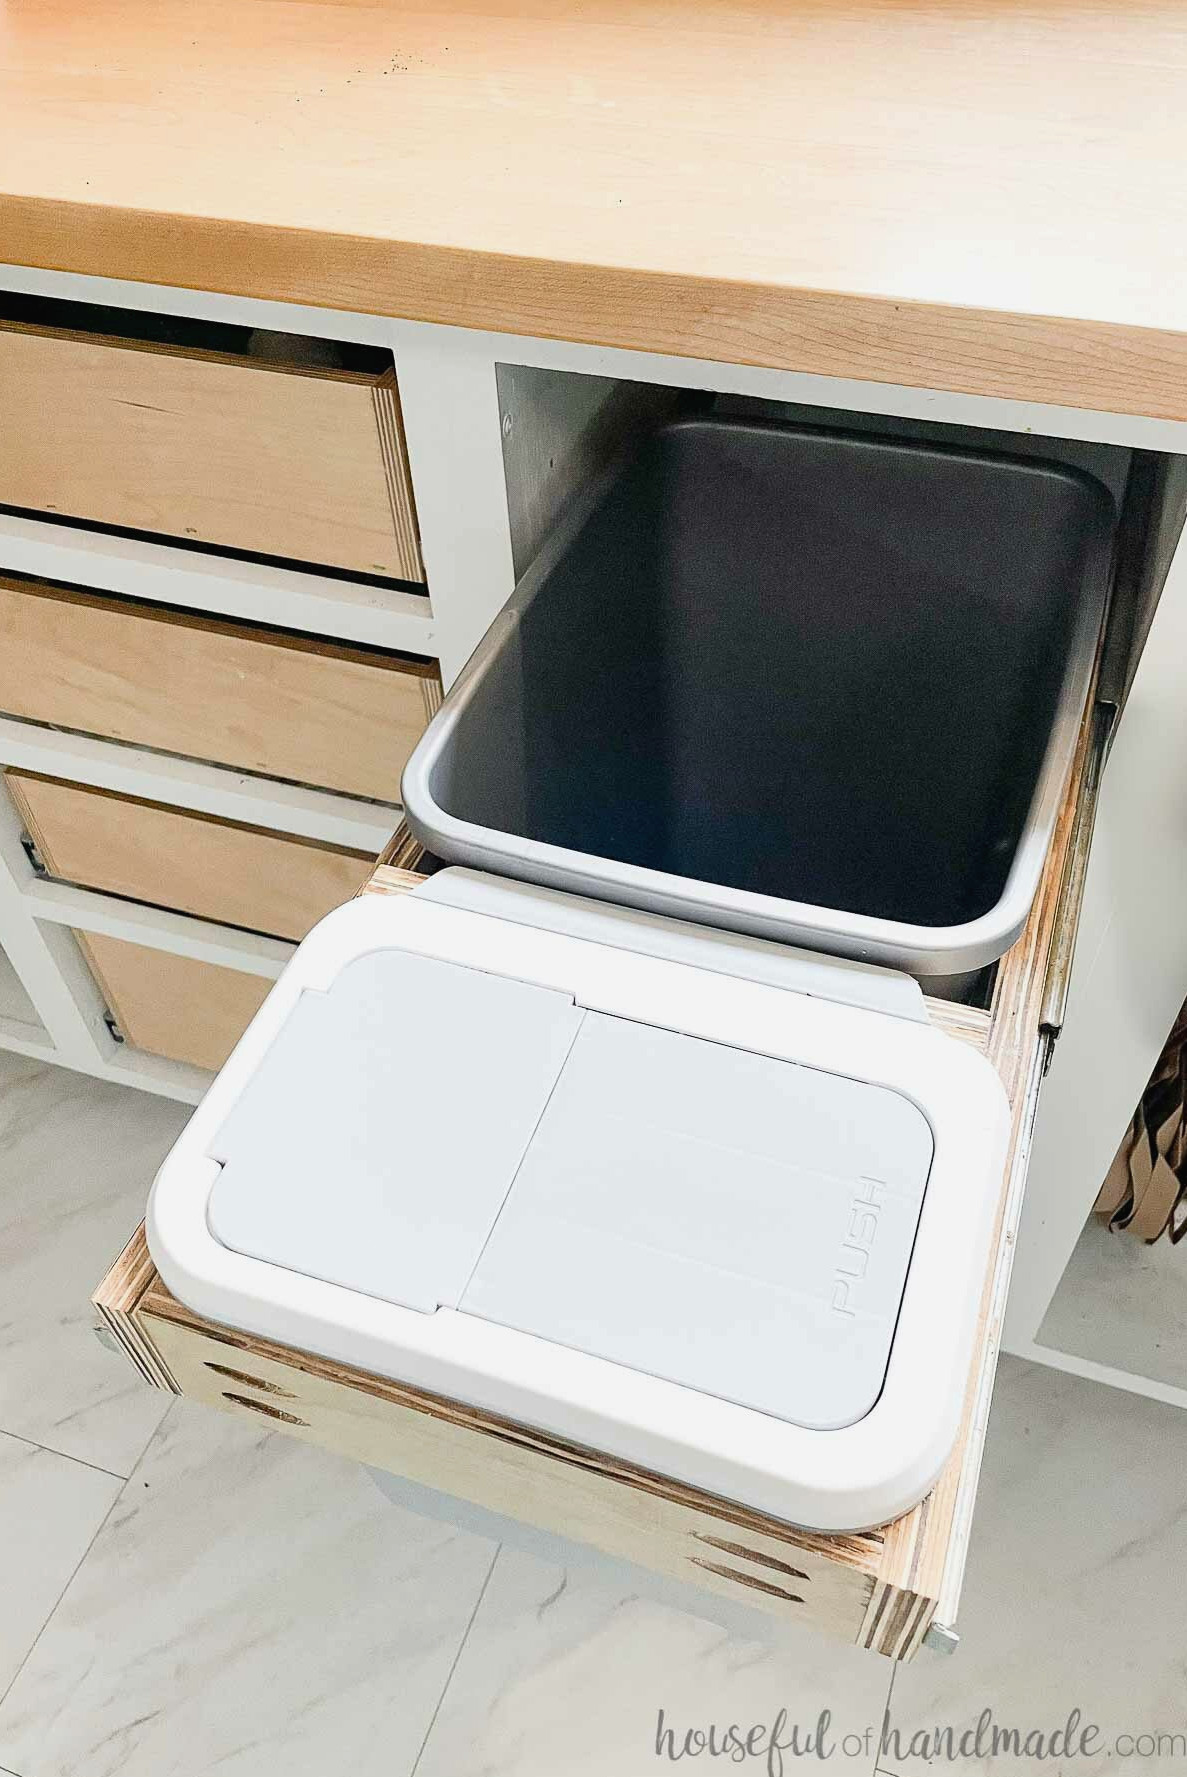
When selecting a trash can for your cabinet, choose one with a sturdy rim around the top. That rim rests on the sliding section of the garbage can cabinet.
You can design the cabinet to any dimensions necessary to accommodate the trash can you prefer. A container with a lid can work as well.
To construct your trash can cabinet, measure the garbage can directly beneath its rim. Ensure that most of the rim rests on the pull-out slider, while keeping the opening loose enough to remove the trash can easily.
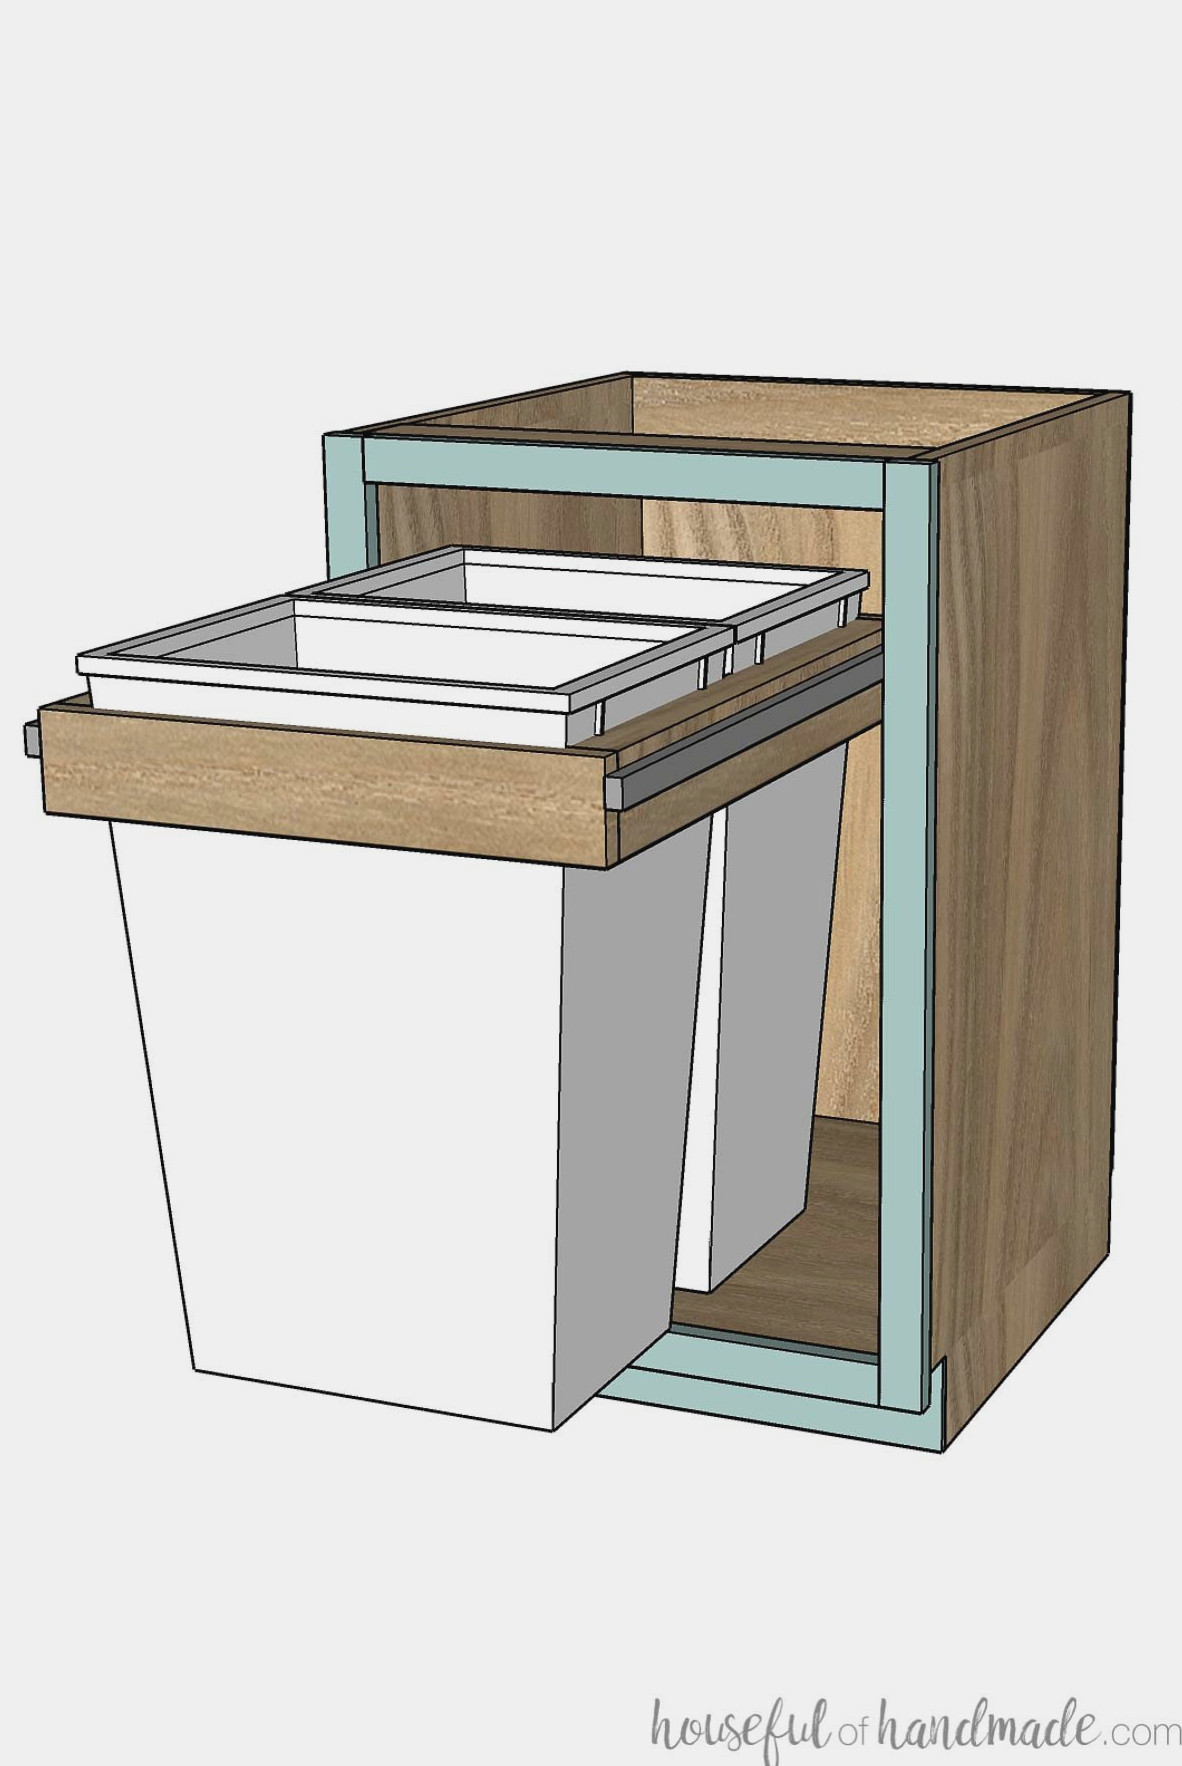
I like to build trash can cabinets that support the cans near their tops rather than underneath their bases. The reason is that you pull the cabinet open using the handle located near the upper part of the door.
When the slides are positioned at the very bottom of the cabinet beneath the trash can bases, extra supports are necessary to prevent excessive stress at the point where the door attaches to the insert over time.
Supporting the cans near their upper edges places the slides directly beneath the handle. This makes opening the cabinet easier and reduces the risk of the door coming loose.
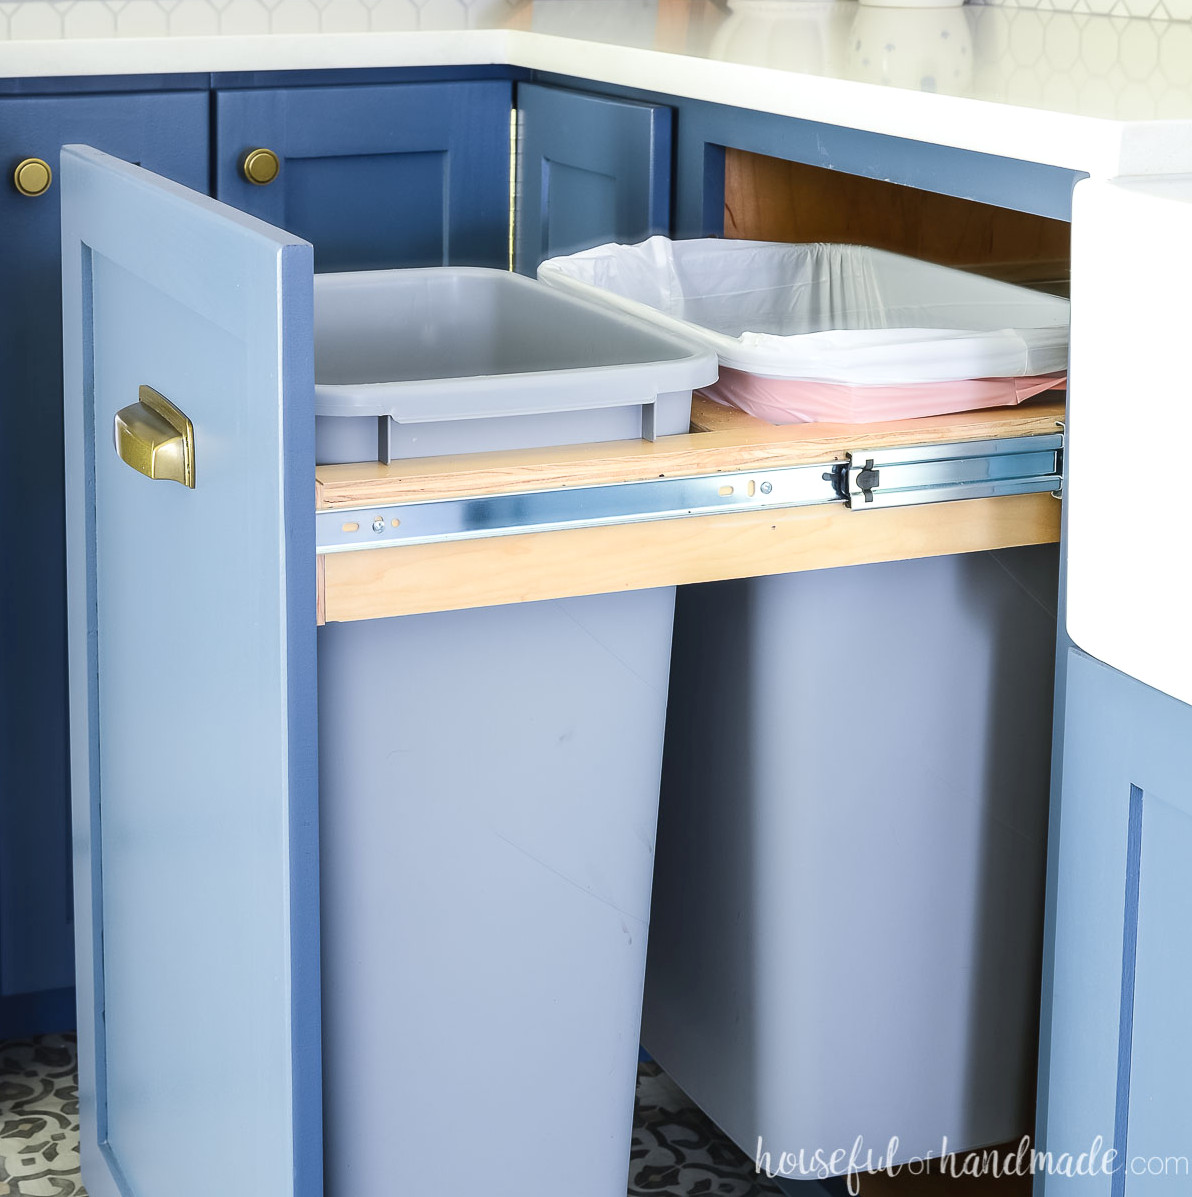
Personalized Trash Can Cabinet
The greatest advantage of building your own pull-out trash cabinet is the freedom to choose any layout you need! Start by selecting the garbage cans you want, then construct a custom cabinet around them.
In my two-tone kitchen, I built a spacious trash can cabinet that accommodated 2 full sized kitchen garbage cans. One held recyclables, while the other was used for regular trash.
Our current kitchen does not offer a recycling pickup service. Therefore, I designed a cabinet with a full-sized trash can positioned on its side and a smaller bin for compost placed in front.
This setup allowed the entirecabinet more compact and left additional room for other cabinets in my kitchen.
You can also install drawers either above or beneath your trash cans inside a cabinet. This drawer is useful for storing garbage bags or cleaning products.
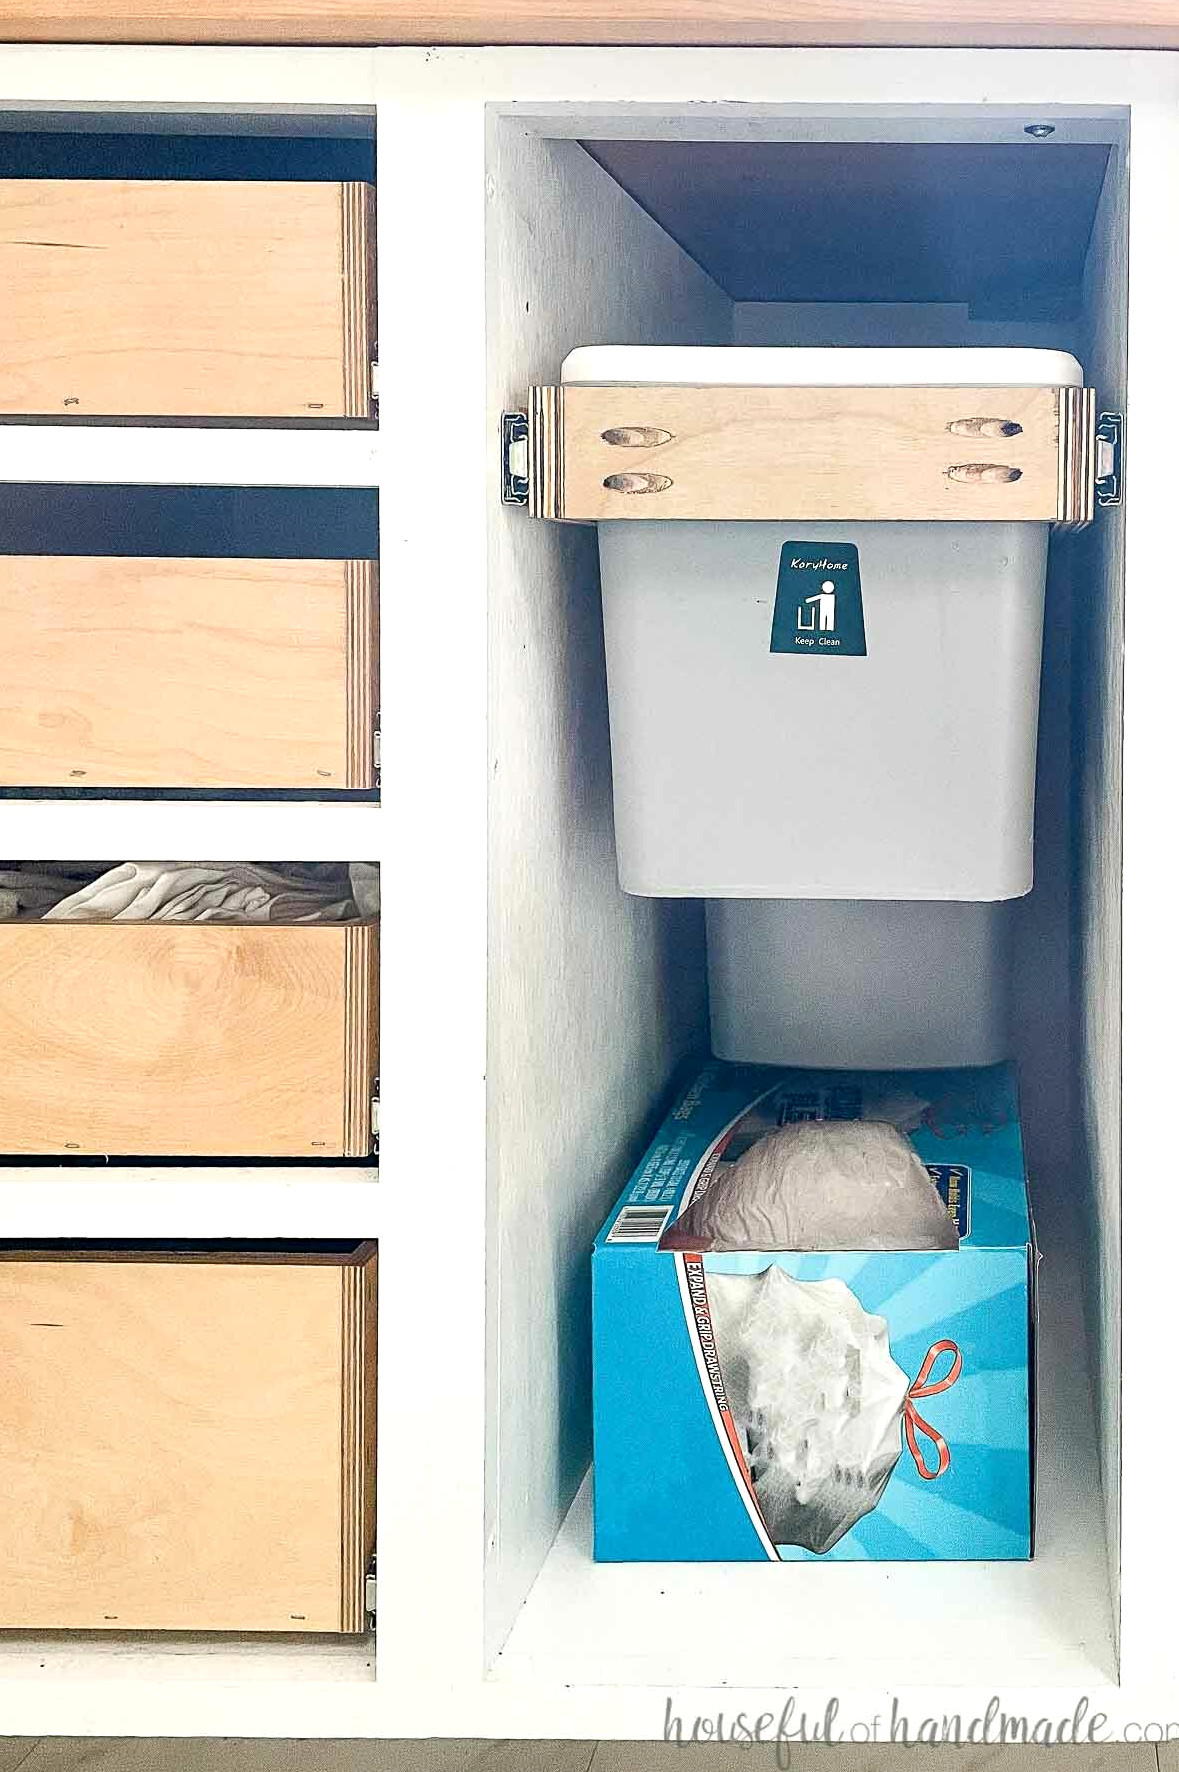
For our compact trash can cabinet, I positioned the sliding garbage can insert higher up inside the cabinet. As a result, a spacious section remained beneath the trash cans for storing a box of trash bags.
It fulfilled the same function as a drawer without the extra expense of an additional pair of drawer slides and the lumber required to make the drawer box and drawer front.
Plans for a Pull Out Trash Can Cabinet
After answering all the questions above, it is time to design plans for your own garbage can cabinet! I will guide you through creating plans for a custom pull out trash cabinet so you can begin construction with confidence.
Before figuring out the cabinet dimensions required for your pull out trash can, start by designing the sliding trash can insert.
Every pull out trash can holder consists of these parts:
- 2 side panels
- 1 front panel
- 1 rear panel
- 1 or 2 center partitions
- Optional: Top frame
- 2 sides and 1 center partition
Measure the trash can directly beneath the rim. If the lid has additional tabs or raised sections underneath, measure immediately below those areas.
Next, decide which style of trash can insert you prefer, then use the directions below to prepare a cut list and assemble it.
Top Frame Holder Cut List
The top frame holder creates a more polished appearance for your pull out trash can. You can build it from plywood offcuts or choose 1x lumber.
For a finished appearance and protection against unavoidable spills, cover the plywood edges with edge banding.
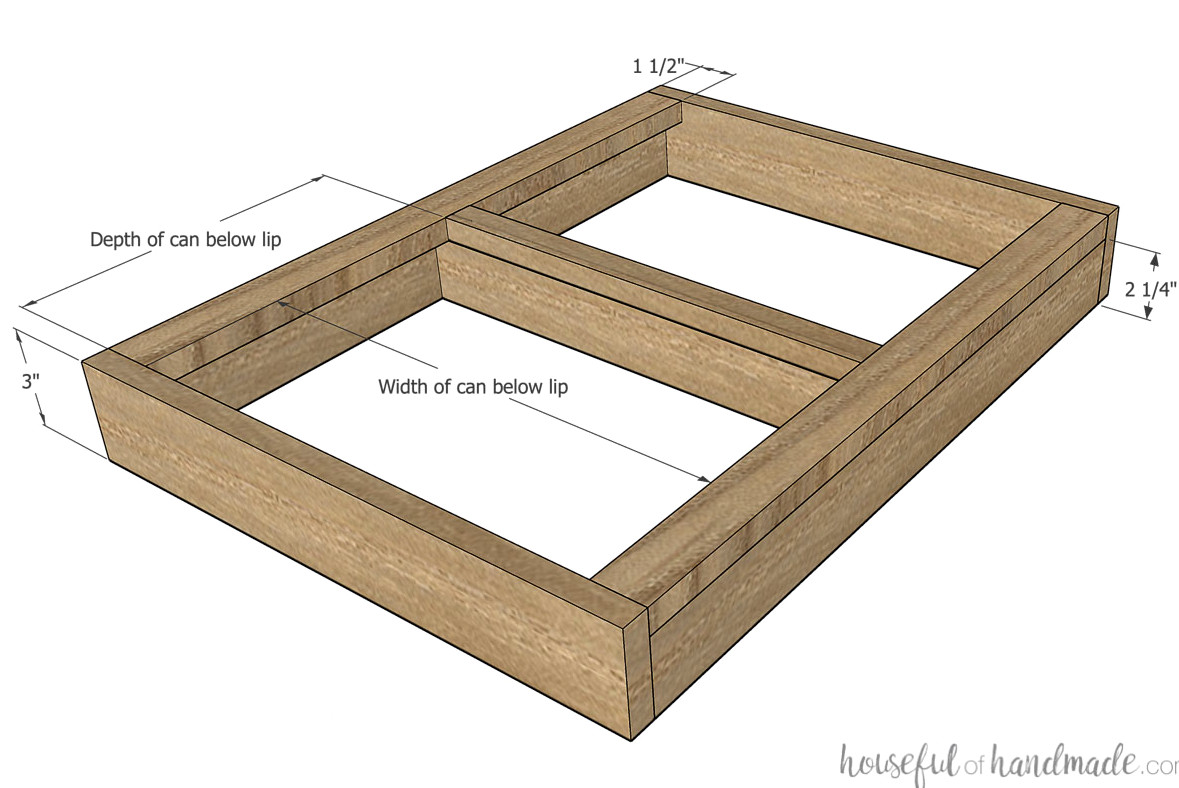
Adjust the thickness of the front, back, and side pieces as necessary. When using 1x wood, a 1×4 can be used for the front and back pieces (the actual width is 3 1/2″).
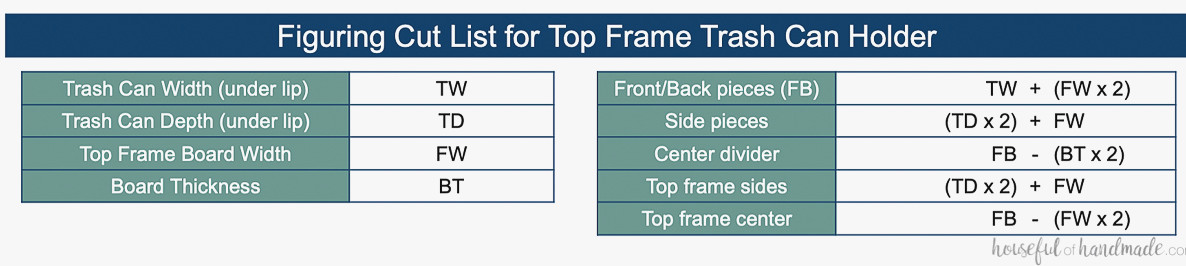
The side pieces should equal the width of the front and back pieces minus the thickness of the top frame components. I used 3/4″ plywood, so I deducted 3/4″ from the front and back pieces to find the required width.
Your cabinet depth is another crucial detail to consider. With a 24″ cabinet, the slider can be no deeper than 23″. You might need to search for trash cans with the dimensions necessary to achieve your preferred arrangement.
Refer to the chart below to find the precise cut list for your custom trash can insert:
Simple Frame Can Holder Cut List
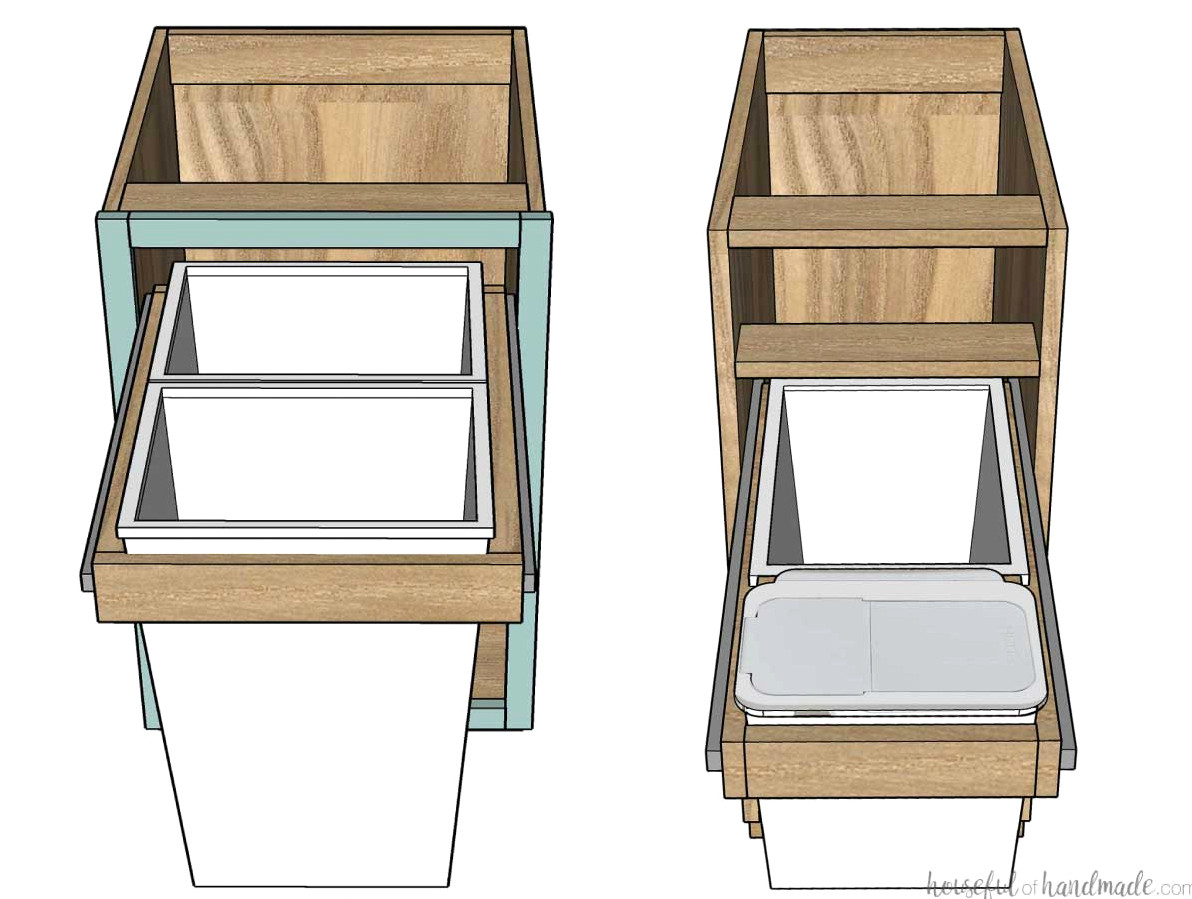
This basic frame is ideal for maximizing every available inch in your kitchen. Since it has no top frame, it does not add extra width to the trash can cabinet.
In my kitchen, I included a lidded compost bin. The bin I selected has a rear lip designed to hang over the outside of a cabinet. Therefore, I installed a second center support higher up so the bin could hang over it.
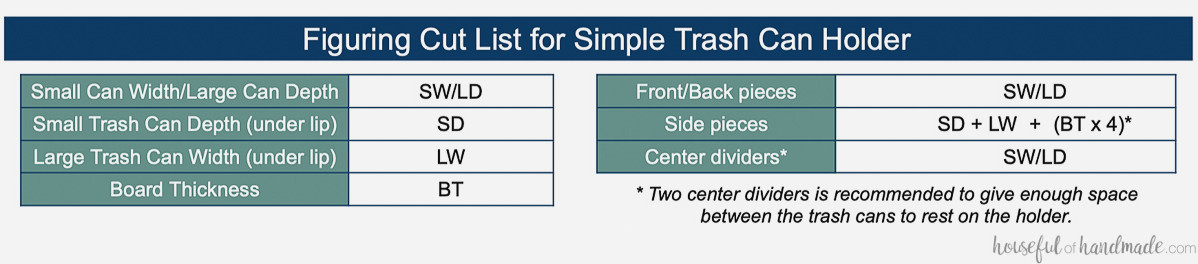
This arrangement also creates more room between the two garbage cans. That space is needed so both cans can rest flat on the holder’s top without overlapping.
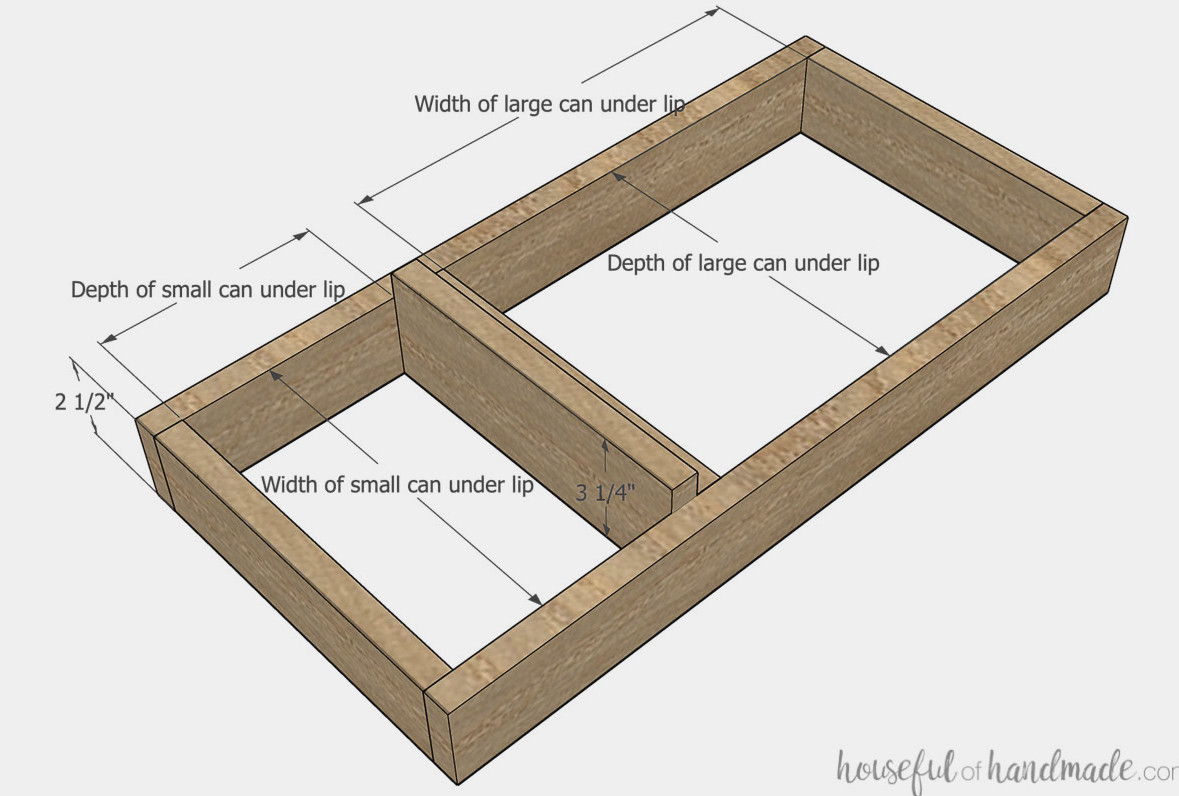
This uncomplicated holder can also be made from plywood remnants or 1x lumber. Apply edge banding to plywood edges for a more refined appearance. I chose a basic approach and sealed the edges with several layers of polyurethane.
Once again, be mindful of your cabinet’s depth. A 24″ cabinet allows for a slider only 23″ deep. You may need to look for trash cans with the dimensions required for the layout you want.
Consult the chart below to determine the exact cut list for the simple trash can holder:
Assemble the Trash Can Holder
For both trash can inserts, I used 3/4″ material (plywood or 1x lumber) along with pocket holes. Before boring the holes, adjust your pocket hole jig for 3/4″-thick material.
Fasten the pieces with 1 1/4″ pocket hole screws and wood glue.
If you plan to use edge banding on the plywood, cut every piece and apply the banding before putting the assembly together.
Top Frame Trash Can Insert
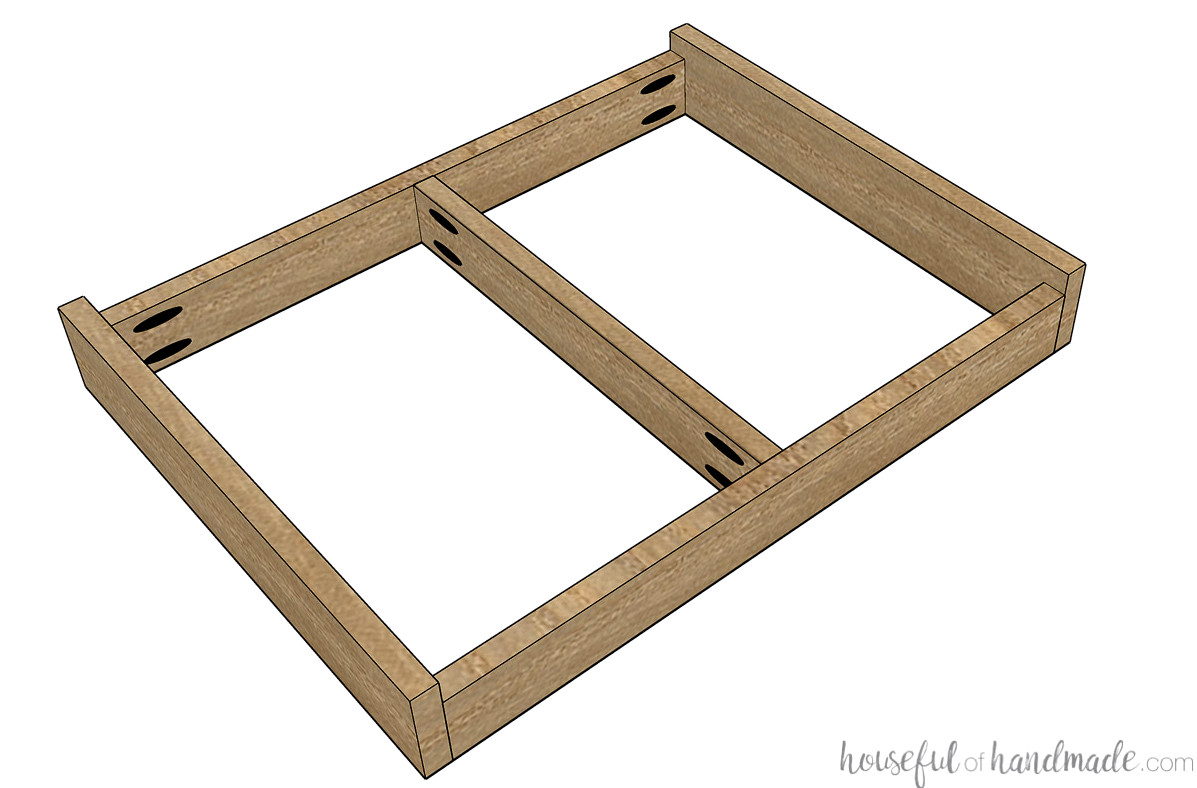
Make pocket holes at both ends of the side pieces and center divider.
Join the sides to the front and back pieces. Position the sides below the top edge of the front and back pieces by the thickness of the top frame boards.
Center the divider between the sides and attach it in place.
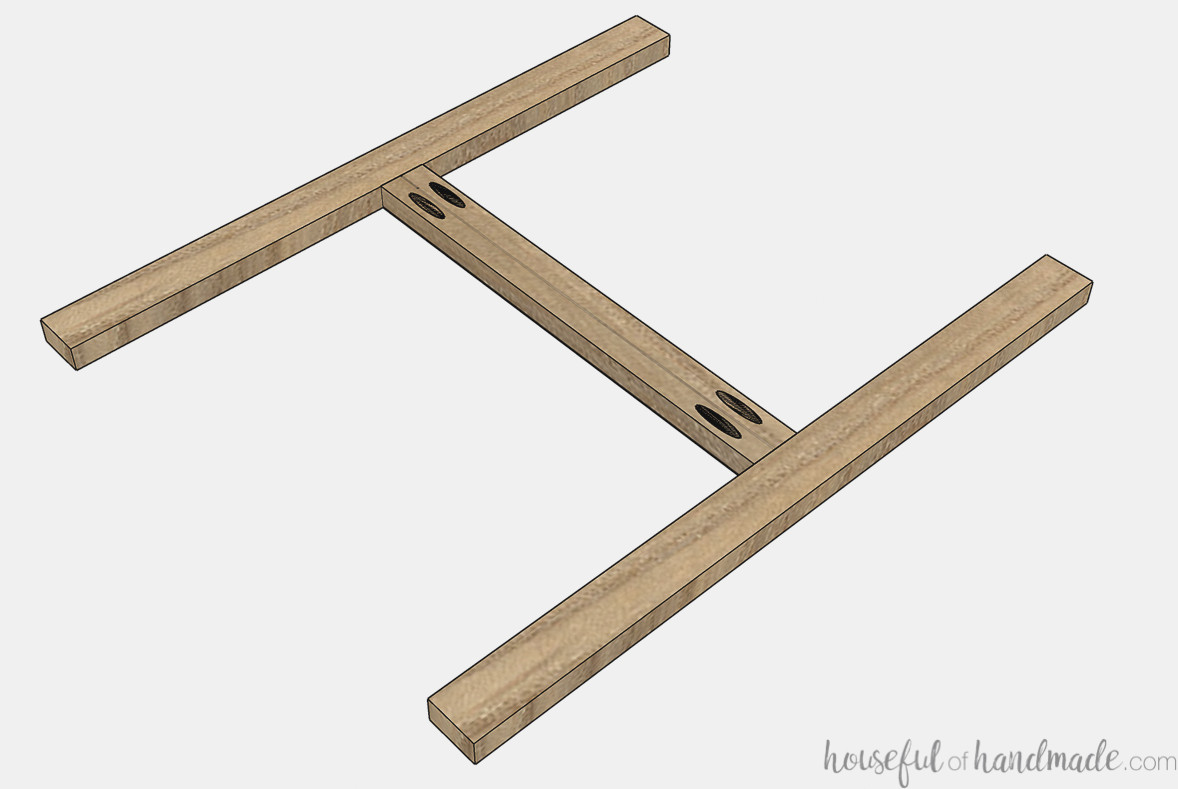
Create pocket holes at both ends of the top frame’s center piece.
Join the top frame center piece to the top frame sides, keeping it centered. Hold the boards level with a face clamp while fastening them,
Add several pocket hole screws to the upward-facing side pieces and center divider of the bottom frame.
Position the top frame over the bottom frame. Fasten it with screws and wood glue.
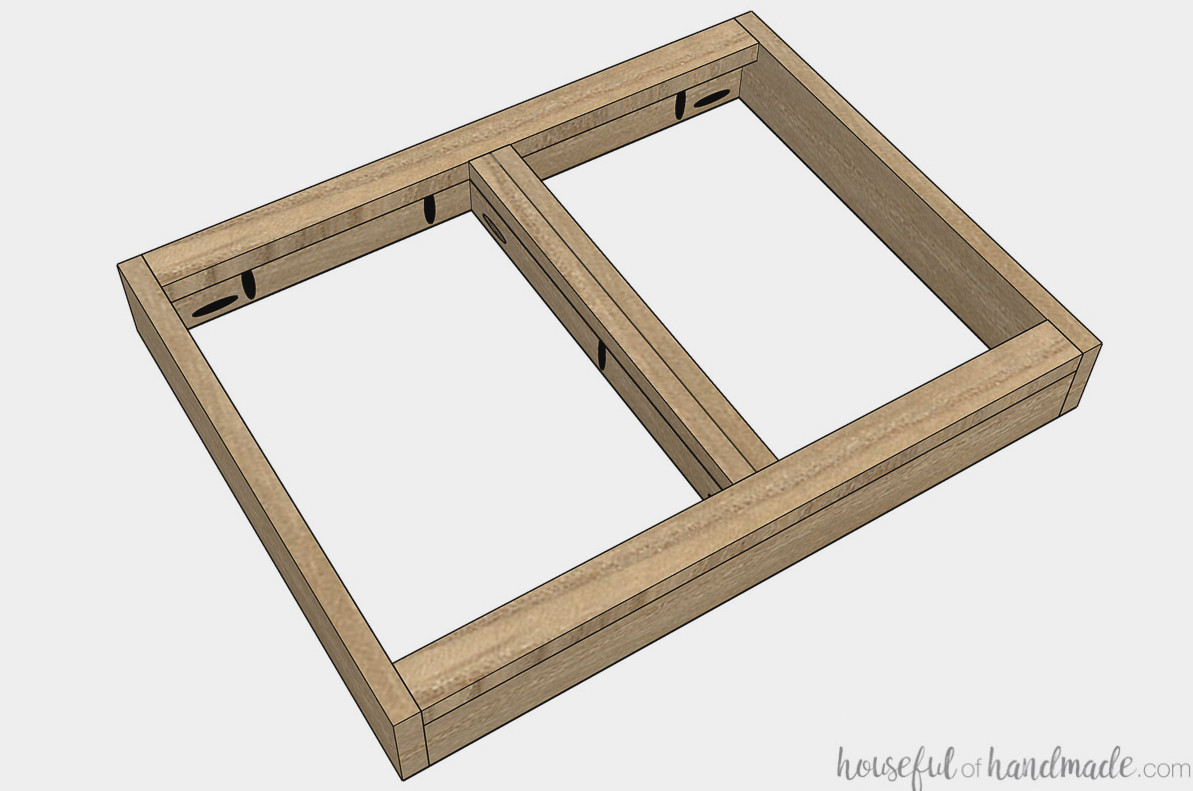
Another option would be to apply glue and use a finish nailer to secure the top frame to the bottom, though this would leave noticeable holes in the top frame. By using pocket holes as I did, they remain concealed within the frame and can only be seen when the trash can is removed from the holder.
Basic Trash Can Insert
Make pocket holes at both ends of the front and back pieces, as well as in 1 center divider.
Join the front and back pieces to the side pieces, ensuring that the tops are perfectly even.
Position the center divider based on the measurements of your trash cans.
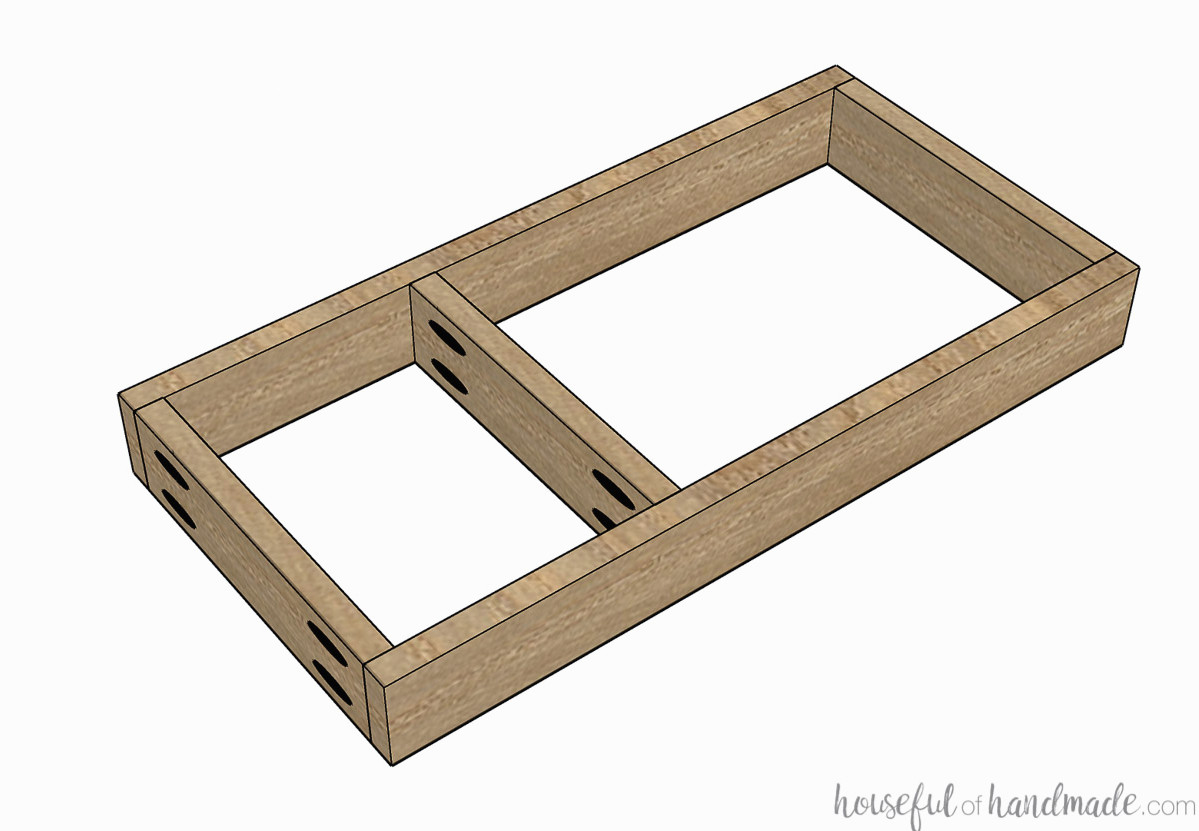
Secure the second center divider to the divider already placed in the holder using wood glue and brad nails or a few screws. This covers the pocket hole screws in the original divider.
- If you are using the compost bin with a lip, make the second divider 3/4″ wider than the remaining boards so it extends 3/4″ above the holder.
- Otherwise, cut the second center divider to match the width of the other boards and align all the tops.
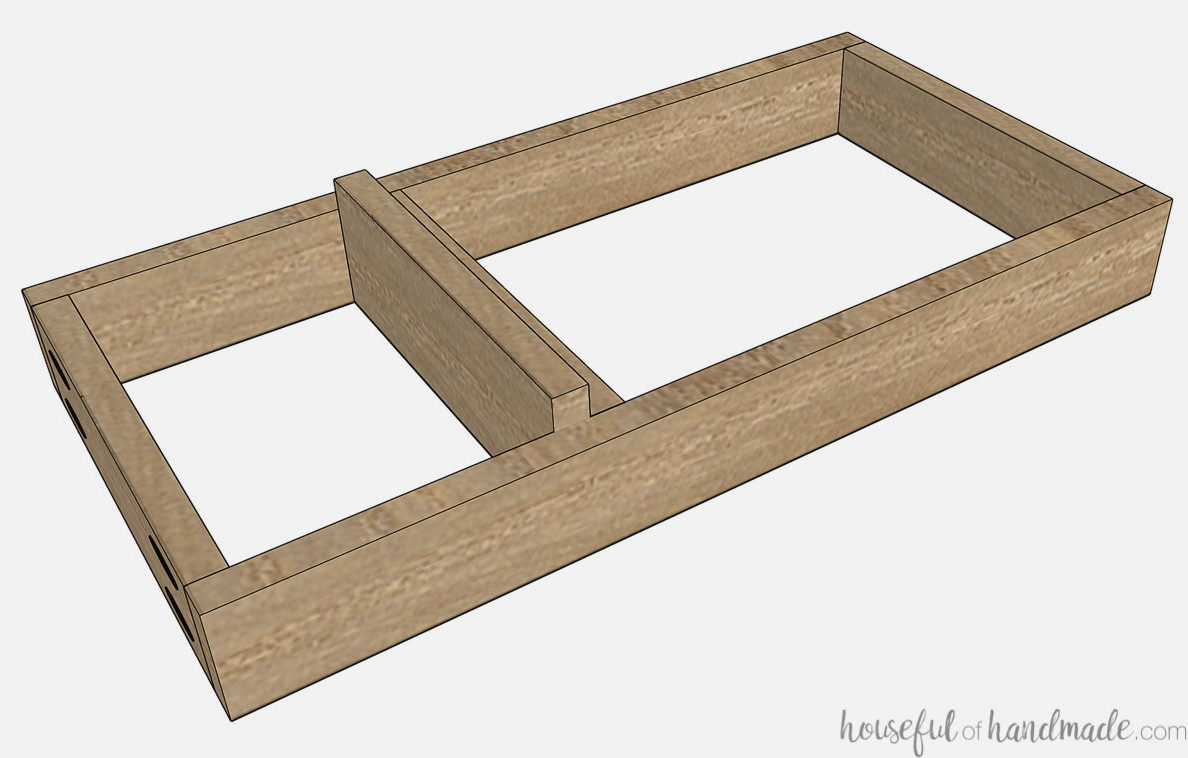
When positioning the pocket holes for the front and back pieces on the outside of the frame, the front will be concealed by the cabinet door, while the back will remain hidden within the cabinet.
Construct the Garbage Can Cabinet
After determining the design of the trash can holder, you can calculate the cabinet dimensions required for it. Begin by finding the necessary cabinet opening using this formula:
Trash Can Holder Width + (Required Drawer Slide Clearance x 2) = Cabinet Opening
I chose ball-bearing drawer slides needing 1/2″ of clearance on both sides of the drawer. Therefore, I added 1″ to the finished trash can holder width to establish the cabinet opening.
With the required opening determined, you can calculate the overall cabinet width.
- For face frame cabinets: (Face Frame Width x 2) + Cabinet Opening = Cabinet Width
- For frameless cabinets: (Plywood Thickness x 2) + Cabinet Opening = Cabinet Width
Next, construct a base cabinet where the trash can holder will be installed. Use the directions in the base cabinet build plans. That post also provides formulas for calculating the cut list for the complete cabinet.
Build this cabinet in the same manner as the other base cabinets in your kitchen.
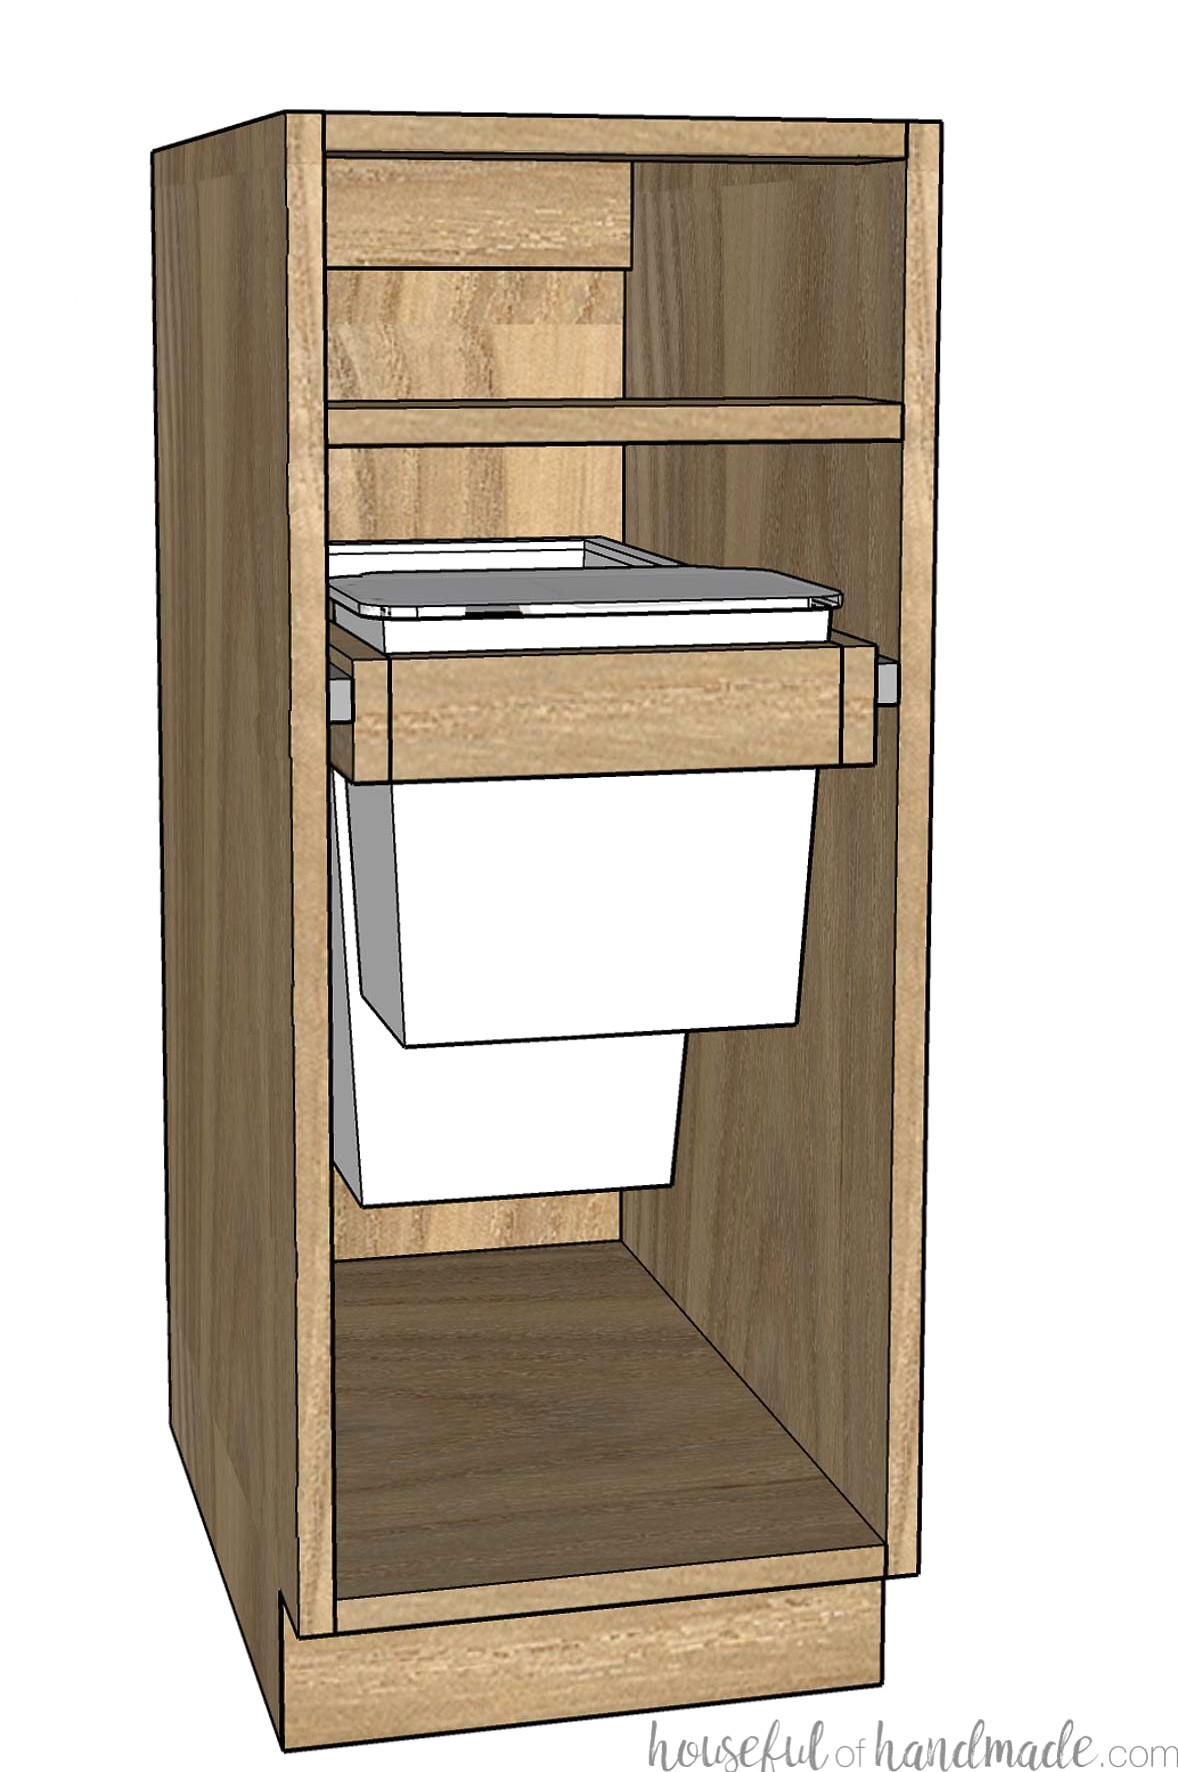
Install the Trash Can Holder
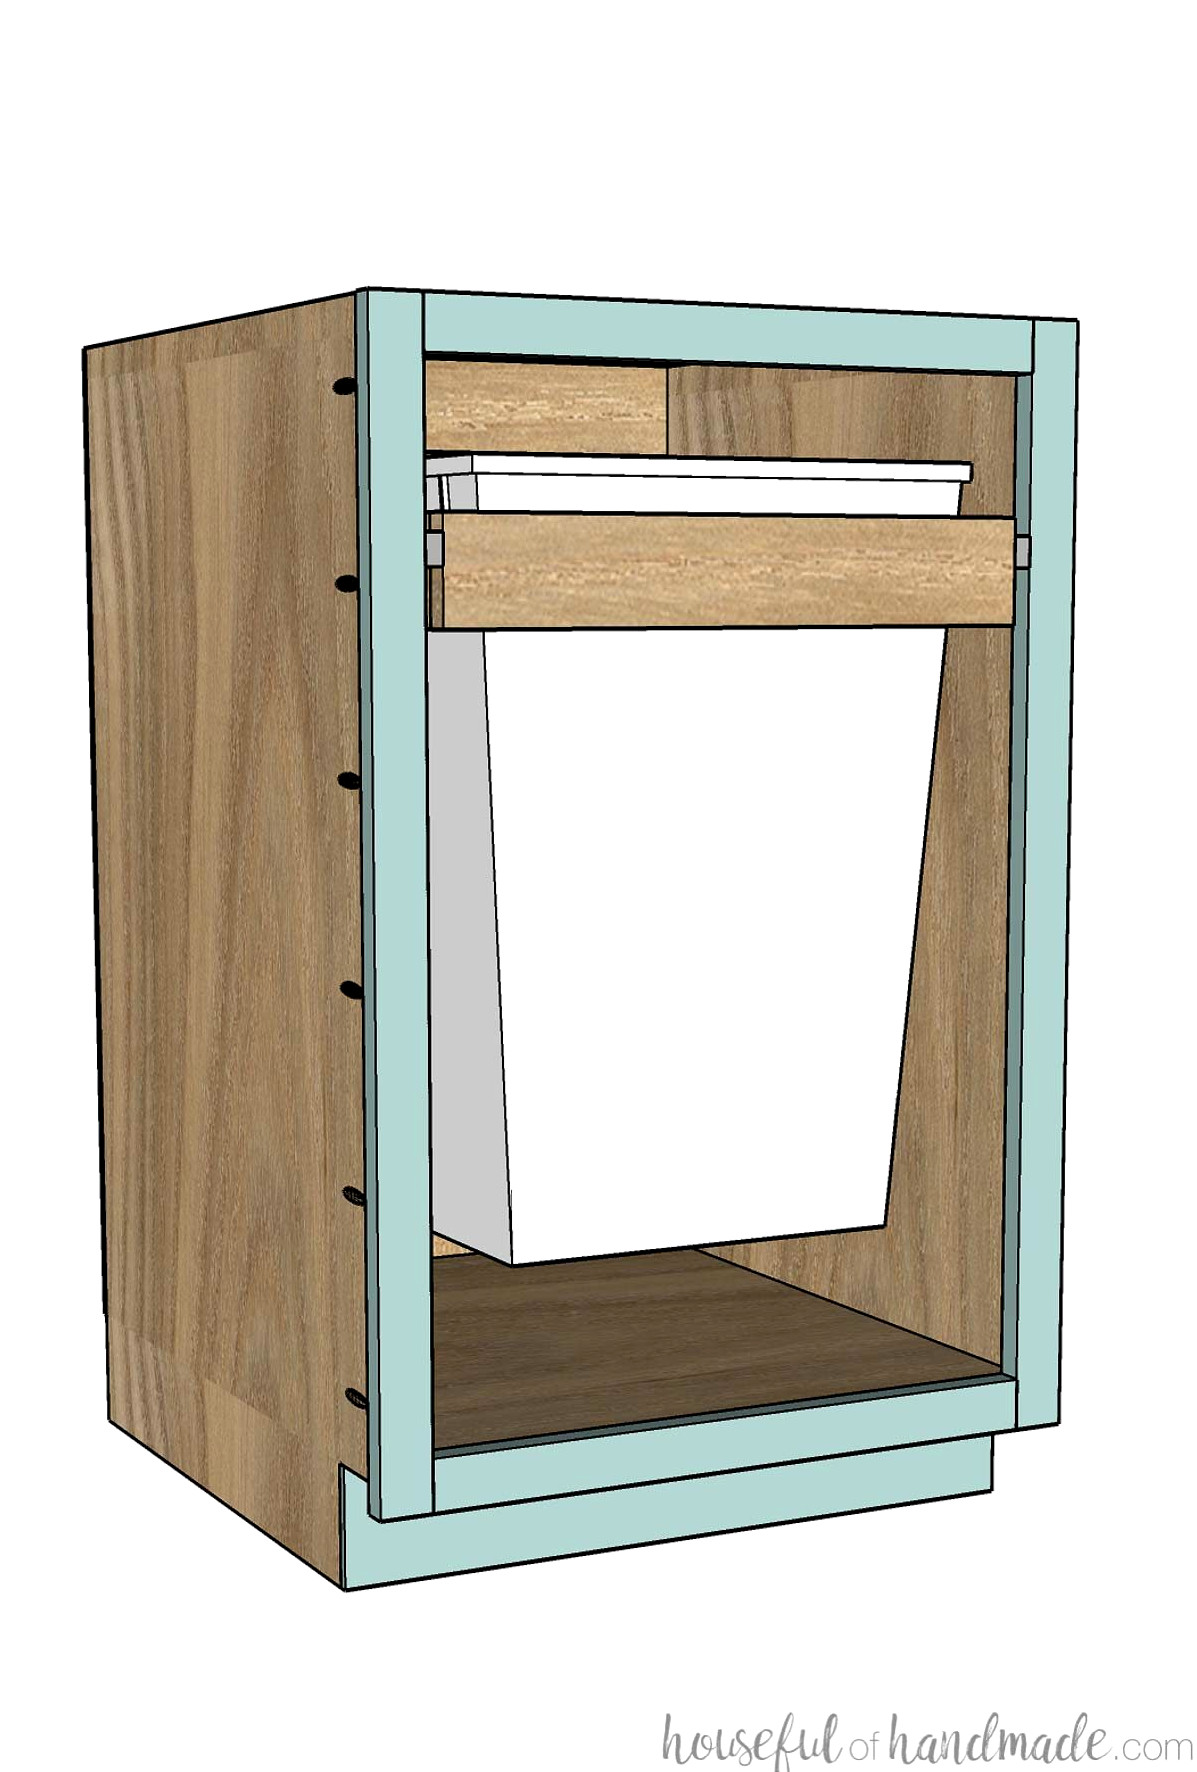
Install the trash can holder the same way you would install a drawer. Set the trash cans inside the holder, then measure how far they extend above and below it to ensure there is sufficient space.
Fasten the drawer slides to the cabinet sides and to the sides of the trash can holder. Learn how to install drawers using ball-bearing drawer slides here.
Next, make a DIY cabinet door for the new cabinet. Attach it to the trash can holder by driving wood screws through the holder’s front piece and into the door. Use 4 screws to hold it securely and prevent the door from twisting.
Finally, install your cabinet pull or knob, and the project is complete!
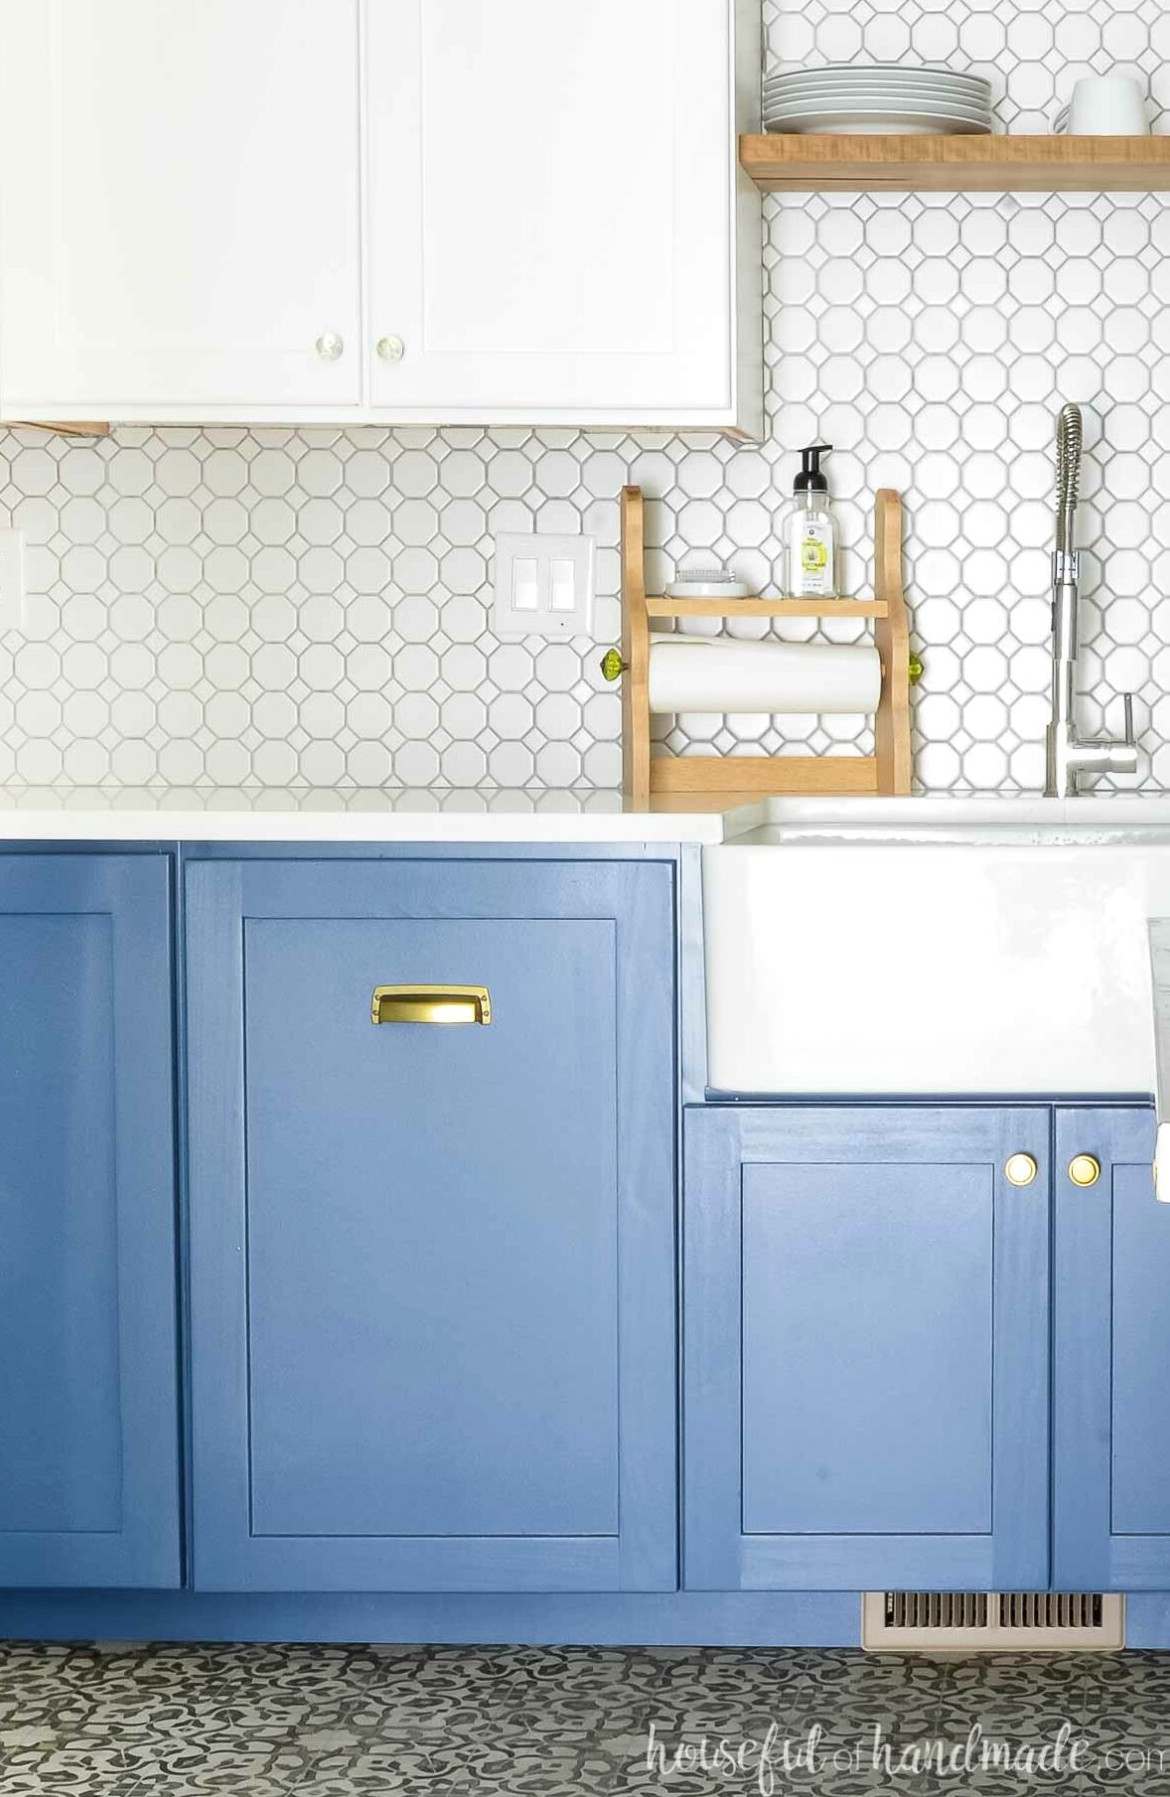
You can now place the trash cans into the holder and keep them tucked out of sight!
Be sure to see more photos of our blue and white two-tone kitchen renovation here. Also, explore these posts to discover everything about constructing cabinets for a new kitchen, bathroom, desk, built-ins, and more!
Enjoy building!