Discover how to construct a pantry cabinet for your kitchen, including designing plans for a custom-built cabinet.
Pantry cabinets are tall storage units that do not require a countertop. They are an excellent way to add abundant storage to your kitchen, especially for keeping food.
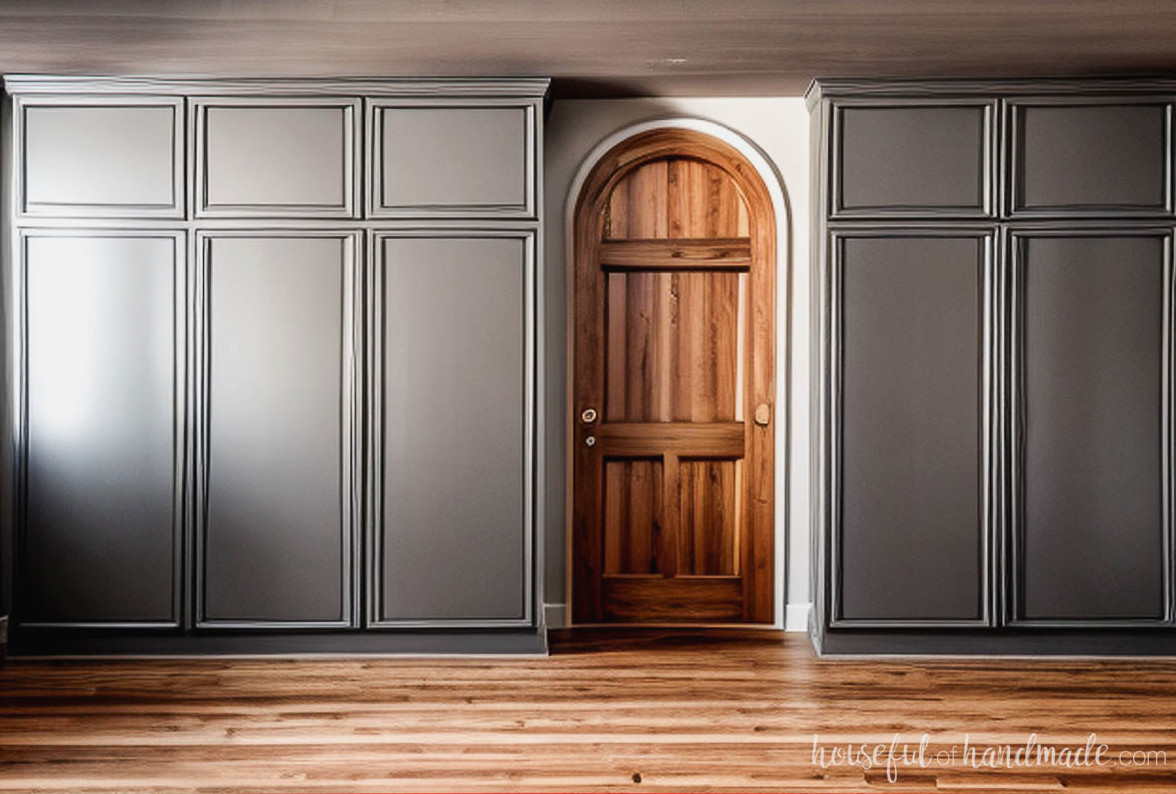
You may also install pantry cabinets in a bathroom for linen storage or use them as part of built-in cabinetry. These floor-to-ceiling cabinets are useful whenever you want to maximize storage in your room.
Features that distinguish a pantry cabinet:
- They extend to full cabinet height
- They may be equally deep as, or deeper than, base cabinets
- They are designed without a countertop
Be sure to read the generalhow to build cabinets post hereto learn about the various cabinet styles, the advantages and disadvantages of each, an overall look at cabinet components, and basic construction methods.
Here, we will focus on the particular measurements and construction process for pantry cabinets.
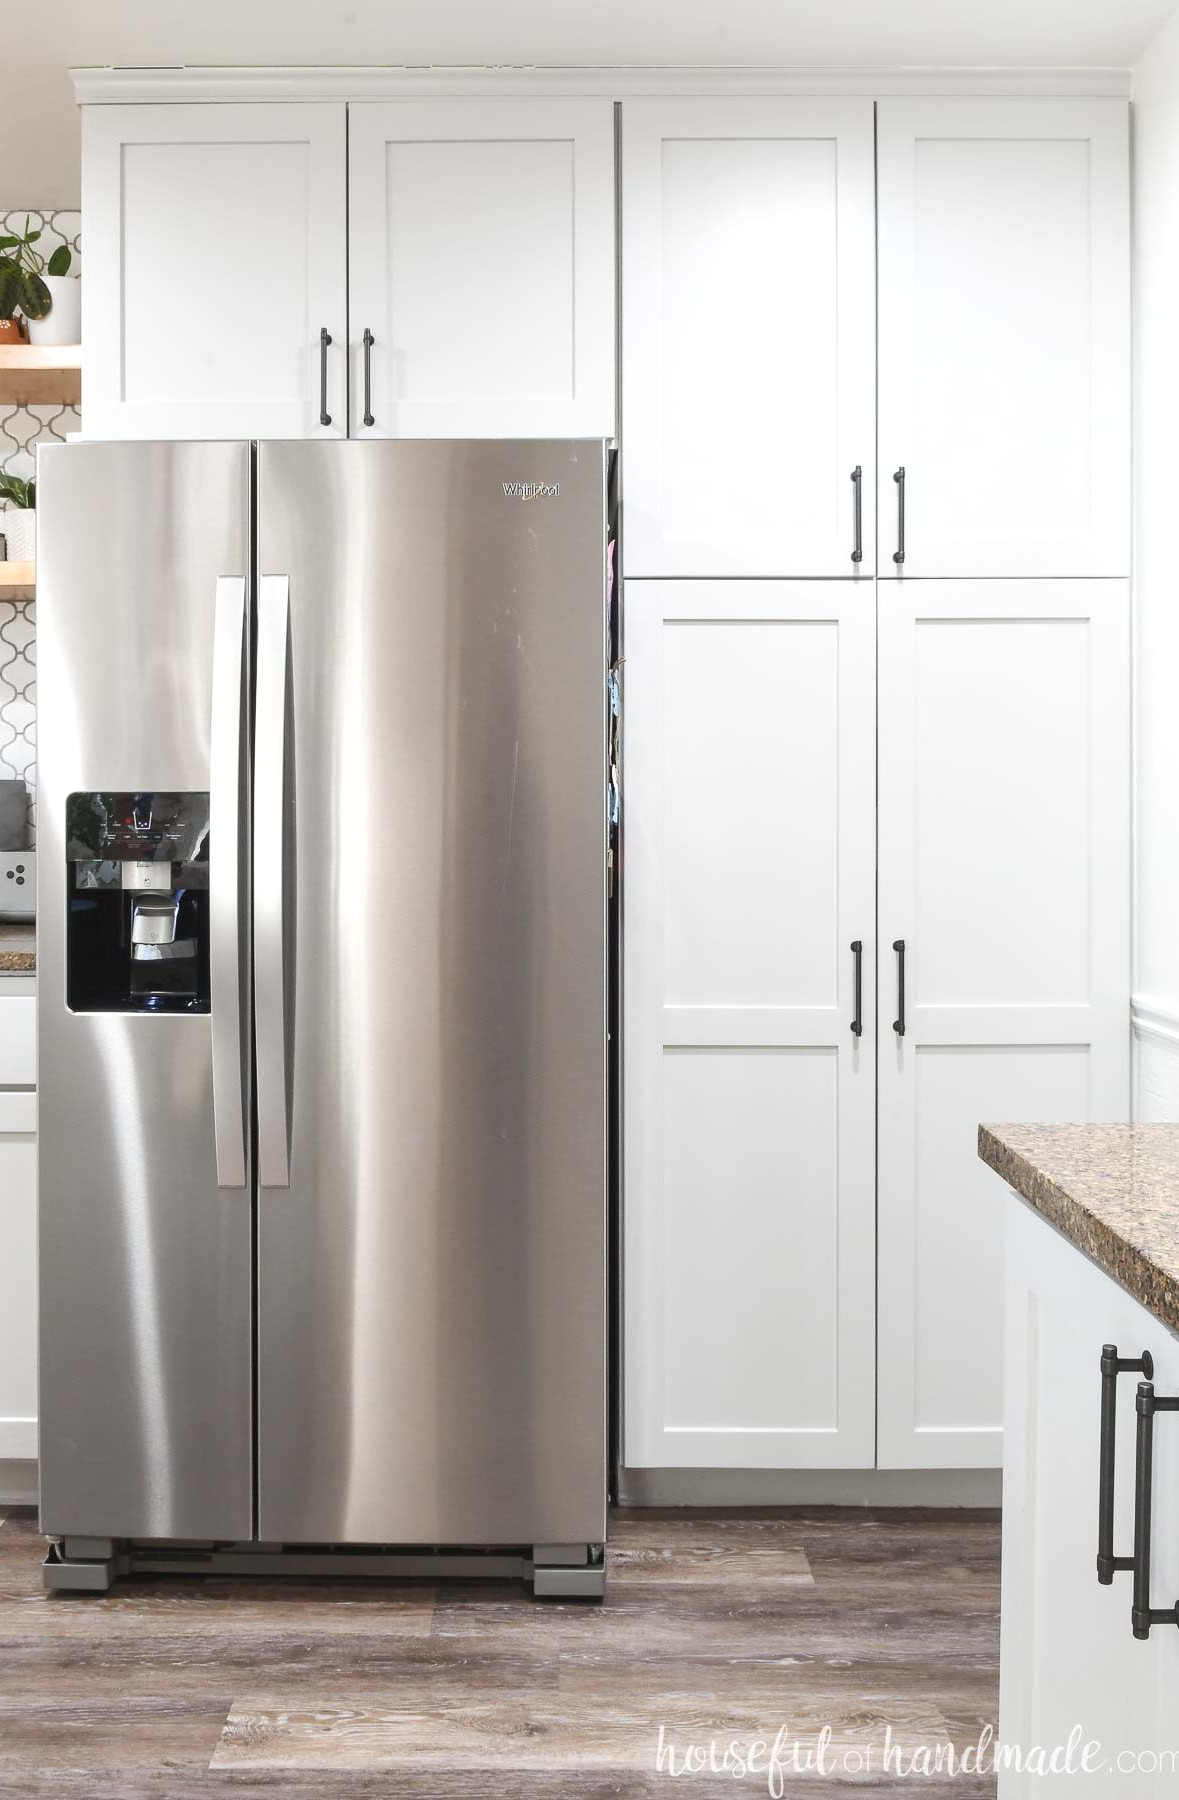
Important Factors When Constructing Pantry Cabinets
Before building your own pantry cabinets, there are several details you need to determine while preparing your cabinet plans.
Let’s review the choices available for pantry cabinet construction so you can decide what works best.
Which cabinet style would you prefer?
Your pantry cabinet can be built with a face frame or in a frameless European-style design.Read all about the different types of cabinets (including pictures) hereto determine which option suits your project.
What height can your pantry cabinet be?
The most challenging aspect of constructing a pantry cabinet is determining its height.
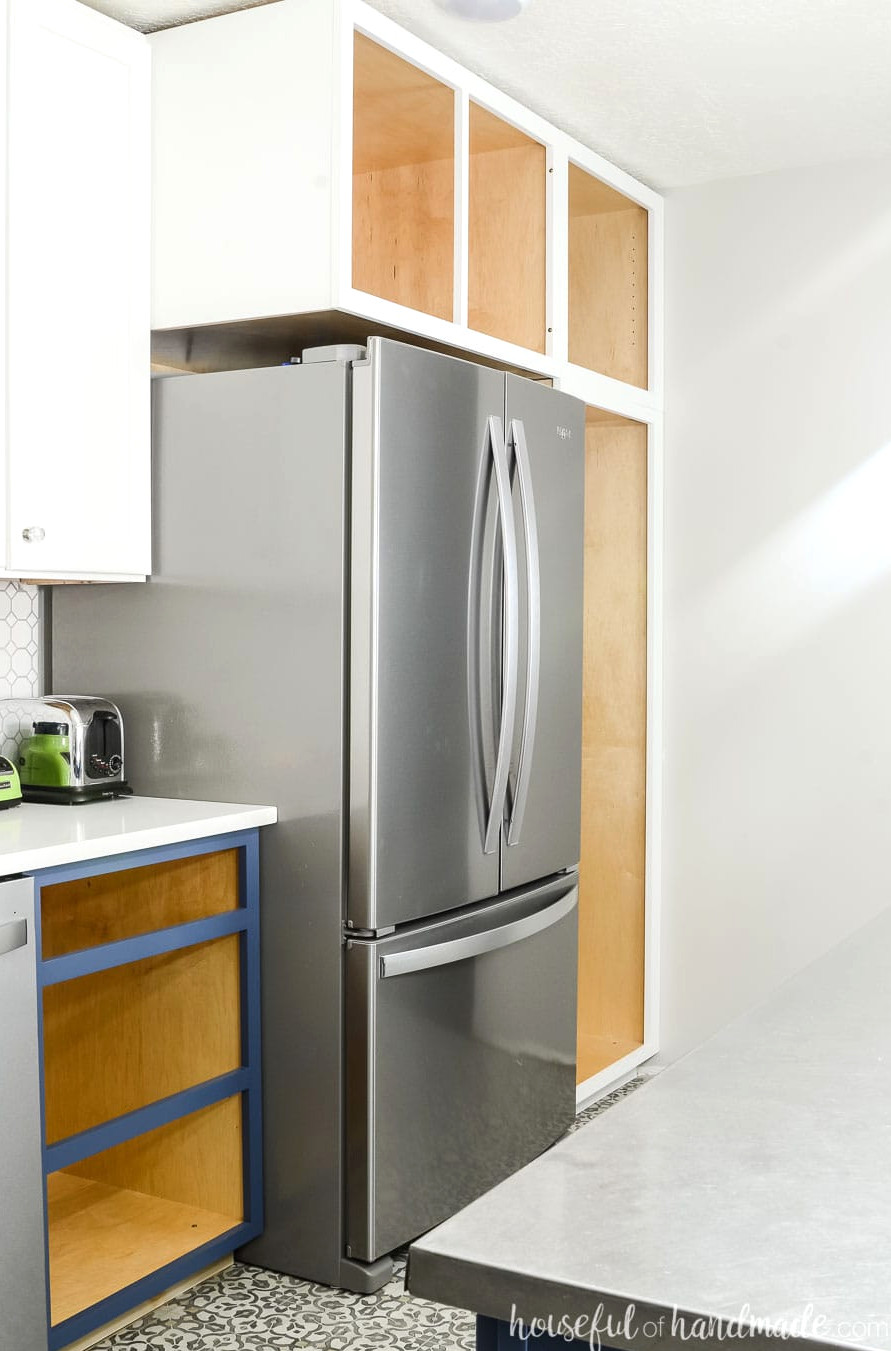
A single unit reaching the entire height of the wall, leaving only a few inches for moulding, cannot be moved into position. When you tilt it upright, its height becomes greater than the ceiling clearance.
Constructing the cabinet in its final location can solve this problem, although pocket hole screws would remain visible inside the cabinet’s upper section.
Another option is to allow additional space for trim. As the cabinet becomes wider and deeper, more clearance is required to tilt it upright.
For this reason, I prefer making two cabinets that can be stacked one above the other.
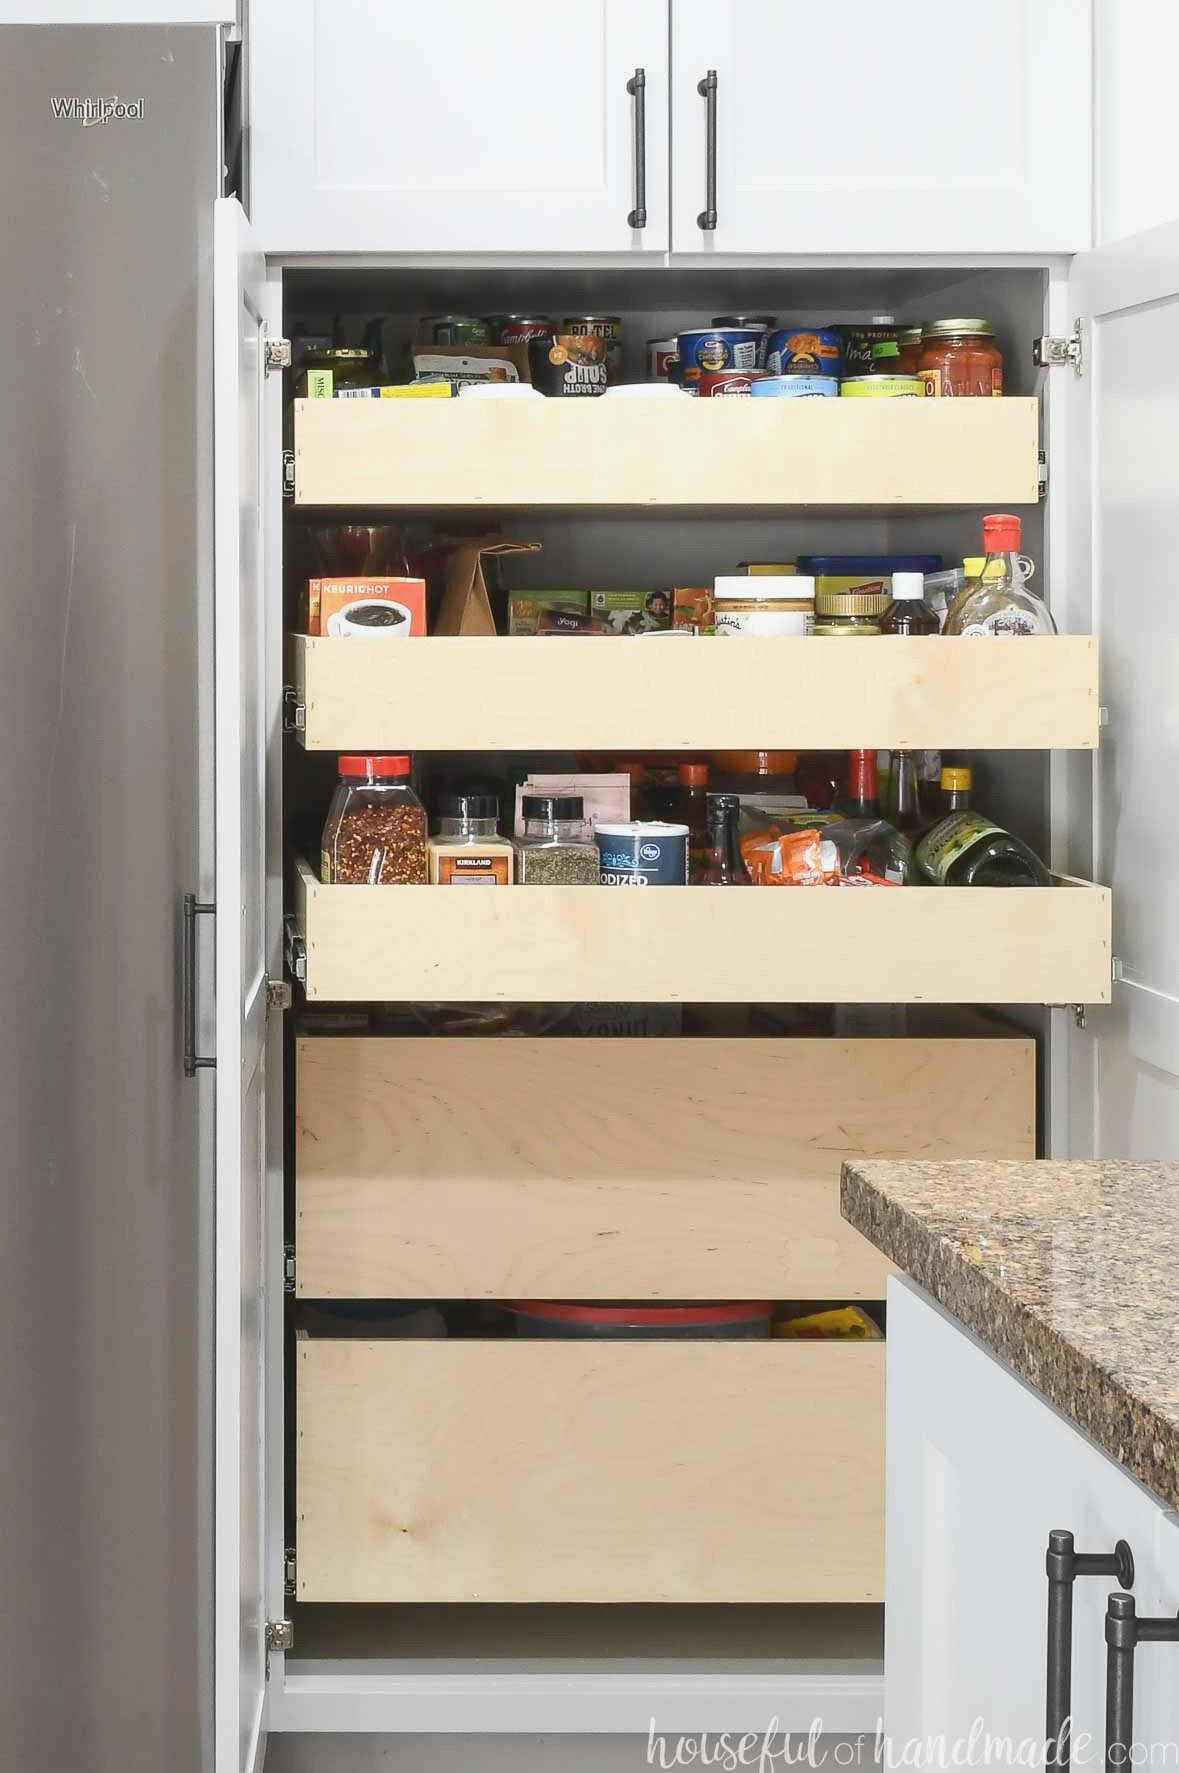
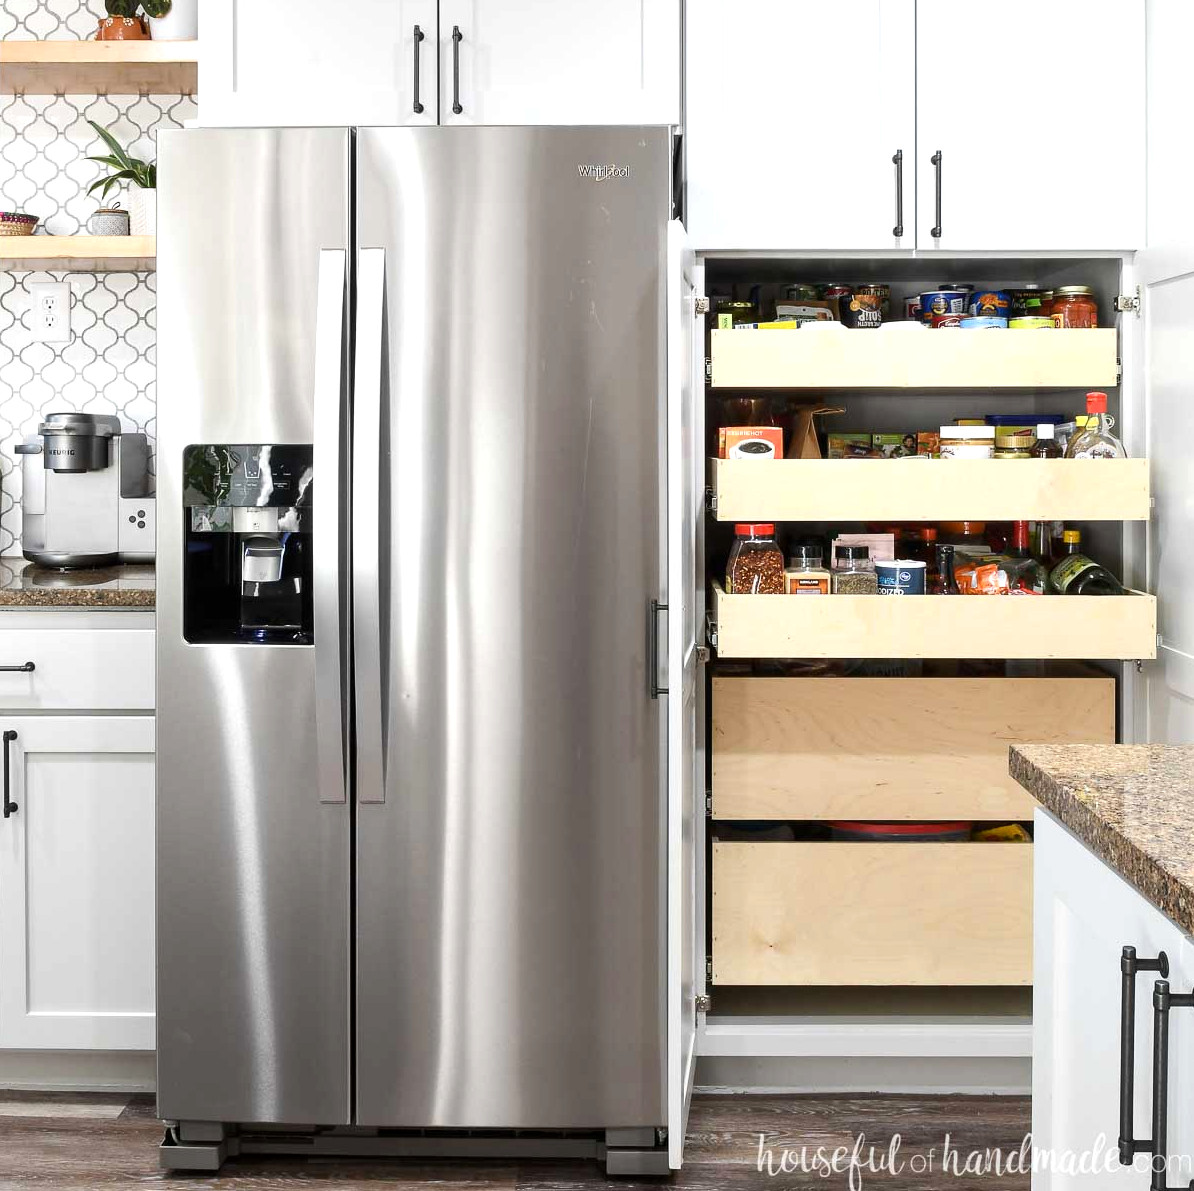
The lower unit is an ideal spot for DIY pull out pantry drawers, while the upper section can contain shelves for items used less frequently since reaching it may already require some effort.
When your pantry consists of stacked cabinets, you are not restricted to a particular overall height. Just keep a step stool nearby to access the upper shelves.
What depth should a pantry cabinet have?
When your pantry cabinet sits beside a base cabinet, I suggest matching the depth of the base cabinets.
On the other hand, if the pantry cabinet is positioned next to a refrigerator, you may make it deeper to align with the appliance. That is the approach I used during my first DIY kitchen remodel.
Most refrigerators are available in two depth varieties: standard and counter depth. Once installed, a standard model is generally a little deeper than 30″.
Therefore, when placing pantry cabinets around or beside a standard-depth refrigerator, I prefer building them 30″ deep.
If your cabinets are next to a counter depth fridge, use the typical 24″ base cabinet depth.
Finally, when your pantry cabinets do not sit beside other cabinets or a refrigerator, you can choose whatever depth you want. That flexibility is one of the benefits of DIY!
A row of 18″ pantry cabinets would be 6″ deeper than conventional wall cabinets while still making items easier to locate than they would be in deeper units.
Is a toe kick required for pantry cabinets?
A toe kick is an opening cut into the bottom of a base cabinet that lets you stand closer by providing room for your feet. It also lifts the cabinet opening several inches above the floor.
Because a pantry cabinet does not have a countertop that you need to stand against, a toe kick is not required.
Even so, you should raise the cabinet opening a few inches above the floor so the doors can operate smoothly without catching on carpet or objects lying underneath.
When your pantry meets other kitchen base cabinets. It is best to match the base cabinets’ toe kick for a consistent appearance.
If the pantry cabinet stands apart from the remaining cabinetry, you can omit the toe kick and install a kickboard instead.
A kickboard is a wooden strip installed around the cabinet base, much like a baseboard along a wall. It conceals the space beneath the lowest shelf.
You can find information about various toe kick designs and recommended measurements in the how to build base cabinets guide.
Pantry Cabinet Design Plans
After answering the questions above, it it time to draw up plans for your own pantry cabinet! I will guide you through creating plans for customized pantry cabinets so you can begin construction with confidence.
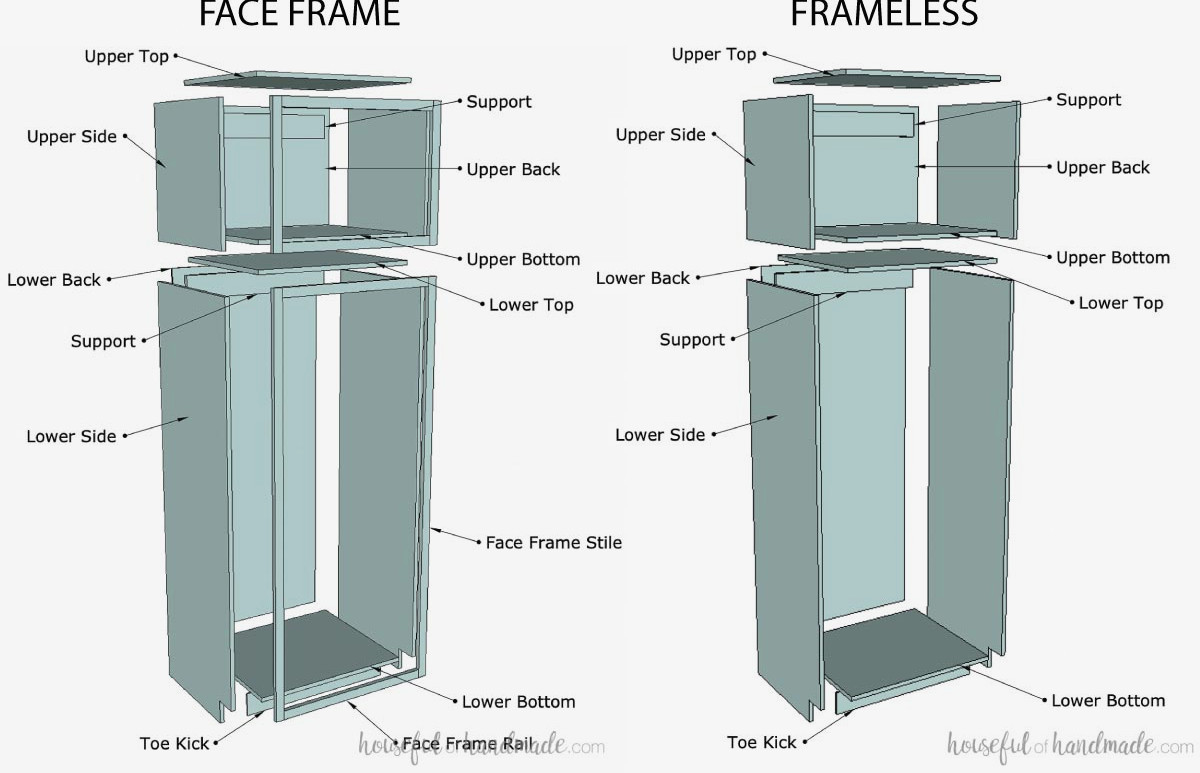
Every pantry cabinet will include these components:
- 2 lower side panels
- 2 upper side panels
- 4 top and bottom panels
- 1 lower rear panel
- 1 upper rear panel
- 2 brace pieces
- Optional: toe kick or kickboard
- Optional: face frame
- 2 lower face frame stiles
- 2 upper face frame stiles
- 4 face frame rails
- Optional: shelves or drawers
For pantry cabinet construction, use 3/4″ plywood for the majority of the cabinet box. To reduce expenses and keep the box lighter, I suggest 1/4″ plywood for the back and toe kick cover, if you are adding one.
To complete the exposed plywood edges at the front, you will need toeither apply edge banding for a frameless cabinet or add a face frame to build a face frame cabinet.
Face frames are generally made with 1×2 boards (despite their actual dimensions being 3/4″ thick and 1 1/2″ wide). For a broader, more prominent frame, choose wider boards.
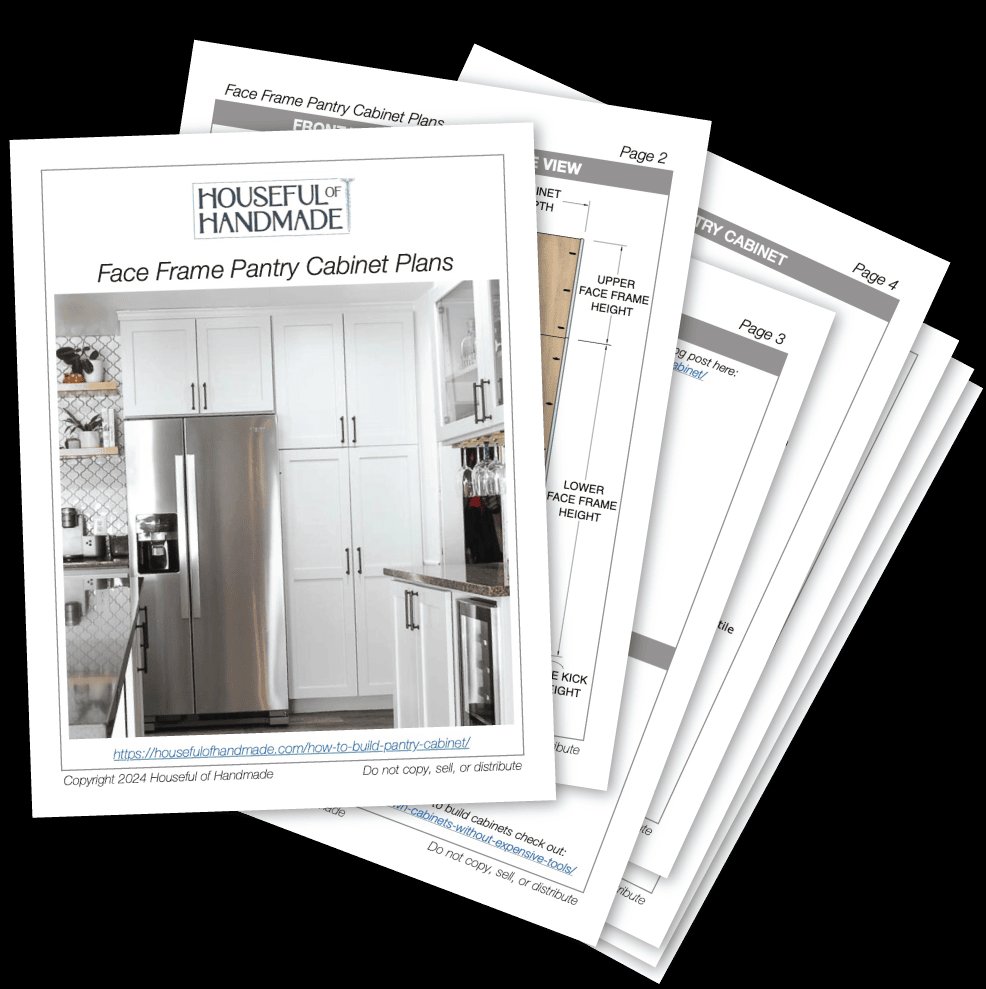
Get the Premium PDF Woodworking Guide
PDF plans include- Instructions for Calculating the Cut List, Shopping List, Suggested Tools, Detailed Steps with 3D Illustrations & Useful Resources
BONUS- 3D SketchUp File & Cut List Calculator
Face Frame Pantry Cabinet Cut List
Refer to the chart below to determine the measurements for every component of your face frame pantry cabinet.
Alternatively, use the cut list calculator provided with the PDF plans.
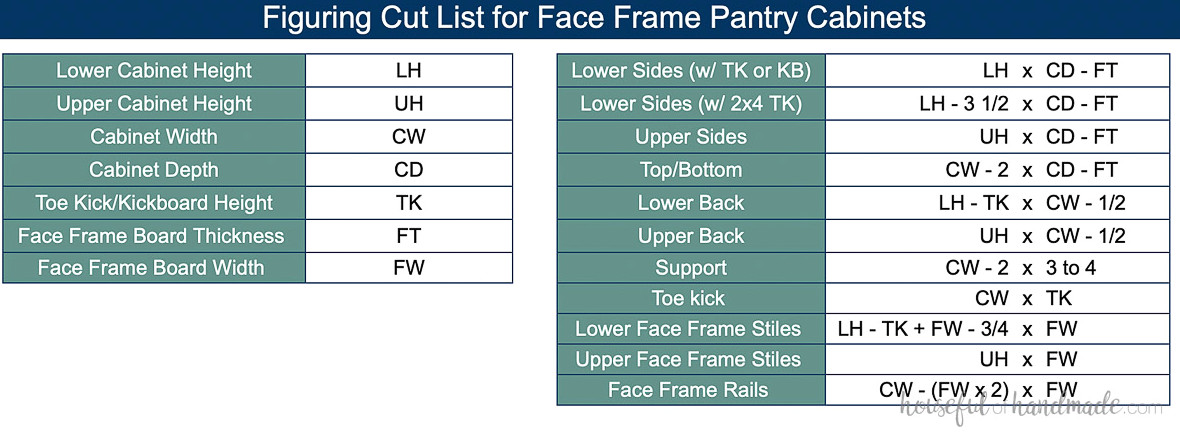
Key considerations for face frame cabinets:
- The face frames extend 1/4″ beyond the cabinet sides. This simplifies installation, but when the side of your base cabinet will be exposed, you must either install a side panel (use 1/4″ plywood cut to the precise dimensions of the base sides and tack it in place) or modify your measurements to account for the additional 1/4″ on one side.
- Rather than being fitted into a rear groove, the back panel is simply nailed in place. Since the cabinet is built in, the back panel will only be visible when the side of a cabinet can be seen. Resolve this by adding the panel mentioned above (cut it 1/4″ deeper so it covers the back panel) or routing grooves and changing the back panel dimensions so it fits inside them.
After determining the measurements for each piece, cut them to size.Learn how to easily cut plywood with a circular saw here.
Frameless Pantry Cabinet Cut List
Refer to the chart below to determine the measurements for every component of your frameless pantry cabinet.
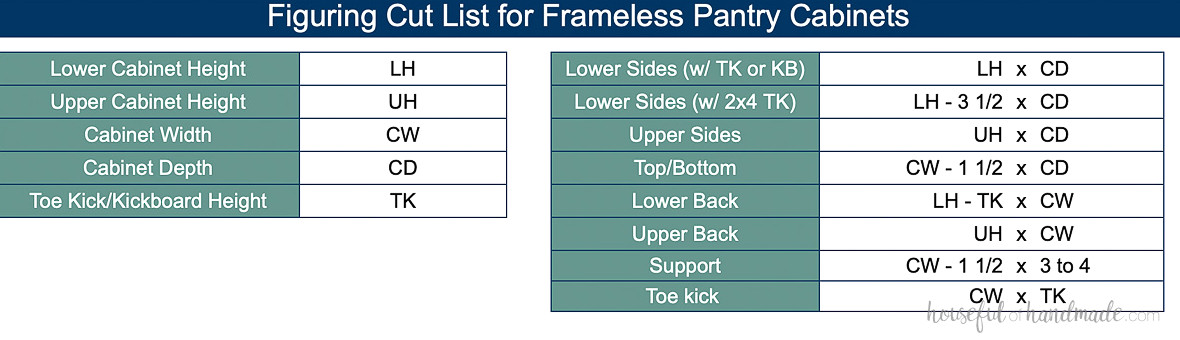
Important details about frameless cabinets:
- Plywood is not truly 3/4″ thick; it is slightly thinner, and thickness can vary between sheets. I suggest pressing two pieces of the plywood you plan to use firmly together and measuring them. Replace the 1 1/2″ deduction for the bottom and support pieces with this measurement. Doing so will provide more precise cabinet widths.
- The back panel is simply nailed onto the rear instead of being installed in a groove. Because the cabinet is built in, the back panel will only be visible when a cabinet side is exposed. If the cabinet sides will be visible, route grooves and modify the back panel dimensions so it fits within them.
How to Build a Pantry Cabinet Box
Tools & Materials
STEP 1- Cut out the pieces
Cut each piece based on the cut list you calculated above. You can also use the cut list calculator included in the PDF construction plans.
When building the lower cabinet with a toe kick, cut the opening from the front of both side boards with a circular saw, jig saw, or band saw.
When using a 2×4 base for the lower cabinet, there is no need to notch the sides. Instead, make them 3 1/2″ shorter so the cabinet can rest on the base.
For a kickboard or an upper pantry cabinet, keep the cabinet sides without notches.
Set your drill for 3/4″ material and make pocket holes in the sides of the top and bottom pieces. For sturdy cabinet boxes, space the pocket holes every 4-5 inches.
With frameless cabinets, apply iron-on edge banding to the front of every piece before putting the cabinet together.
For face frame cabinets: drill pocket holes in the front edges of the top, bottom, and both side pieces as well.
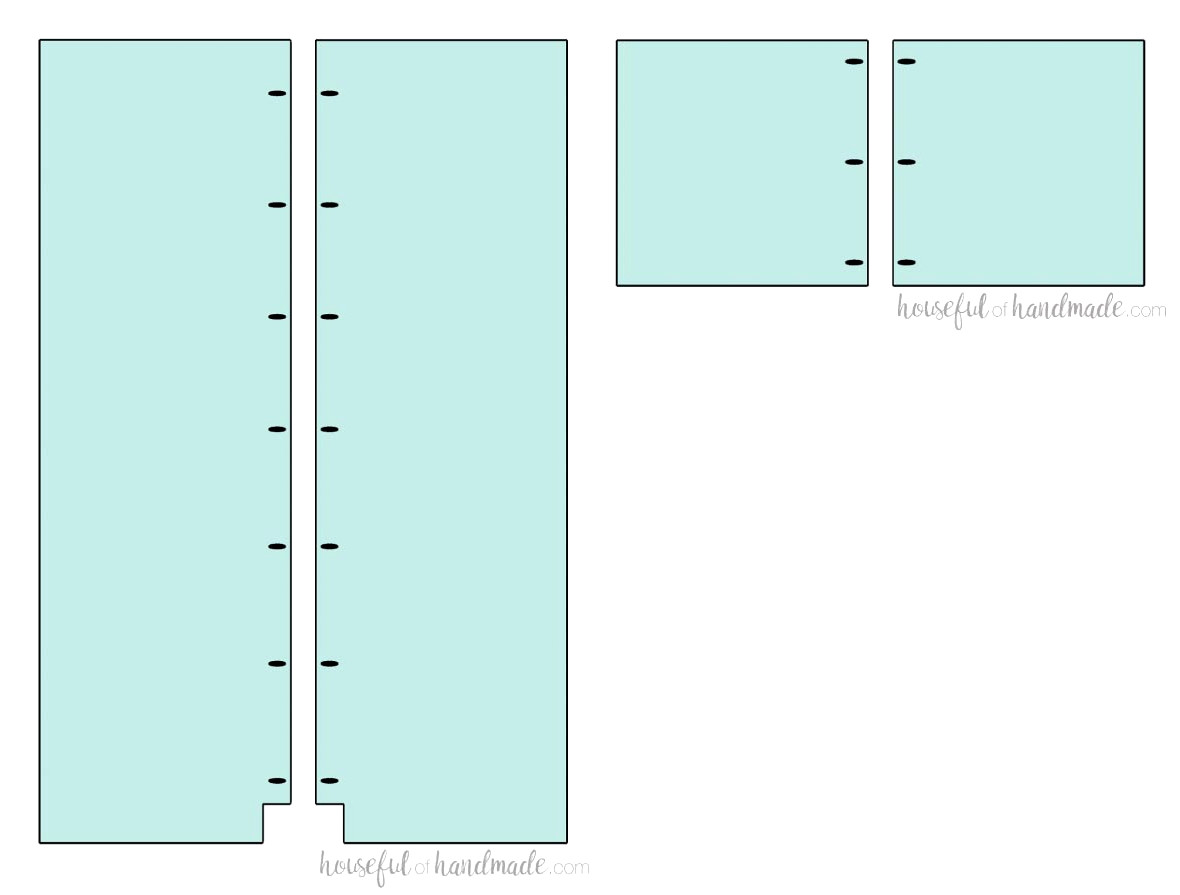
STEP 2- Assemble the Cabinet Box
For useful advice, be sure to read the Tips for a Perfect Cabinet Box section in this post.
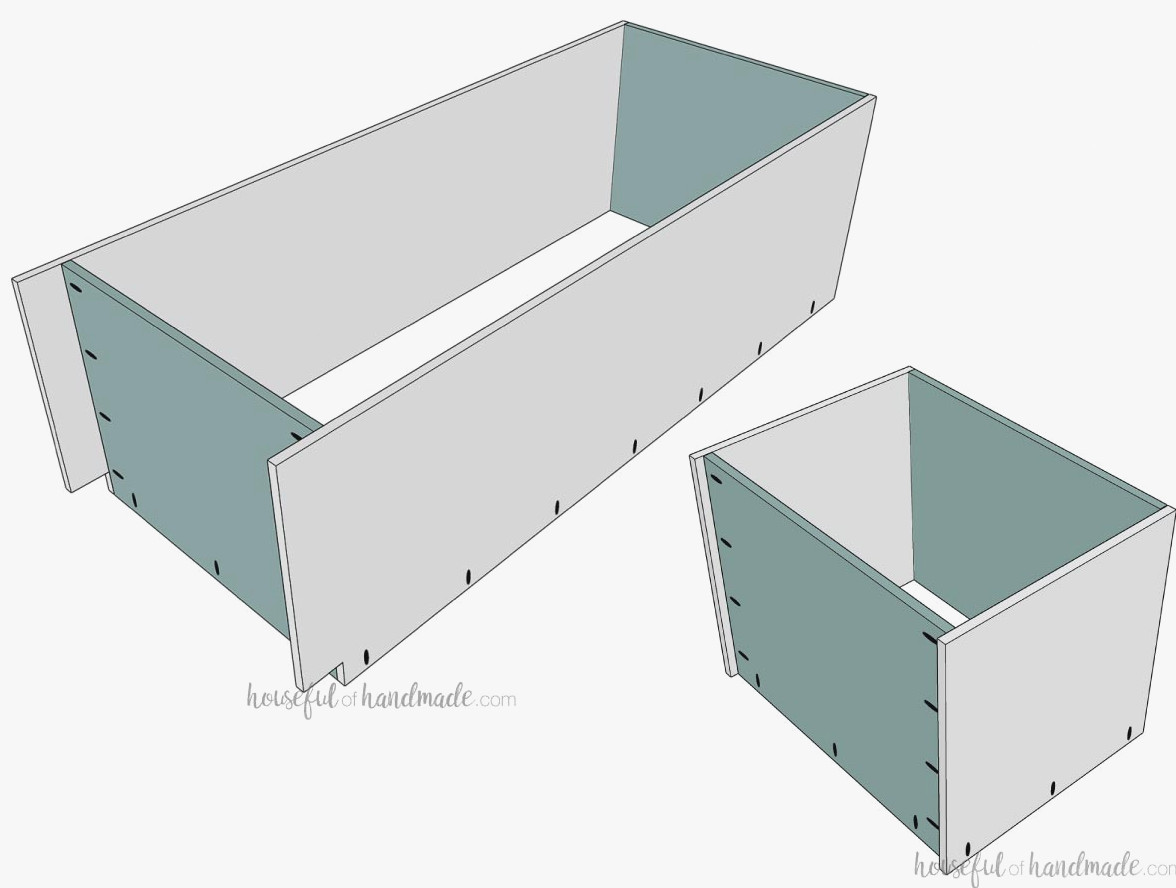
For the lower cabinet, position the bottom piece so it aligns with the top of the toe kick or kickboard (or with the bottom of the side board when using a 2×4 toe-kick base).
Fasten it with wood glue and pocket hole screws. Use corner clamps to ensure the joint forms a 90 degree angle.
Next, install the top piece so it sits flush with the upper edges of the sides.
On the upper pantry cabinet, raise the bottom piece from the bottom edges of the sides so the shelf top aligns with the top of the face frame. For example, with a 1 1/2″ wide face frame, attach the bottom piece so its top edge sits 1 1/2″ above the bottom of the sides.
In frameless upper cabinets, the bottom piece should align flush with the bottom edges of the sides.
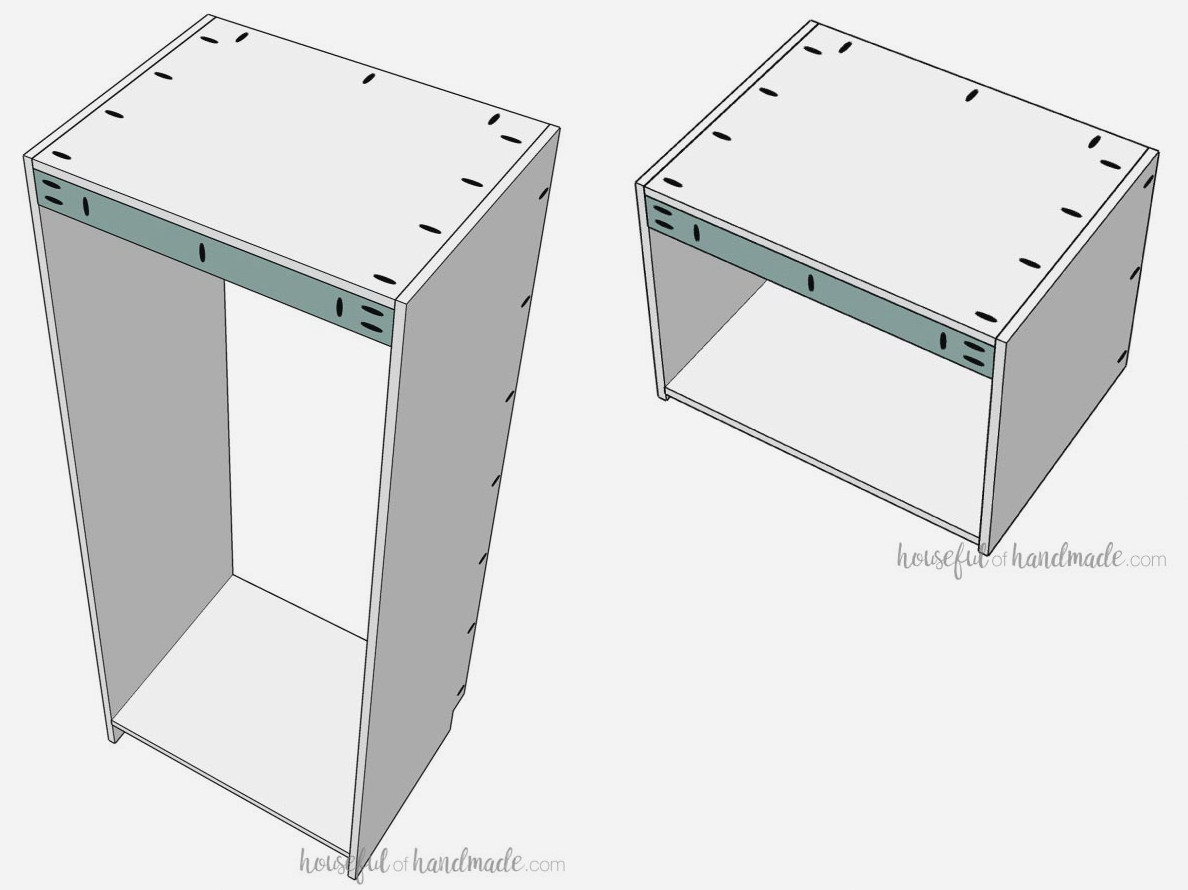
Install the support piece, which will be used to fasten the cabinet to the wall. Cut it from plywood scraps. Make it 3-4″ thick.
Position the support along the back of the box near the top, directly beneath the top piece. Secure it with pocket holes and 1 1/4″ pocket hole screws.
I also prefer fastening it to the top piece with a couple of pocket holes along the edge.
Secure the back using wood glue and finishing nails.
If the sides of your cabinet will be exposed, consider routing a groove into the back so the panel can fit inside it. Alternatively, make one side panel slightly larger so it covers both the sides and the back panel.
If you prefer not to see the support pieces inside the cabinet, install the back panel in front of them. However, I think the supports blend well with the cabinet’s back. They are only visible when the doors are open.
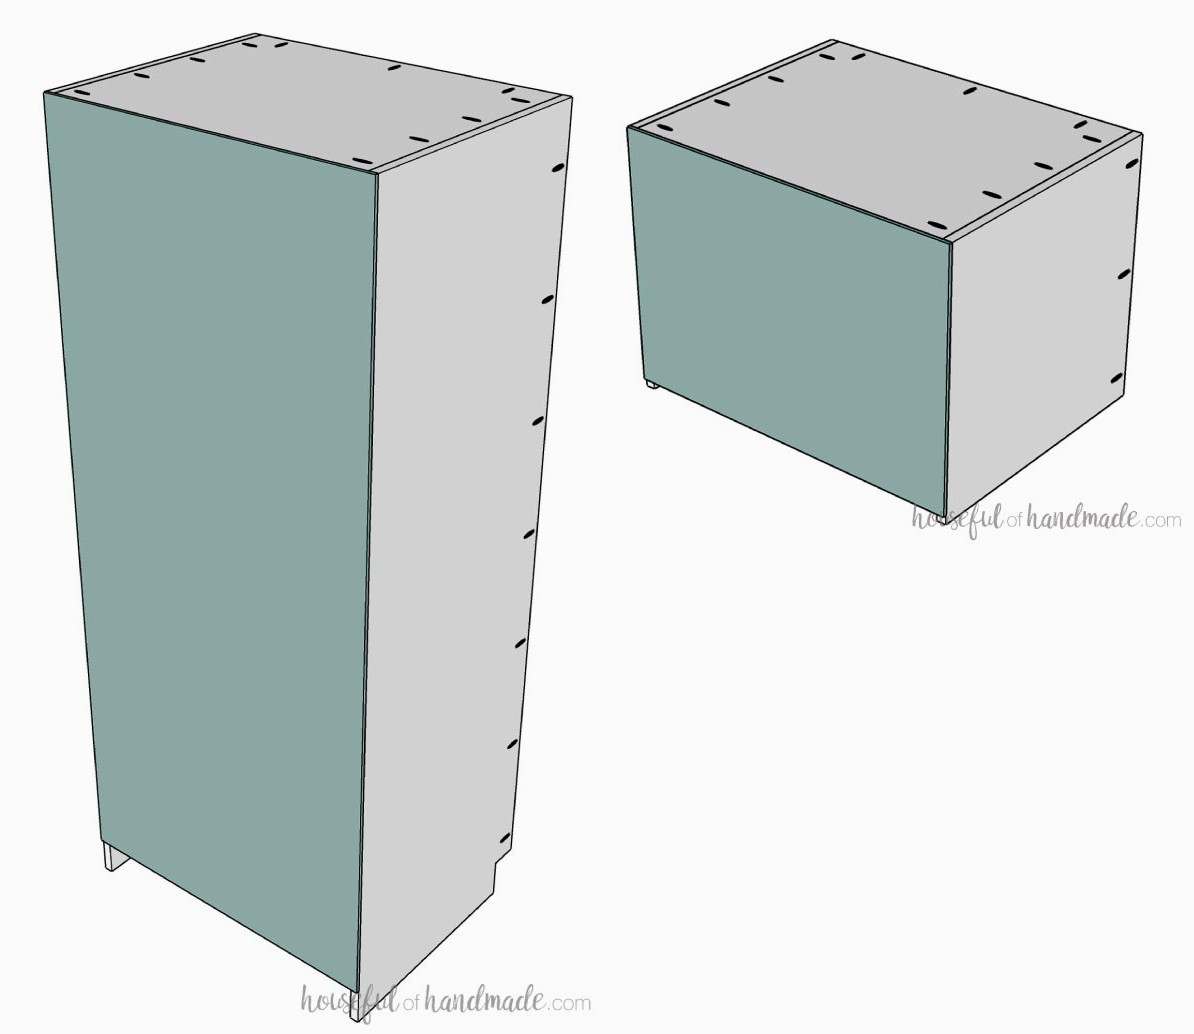
You can also cut and install the toe kick/kickboard front at this point. Better still, cut it oversized so it spans an entire row of cabinets.
Your base cabinet carcass is now complete!
If you are building face frame cabinets, continue with the following steps. For frameless cabinets, move ahead to Step 4.
STEP 3- Assemble the Face Frame
Prepare the rails and stiles for the face frame. At each end of the rails, drill pocket holes intended for 3/4″ material.
Position the rails between the stiles, keeping them even with the top and bottom edges. Apply wood glue and drive in 1 1/4″ pocket hole screws.
While fastening the frame, use a face frame clamp to hold the front flush and firmly in place.
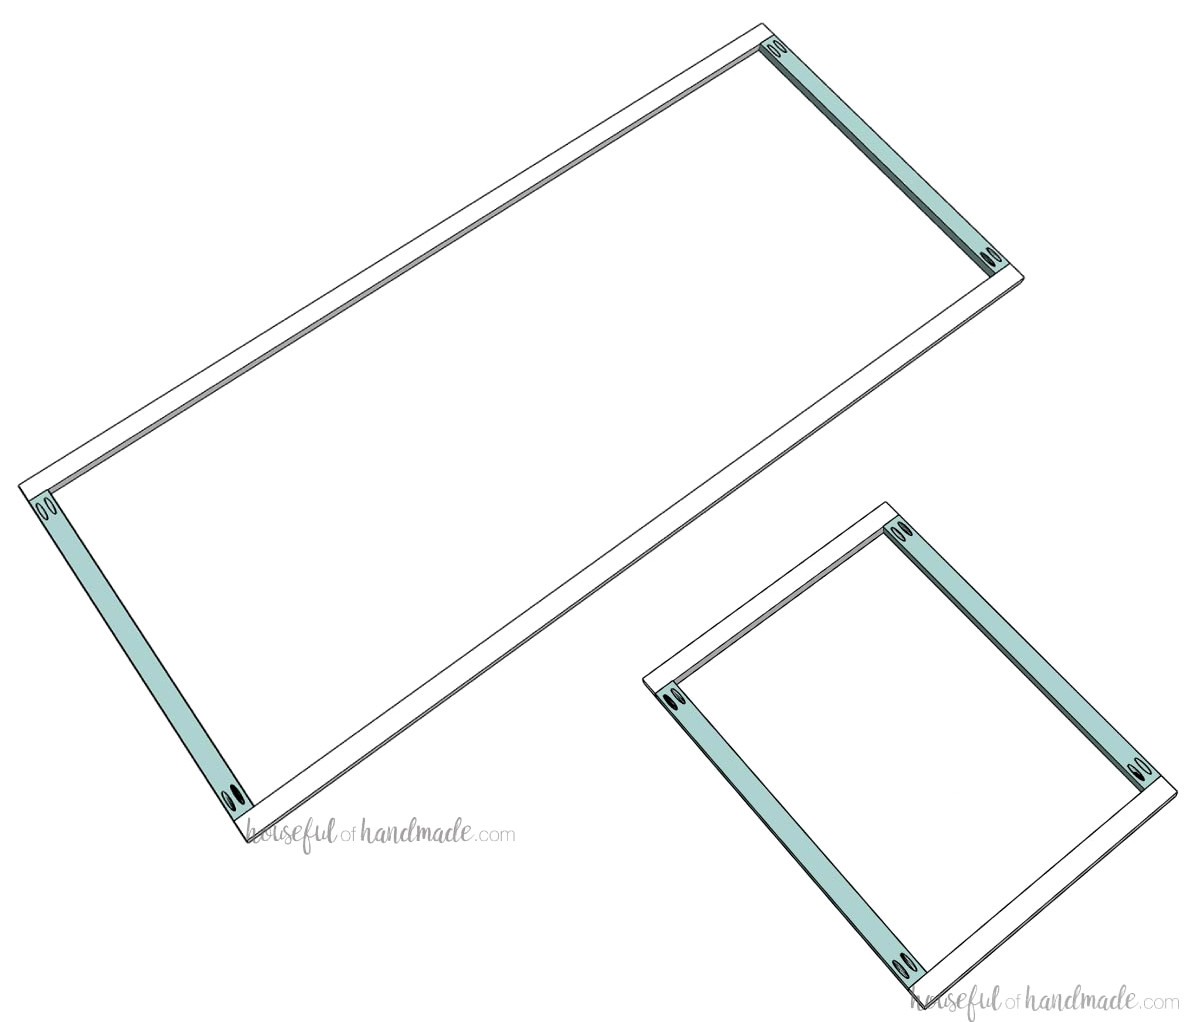
The face frame can now be mounted to the front of the cabinet box.
The face frame should extend 1/4″ beyond both sides of the cabinet. Be sure its top edge aligns evenly with the top of the cabinet box.
The upper edge of the bottom rail should also align with the top of the bottom shelf.
Apply a small amount of wood glue to the plywood front, then fasten the face frame using the pocket holes previously drilled in the cabinet sides and base along with 1 1/4″ pocket hole screws.
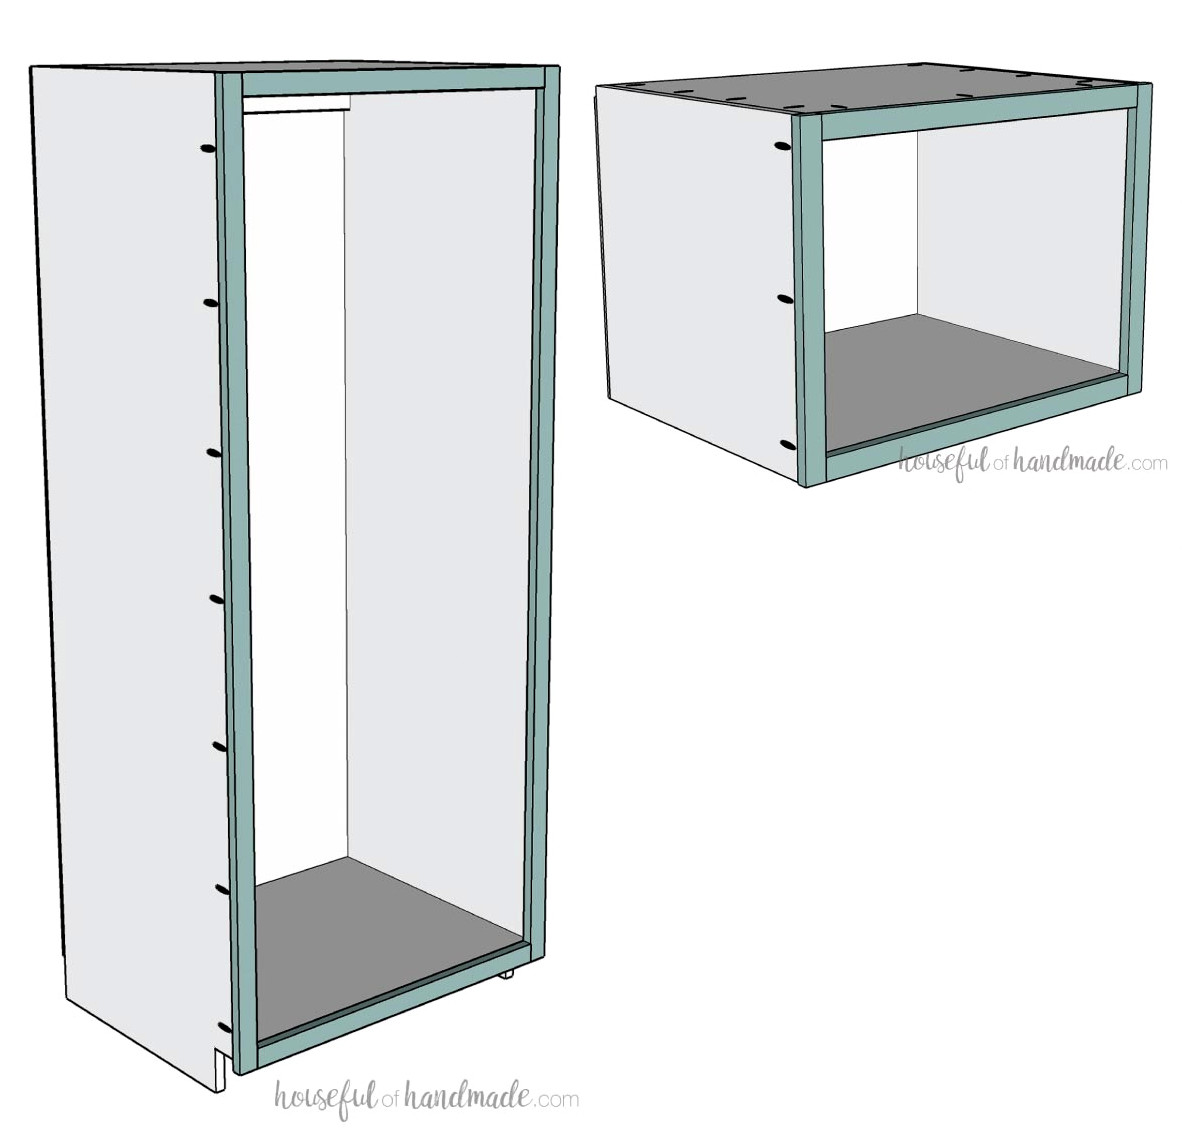
As another option, secure the face frame with 1 1/4″ brad nails. You will then have to fill the nail holes before applying paint. This method is not advised for stained cabinets.
STEP 4- Add Shelves or drawers
To maximize the storage space in your pantry cabinet, add adjustable shelves, drawers, or a mix of both.
Learn how to build drawers for your pantry here.
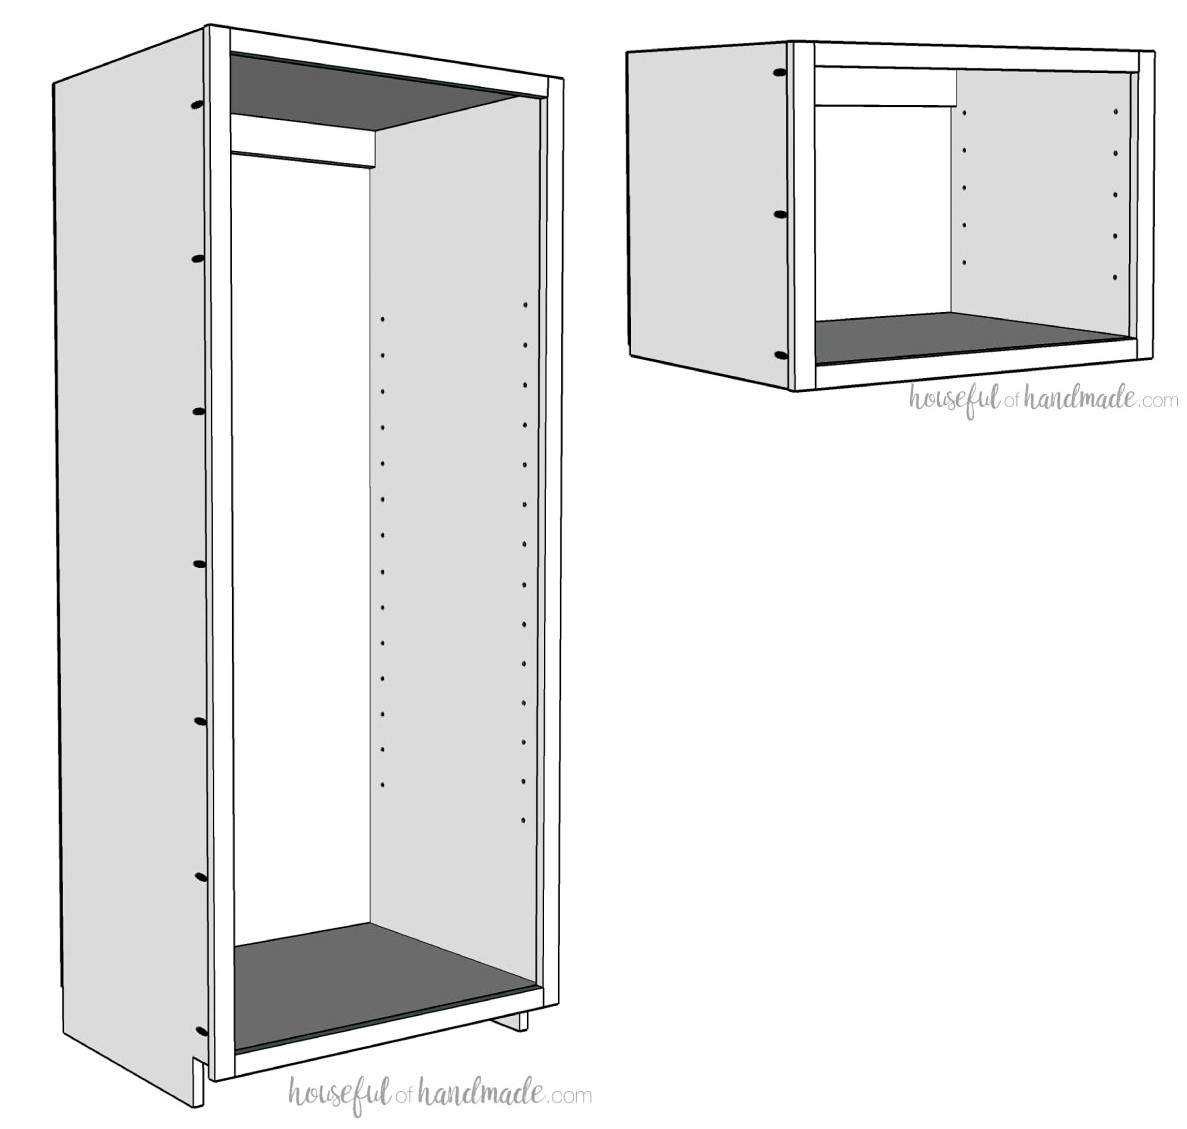
You have numerous options for installing adjustable shelves in DIY cabinets. In my experience, the simplest and most affordable method is using shelf pins with a basic shelf pin jig.
I rely on theKreg shelf pin jigto make shelf pin holes quickly. The jig includes two bit options (5mm and 1/4″), so verify that your pins match the bit size you have (or purchase both).
Shelf pins come in several designs, ranging from straight cylinders to L-shaped versions. I like theL shaped pinsbest. The shelves help keep the pins secured in the cabinet sides, resulting in very stable shelves.
When creating the holes, you can skip drilling approximately 6″ from the bottom and top unless you require an especially short shelf section. Instead, place a scrap piece of wood beneath theshelf pin jigas a spacer, ensuring that the pin holes remain consistent across all 4 rows.
STEP 5- Add doors
Doors are required to complete the pantry box. They conceal the contents while helping keep everything clean and free of dust.
You can construct cabinet doors in many styles. Before selecting a design, though, make sure you understand cabinet door dimensions and hinges.
After establishing the correct door measurements, create your own DIY shaker-style cabinet doors or simple slab doors using plywood. For an extra decorative touch, you could also make glass-panel cabinet doors.
After building the doors, follow this tutorial to mount them with concealed hinges.
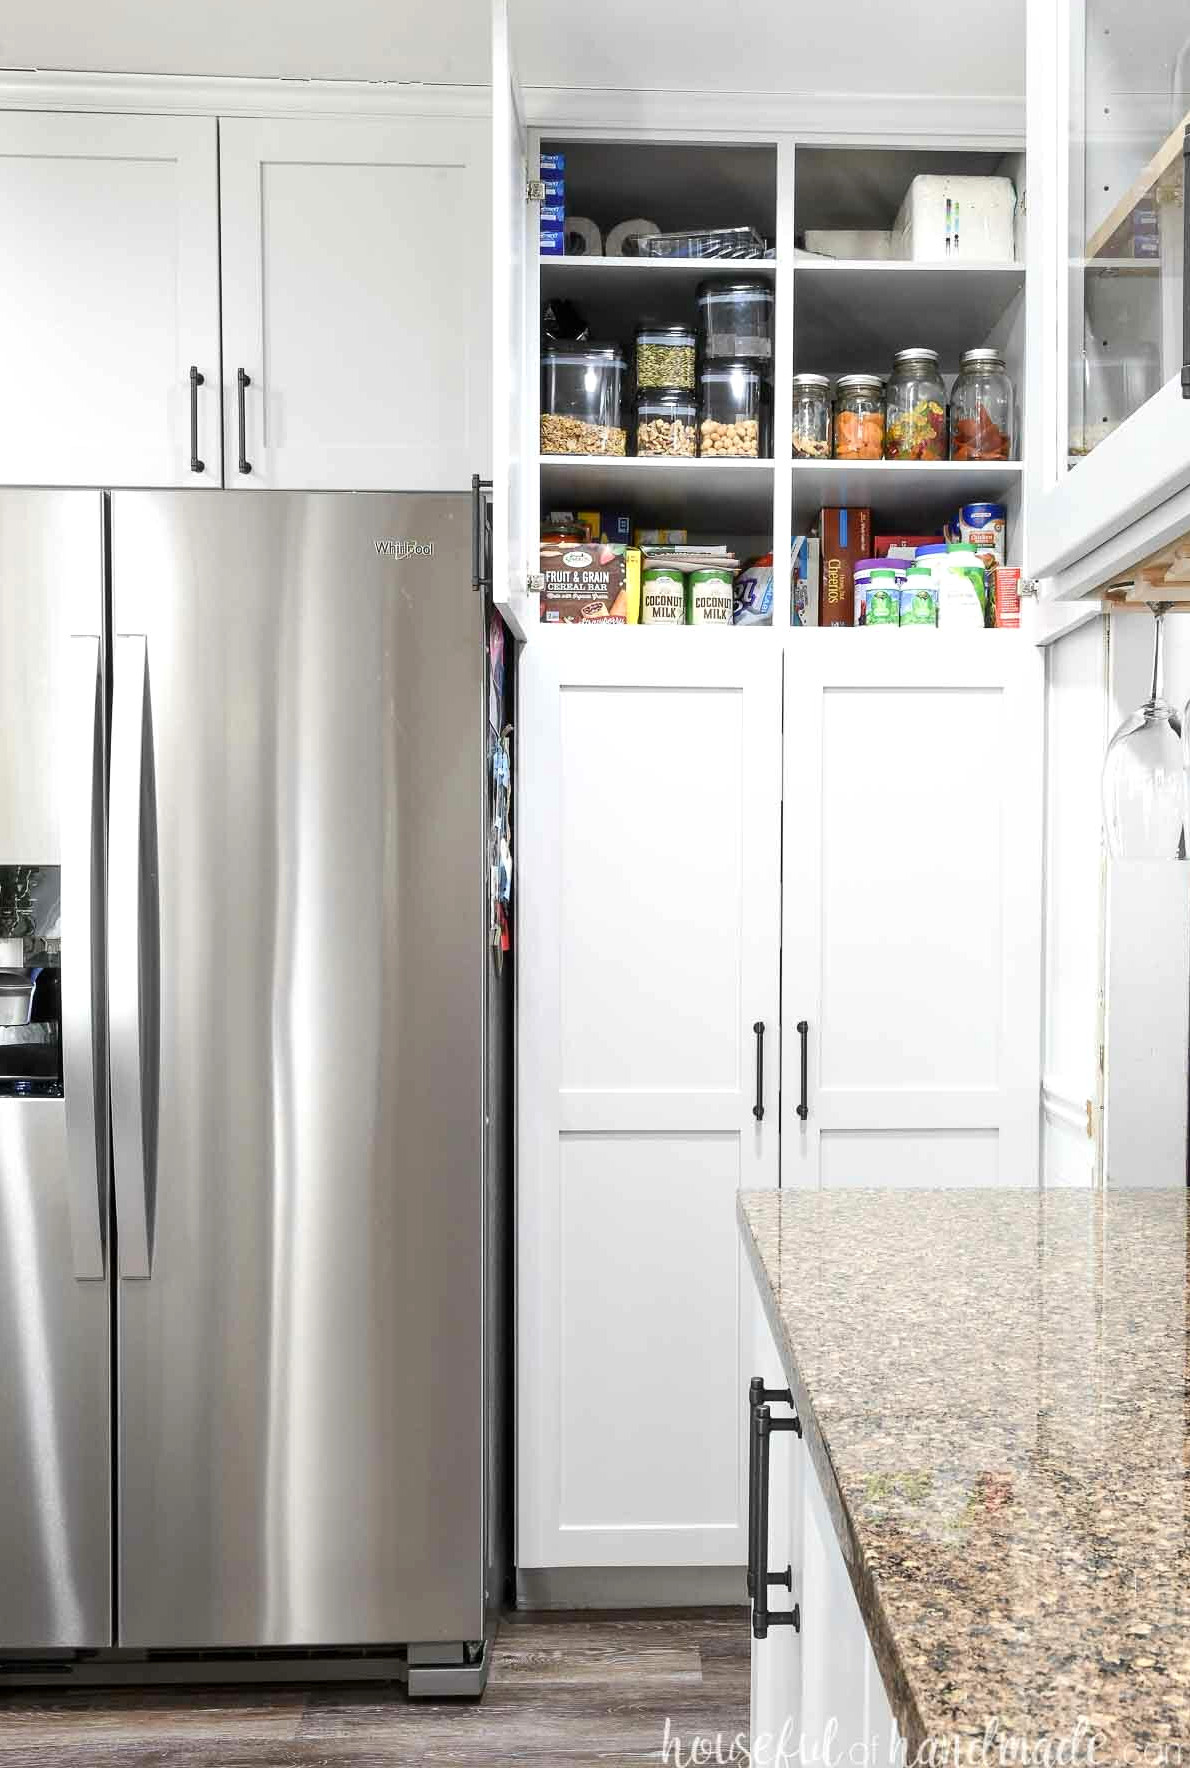
If you want to include drawers in your pantry, learn how to make easy DIY drawers 3 ways here. You can then learn to install cabinet doors here.
Your cabinet is ready for installation.
Don’t Forget to Grab the Printable PDF Plans Here!
Premium cabinet plans include:
- Suggested Tools
- Shopping guide
- How to determine a cut list for custom cabinets
- Detailed instructions with 3D renderings
- Plywood arrangement tips and examples
- Cabinet construction tips & techniques
- Useful resources
- BONUS: Cabinet cut list calculator
- BONUS: Cut lists for standard-size cabinets
- BONUS: 3D SketchUp file for a basic cabinet
Tips for a Professional Cabinet that are Easy to Install
1-Use a router to create small chamfers along the side edges of the face frames. This makes imperfectly flush cabinet installation less noticeable.
2-For cabinet sides that will be visible, cut 1/4″ panels to cover them. These panels conceal the pocket holes and bring the face frame side even with the cabinet.
3-Rather than cutting separate toe kick panels for each cabinet, make one panel long enough to cover an entire cabinet section. This removes an additional edge that must be aligned precisely.
4-Construct the cabinet box from pre-finished plywood, then simply paint or finish the face frames before installation. Seehow to achieve a smooth professional paint finishon your cabinets.
5-Install a center stile in wide base cabinets for added middle support and easiercabinet doorinstallation (you will not need to worry as much about the center reveal).
If you have questions or notice anything I missed, send me a message and I will do my best to help. I want you to feel confident building your own cabinets as well!