Make the most of every corner with a DIY bifold corner cabinet.
Bifold corner cabinets are an excellent way to add storage to your next cabinetry project, whether you are building a DIY kitchen, built-ins, vanity, or integrated desk.
This style of corner cabinet occupies the entire corner while creating useful storage space. For easier access to items at the back, you can also place a pie-shaped lazy Susan inside the cabinet.
Another option is to install adjustable or fixed shelves in your corner base cabinet. I prefer this approach for keeping larger kitchen essentials, such as small appliances or serving platters.
If a bi-fold cabinet does not suit your needs, explore the other DIY corner cabinet styles to choose the best option for your project.
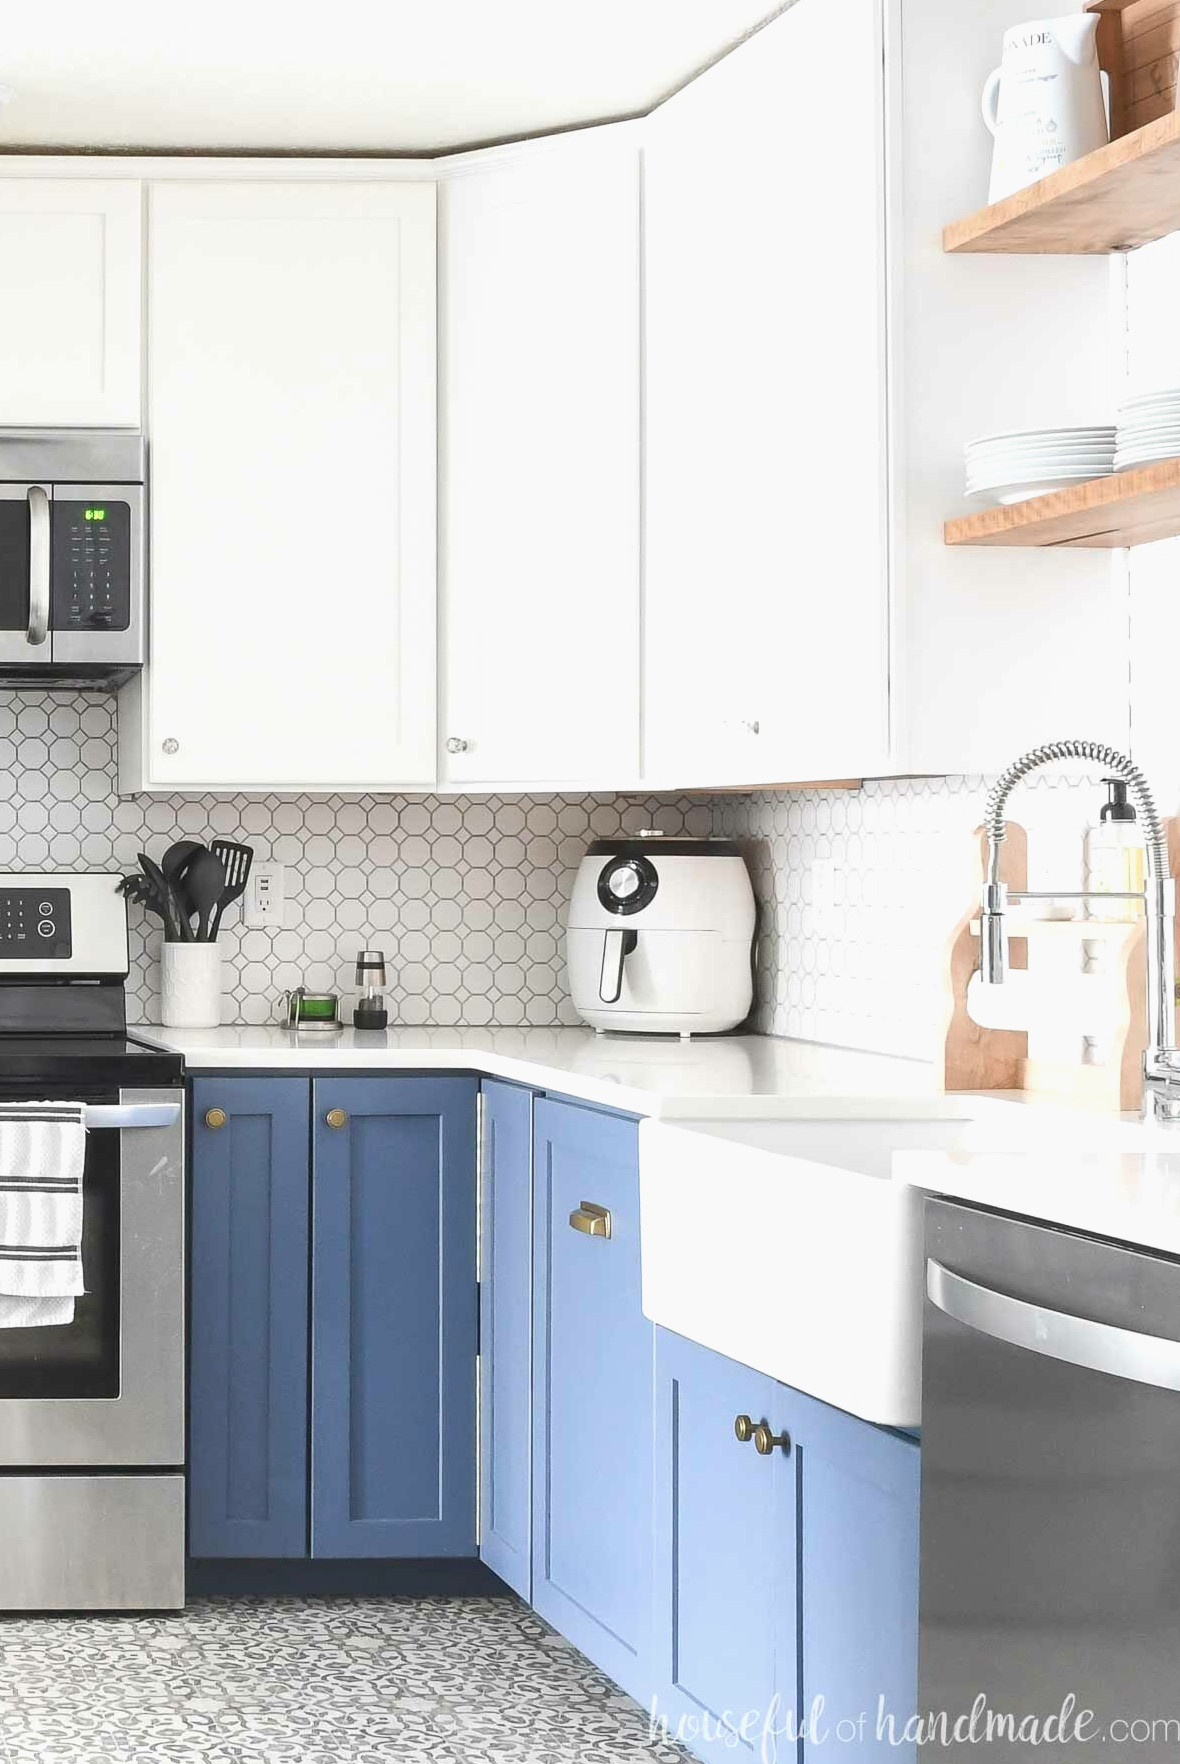
Be sure to read all about how to build base cabinets to understand the fundamentals for every cabinet, including toe-kick dimensions and cabinet height/depth. You should also review the distinctions between cabinet styles in How to Build DIY Cabinets.
Advantages of a Bifold Corner Cabinet
A bi-fold corner cabinet is an ideal solution for adding substantial storage to an unused corner.
These cabinets are simple to construct, with the only angled cuts required at the back. Even if your angles are slightly imperfect, they will be difficult to notice!
A bifold cabinet provides plenty of corner storage. Only a small angle is needed at the rear so the cabinet can fit snugly against the wall corner. Aside from that, the whole interior can be used for storage.
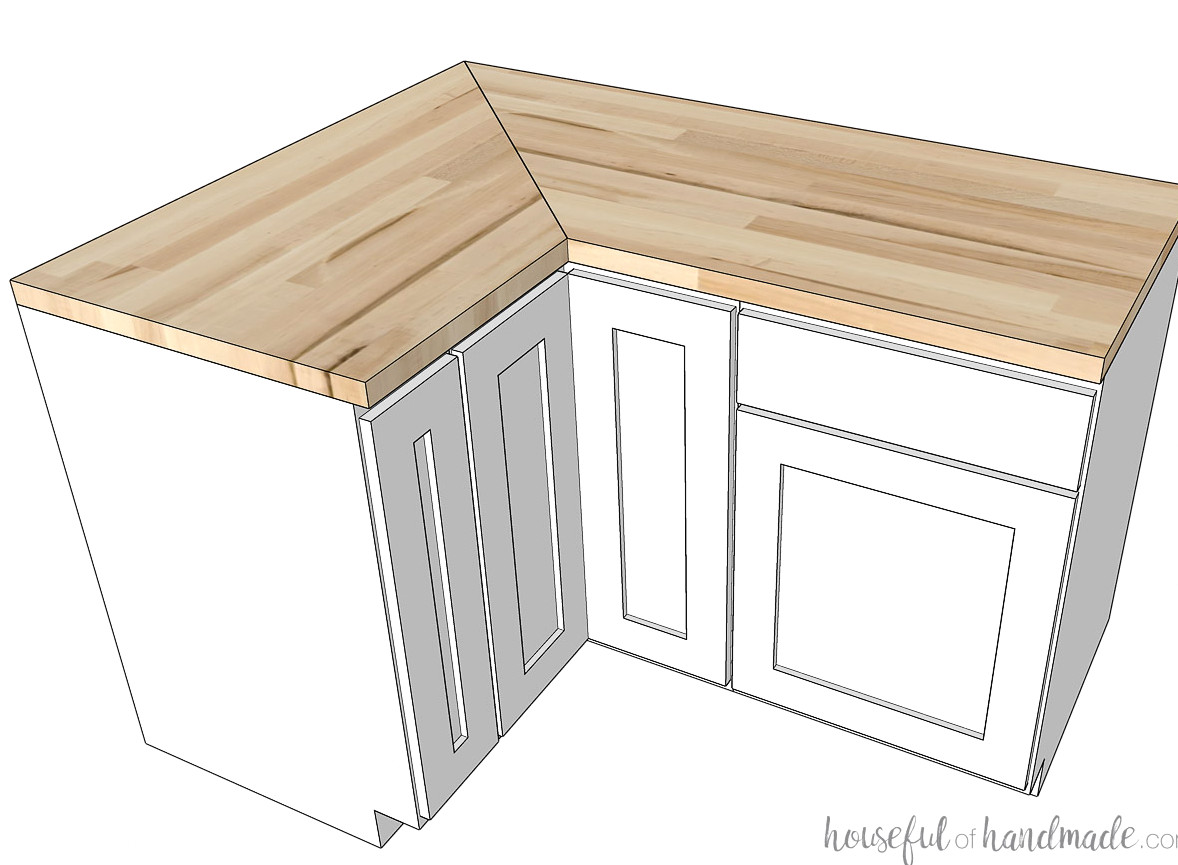
The cabinet’s front opening is smaller than its interior space, so keep that limitation in mind when choosing which items to store inside.
You can install a lazy Susan style turntable in a bifold corner cabinet for easier access to items in the rear. This simple addition transforms the cabinet into a generous storage area.
Lazy Susans have weight capacities, so choose a model that can support the items you intend to keep inside. I find turntables especially useful for organizing small, lightweight pantry goods.
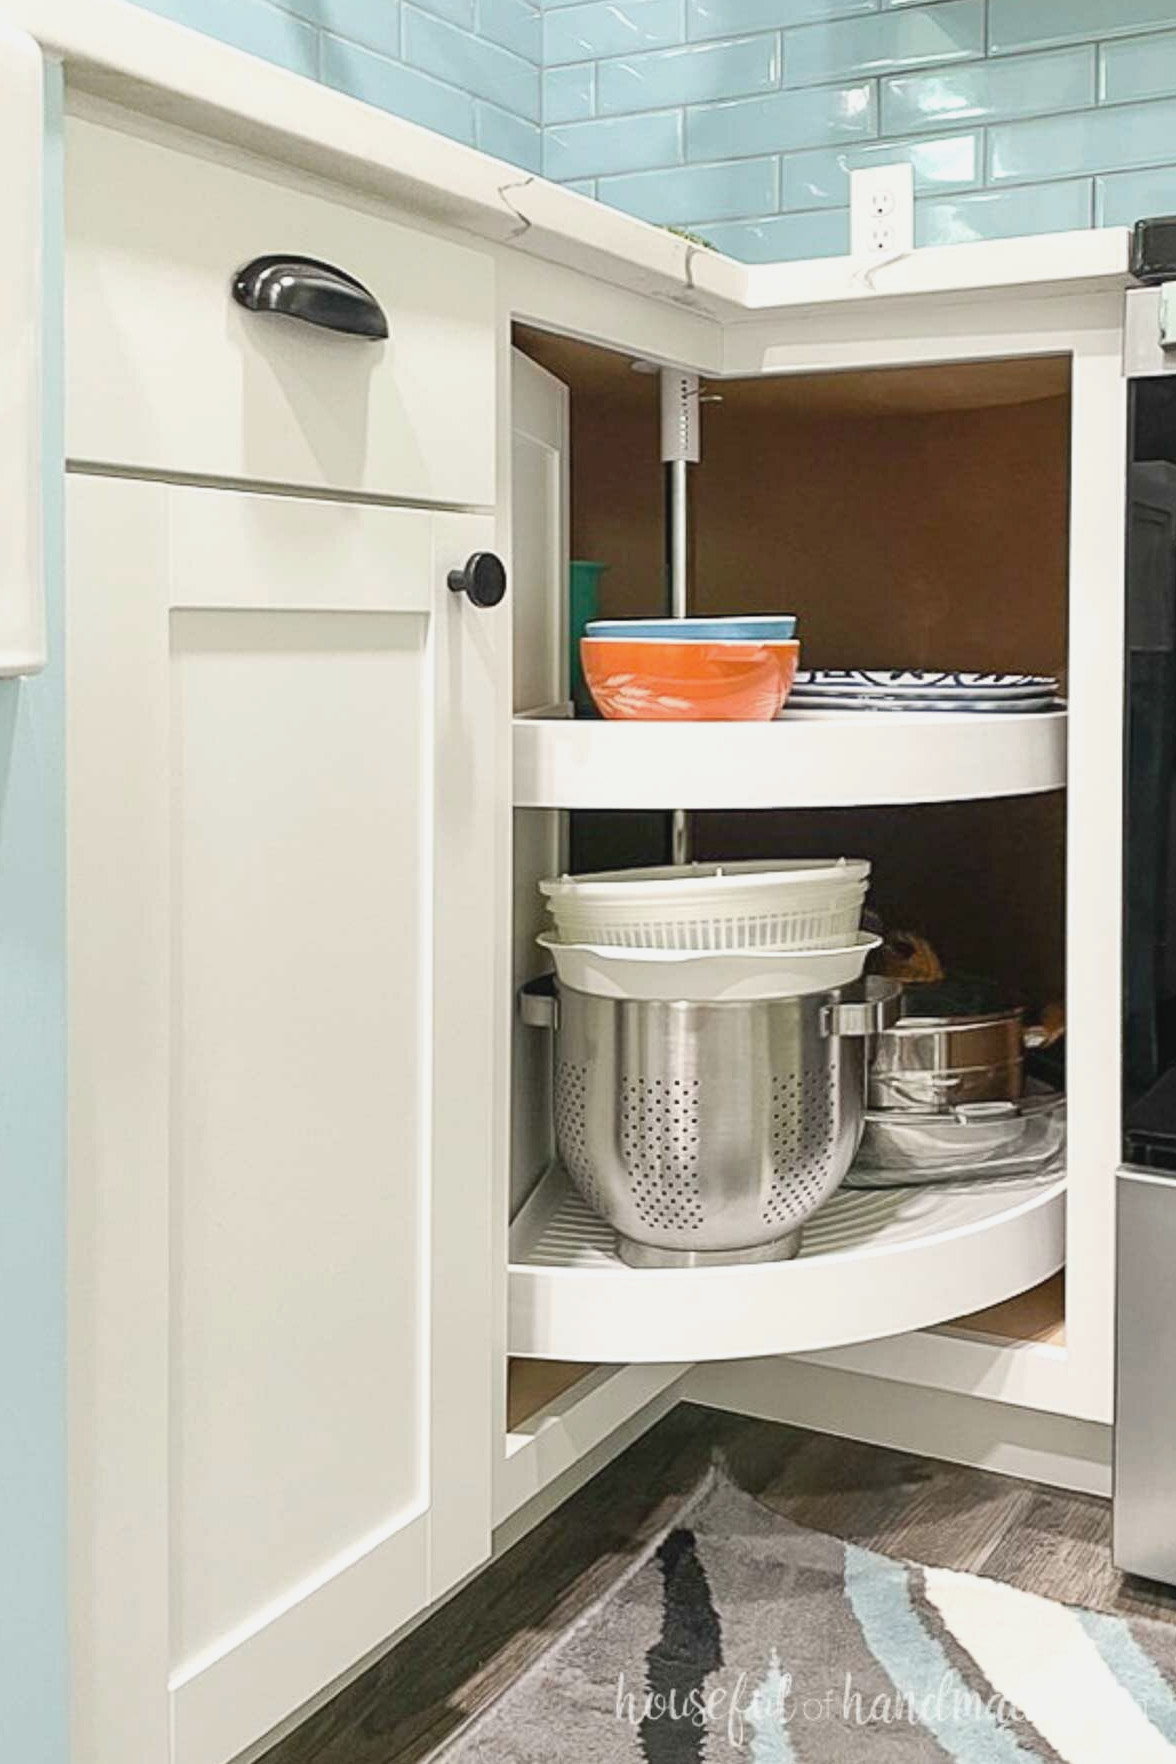
Still, to keep my countertops free of clutter, I used my DIY bifold corner base cabinet in my most recent kitchen to put away small appliances.
I placed the appliances I used most often near the front. Larger items are less likely to disappear in a corner cabinet, and they can be moved aside quickly when I need to reach something in the back.
Personalized Corner Cabinet
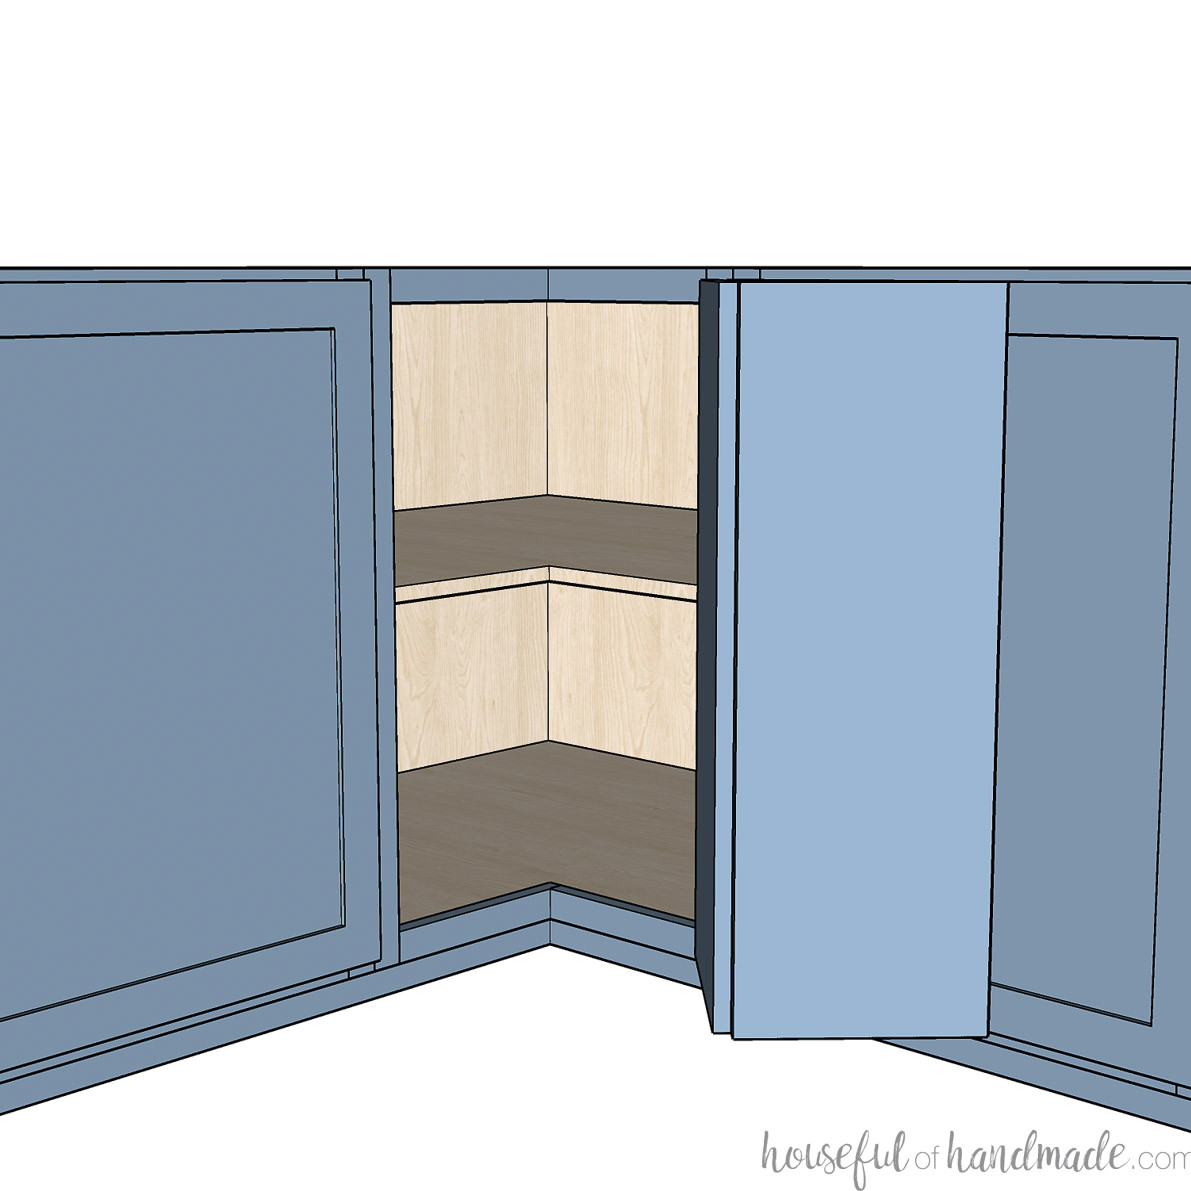
The greatest benefit of making your own corner base cabinet is the ability to design it in whatever size or layout works best for you!
Corner base cabinets are commonly 36″ X 36″, creating an opening of roughly 12″ x 12″ (or 15″ across).
Building a wider cabinet results in a larger opening for reaching the stored items. You can also make the cabinet rectangular rather than square, such as a 36″ x 48″ base cabinet.
Consider what you need to store, then construct a cabinet that accommodates the items you intend to put inside.
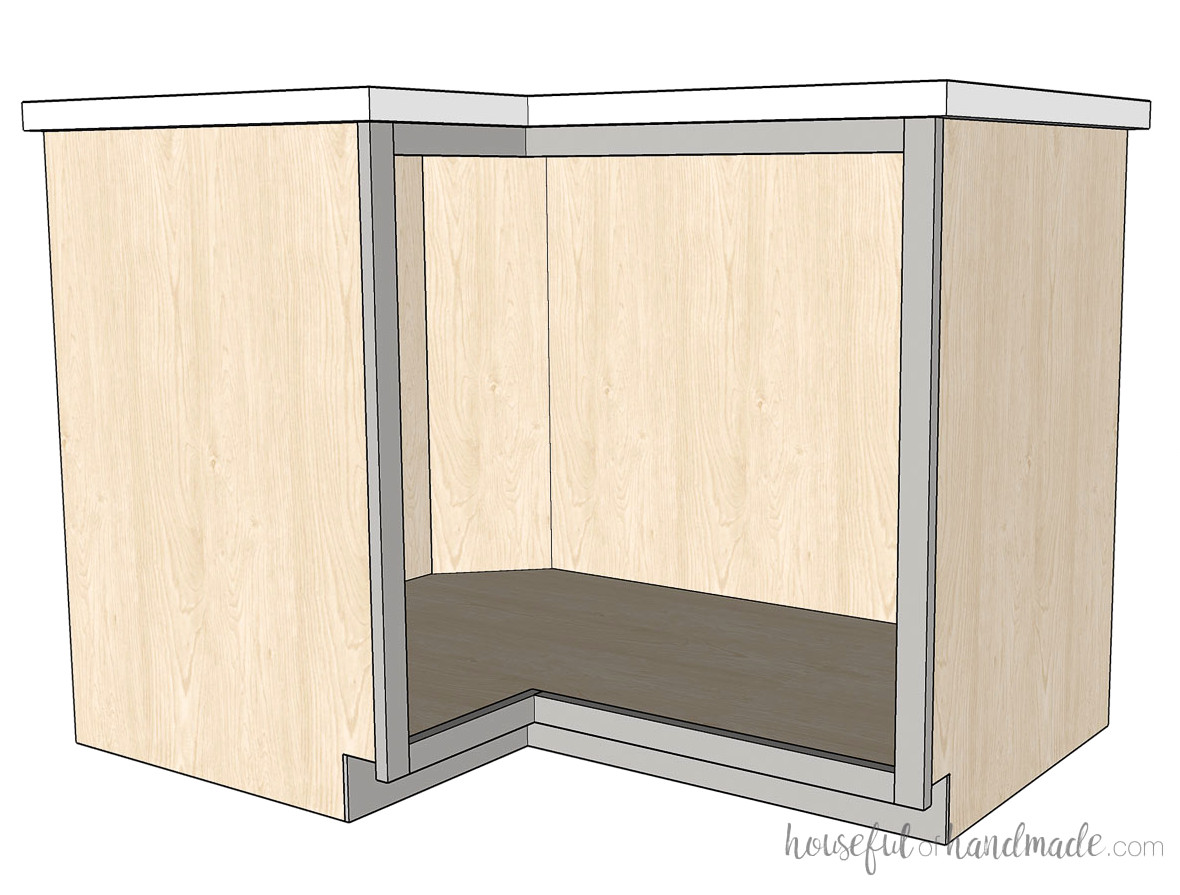
Corner Base Cabinet Plans
After answering the questions above, you can begin drawing plans for your own bi-fold base cabinet! I will guide you through creating plans for a custom corner cabinet so you can move on to construction with confidence.
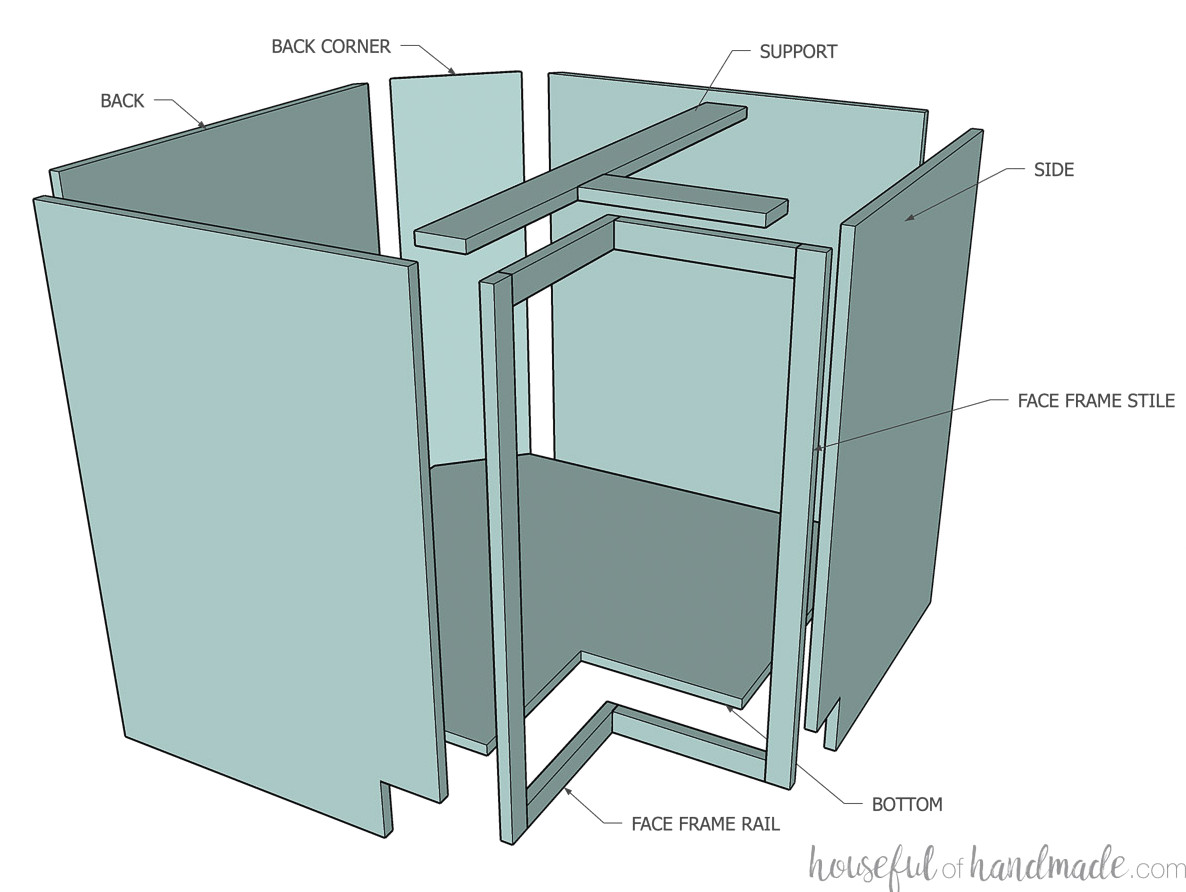
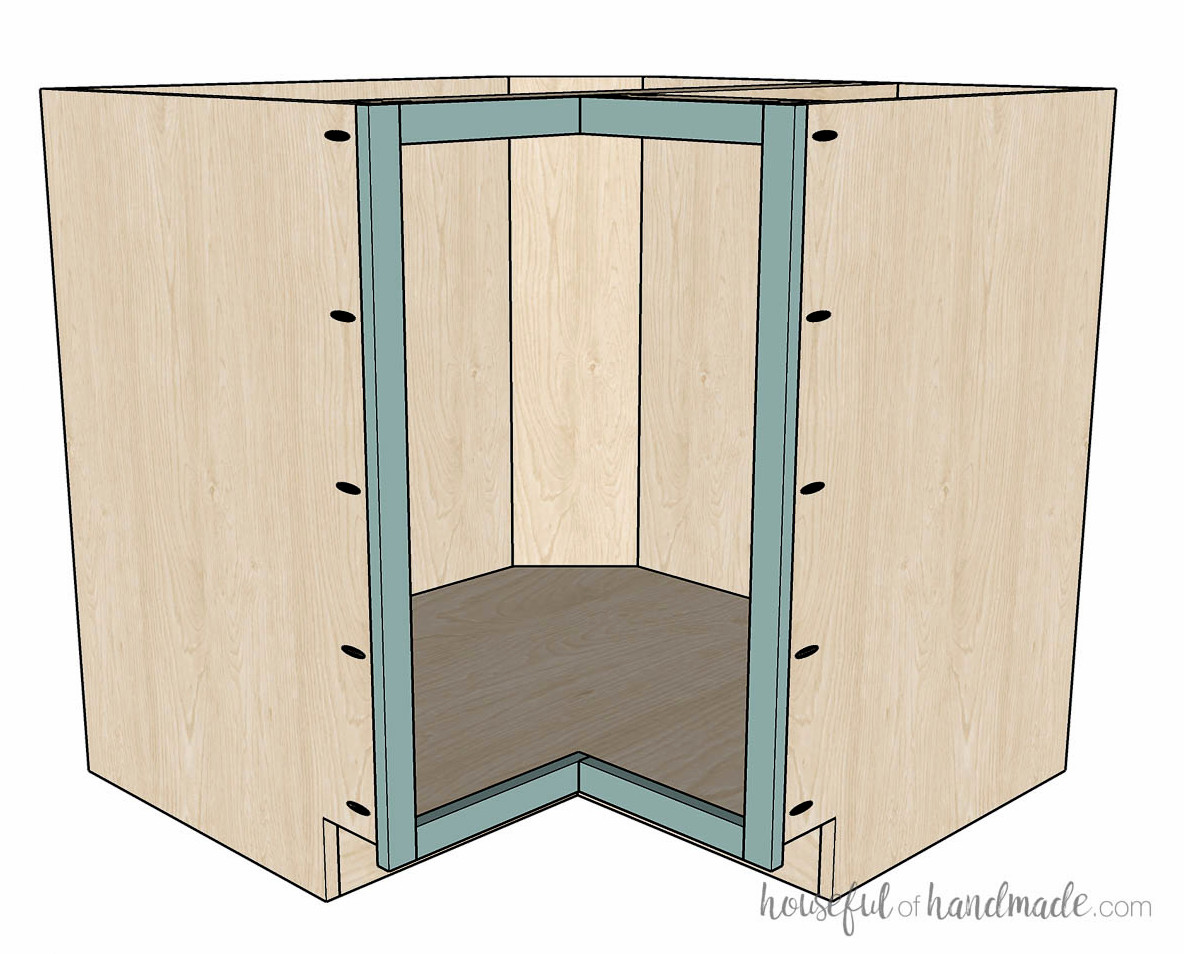
Every bi-fold base cabinet consists of the following components:
- 2 side panels
- 2 rear panels
- 1 bottom panel
- 1 back corner panel
- 2 brace pieces
- Optional: toe kick
- Optional: face frame
- 2 face frame stiles
- 4 face frame rails
How to Determine the Cabinet Cut List
Refer to the charts below to determine the measurements for every piece of your face-frame or frameless bi-fold corner base cabinets. All dimensions are listed in inches.
Cabinet width means the distance from the wall to the cabinet’s outer edge on each side of the corner, whether right or left. Cabinet depth matches the depth of the base cabinets positioned on either side.
For instance, a standard 36″ x 36″ corner base cabinet has a right cabinet width (CWR) and left cabinet width (CWL) of 36″, while the cabinet depth measures 24″.
With square corner cabinets, the CWR and CWL measurements are identical. For a non-square corner cabinet, increase either the CWR or CWL to extend one side.
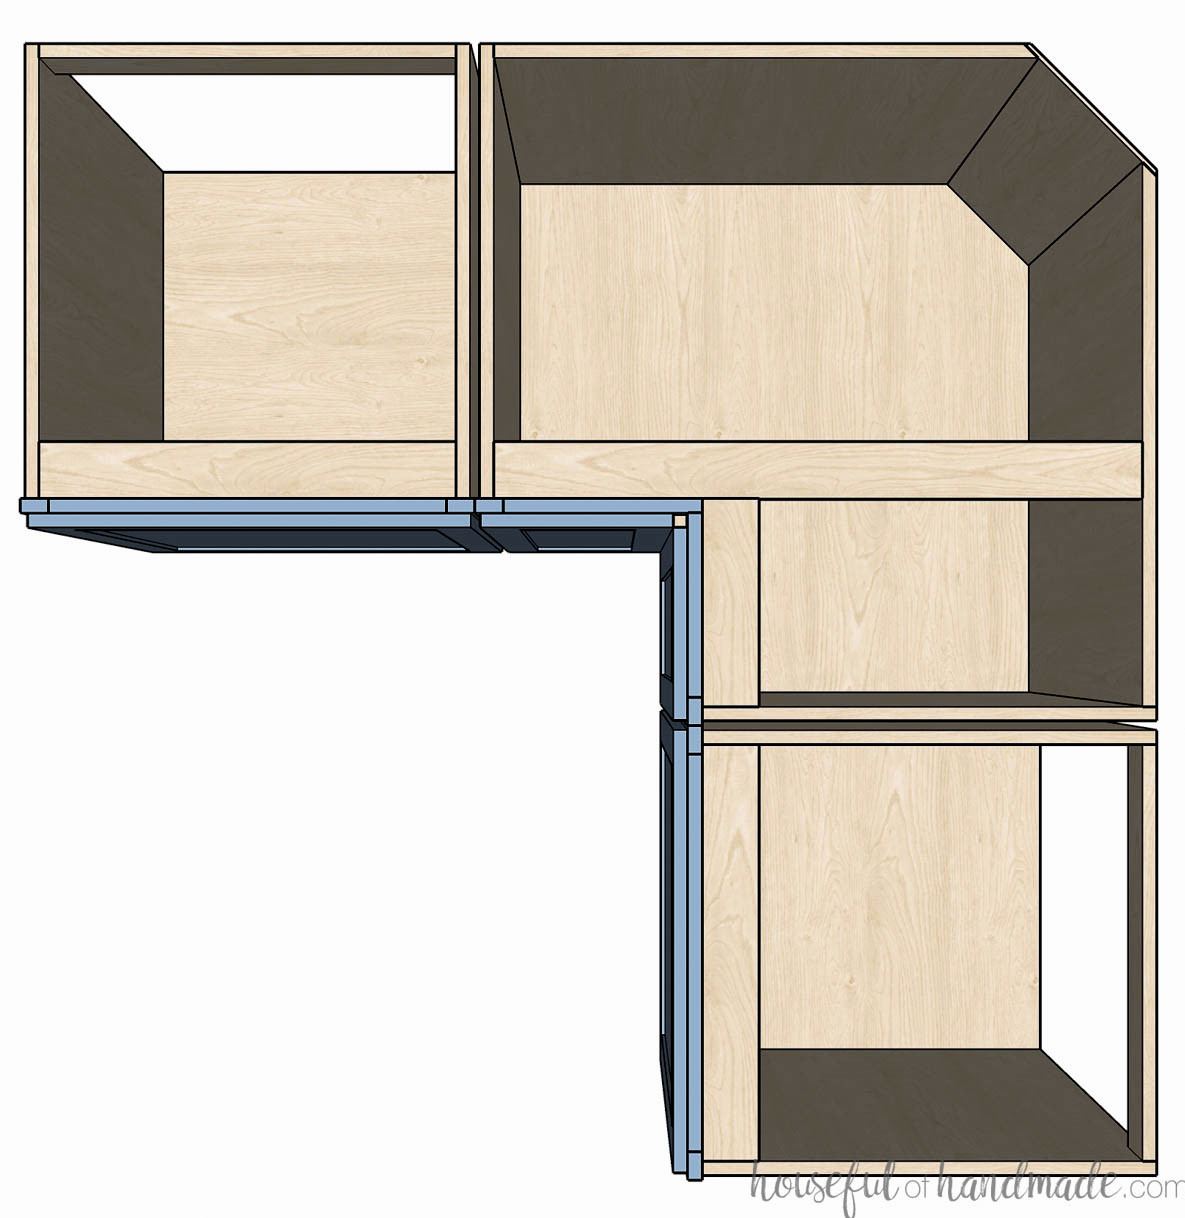
Back corner diagonal length (BDL) describes the distance from the corner along both sides where the rear portion will be trimmed. Use the same measurement on each side to create a 45-degree cut.
This step helps the cabinet sit firmly in the corner, since most corners are not completely square due to the drywall compound used to finish them.
For a shallower corner where items are less likely to get buried, cut a longer diagonal. If you plan to install a turntable, check its required dimensions so you do not remove too much from the corner.
Calculating the width of the back corner piece involves square-root math because the piece sits diagonally. The charts include the calculation, but the simpler approach is to assemble the box, measure the opening for the back piece, and cut it accordingly.
Face Frame Corner Cabinet Cut List
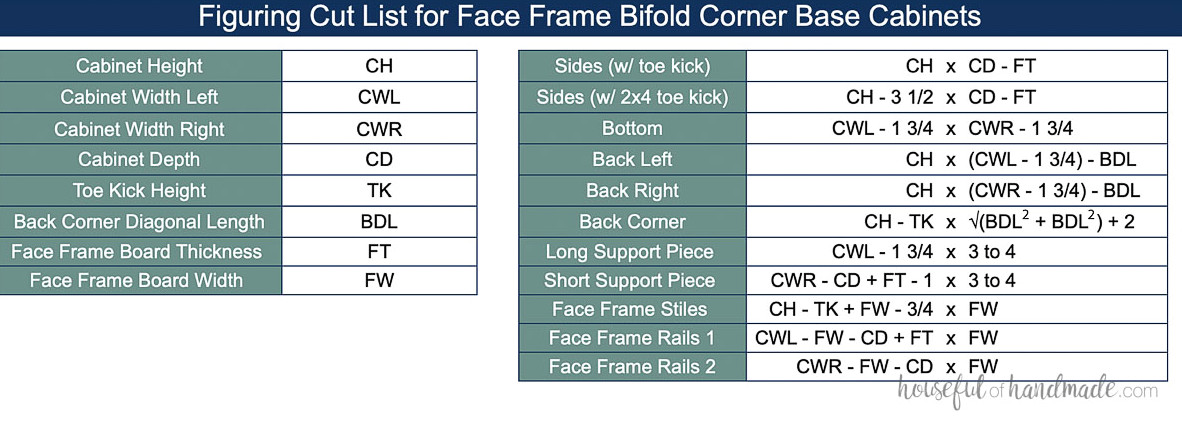
Key details for face frame cabinets:
- The face frames extend 1/4″ beyond the cabinet sides. This simplifies installation, but if the side of your corner base cabinet will be exposed, you must add a side panel (use 1/4″ plywood cut to match the exact dimensions of the base sides and fasten it in place) or modify your measurements to account for the additional 1/4″ on one side.
- If you plan to attach 1/4″ plywood to the backs of your other base cabinets (without setting it into a groove), the sides of the corner cabinet must be cut 1/4″ wider because they will not receive the backing in the same manner. Alternatively, cut every cabinet side to the same width (which is simpler when making several cabinets) and place a shim behind the corner cabinet when fastening it to the wall so the face frames sit flush.
Frameless Corner Cabinet Cut List
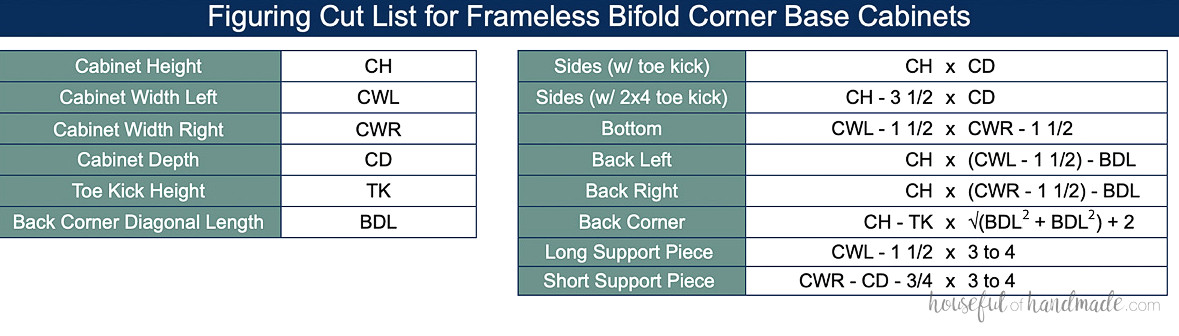
Key details for frameless cabinets:
- Plywood is not truly 3/4″ thick; it is generally a little thinner. Since plywood thickness can vary, I suggest pressing two pieces of the material you will use firmly together and measuring them. Replace the 1 1/2″ deduction for the bottom and support pieces with that measurement. This will produce more precise cabinet widths.
- When adding 1/4″ plywood to the backs of your other base cabinets (without placing it in a groove), cut the corner cabinet sides 1/4″ wider because their backing will be installed differently. You may also cut all the sides to one consistent width (more convenient for multiple cabinets) and use a shim while securing the corner cabinet to the wall so the fronts align flush.
How to Build a Bi-Fold Corner Base Cabinet Box
STEP 1- Cut out the pieces
Cut the plywood components based on the cut list.
Get the Premium PDF Woodworking Guide
PDF plans include- Instructions for Calculating the Cut List, Shopping List, Suggested Tools, Step-by-Step Directions with 3D illustrations & Useful Resources
BONUS- 3D SketchUp Model & Cut List Calculator
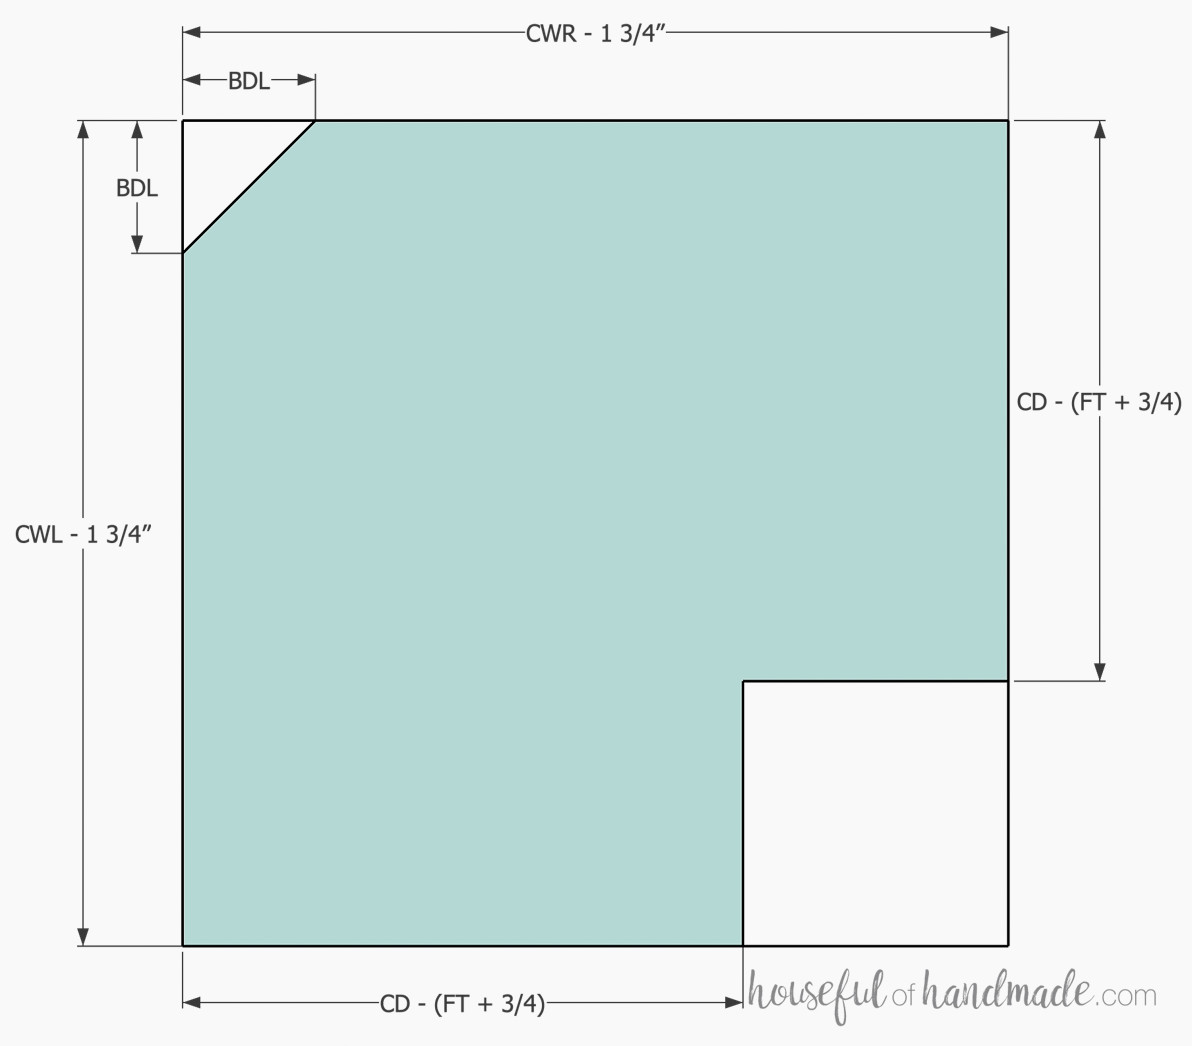
Use 3/4″ plywood for every cabinet box component except the rear corner piece. Trim the rear edges of the back pieces to a 45 degree angle so the back corner piece can rest flat.
Using a circular saw, jigsaw, or band saw, remove a 90 degree notch from the bottom piece. The sides should line up flush with the front edges of the side pieces.
In addition, cut the rear diagonal at a 45 degree angle approximately 4-8″ from the back.
For base cabinets with a toe kick, cut the notch into the front of both side boards. If you are constructing a 2×4 cabinet base, the side boards do not need notches (see the DIY base cabinet post for additional information).
STEP 2- Drill pocket holes
Adjust the pocket hole jig and drill bit for use with 3/4″ thick material.
Make pocket holes in these pieces:
- Along the entire perimeter of the bottom piece
- On the unangled side of each back piece
- Across the front of the side pieces
- At both ends of the support pieces
For face frame cabinets, drill pocket holes in these additional pieces:
- Across the front of the side pieces
- On both ends of the shorter face frame rails
- On one end of the longer face frame rails
STEP 3- Assemble the box
Apply wood glue (or melamine adhesive when using prefinished plywood) and 1 1/4″ pocket hole screws at every joint.
First, fasten the back pieces to the bottom piece. Confirm that the fronts are flush and that the rear angles transition smoothly into the diagonal cut.
With a 2×4 toe kick base, the bottom piece will sit flush. For a notched toe kick, position the bottom so it aligns with the lower edge of the toe kick notch.
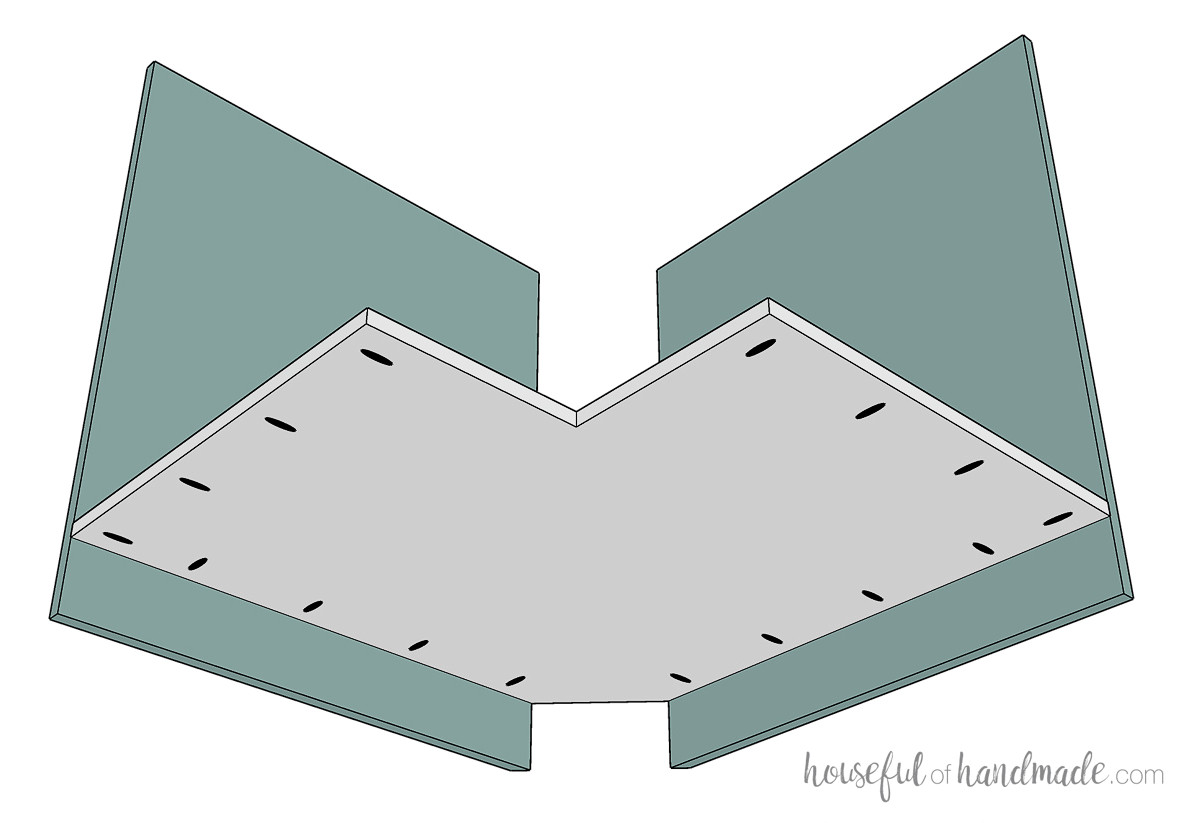
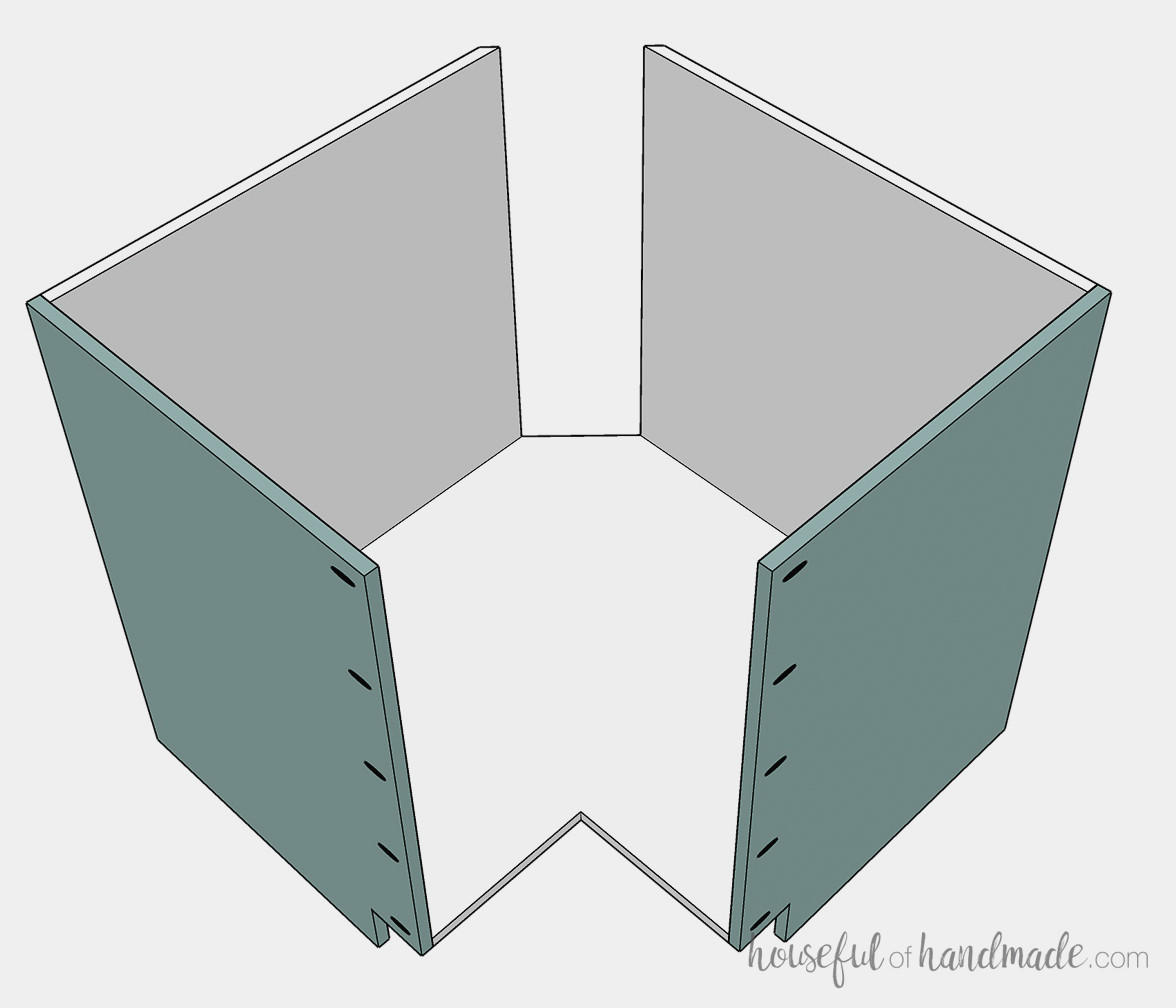
Next, install the side pieces.
Fasten them to the bottom and back pieces using the pocket holes drilled earlier.
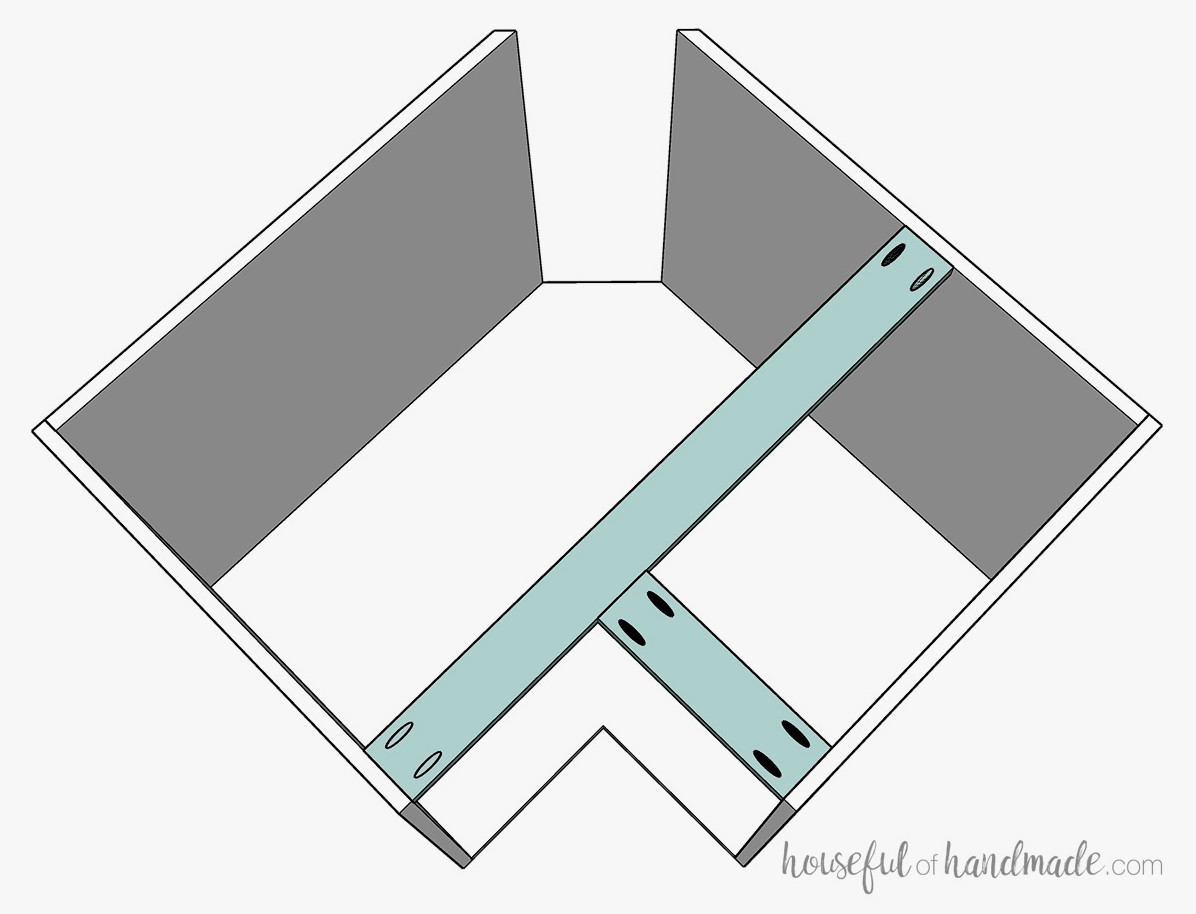
Install the two support pieces along the cabinet top and join them together.
They should replicate the 90 degree notch in the bottom piece and remain level with it.
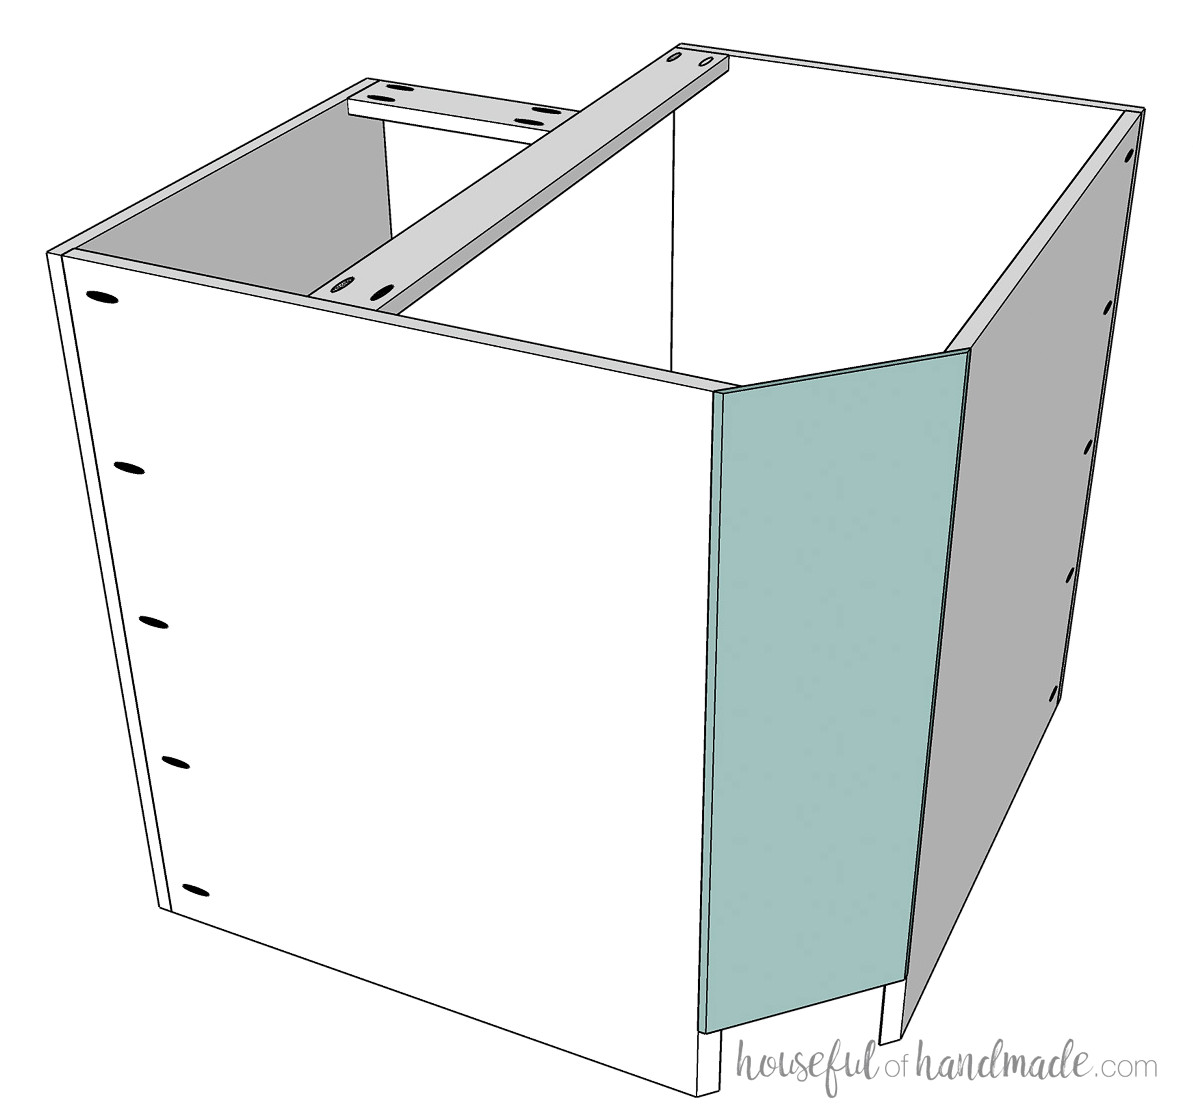
Complete the cabinet back with the 1/4″ thick corner back piece. Fasten it using brad nails.
Cut both sides of the back corner piece at a 45 degree angle. It also does not have to extend all the way to the floor; stopping it at the bottom piece will conserve lumber.
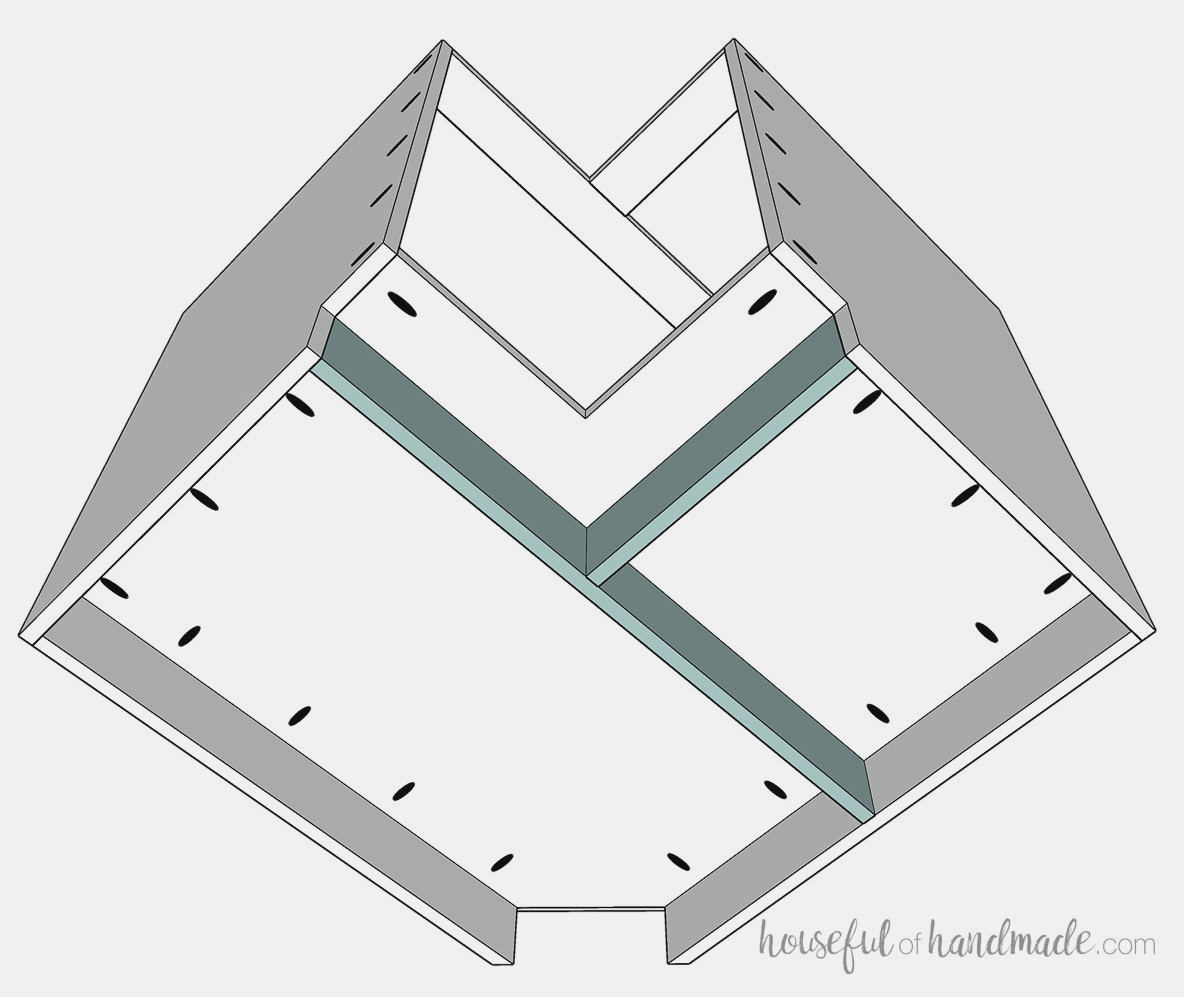
When using a notched toe kick, I suggest cutting one long strip of 1/4″ plywood to cover the cabinet fronts rather than trying to align several smaller toe kick pieces.
However, you will need to install several toe kick support pieces beneath the corner cabinet to fastenthe extended toe kick components.
Use leftover 3/4″ plywood pieces to form a rear support for your toe kick.
STEP 4- Put together the face frame
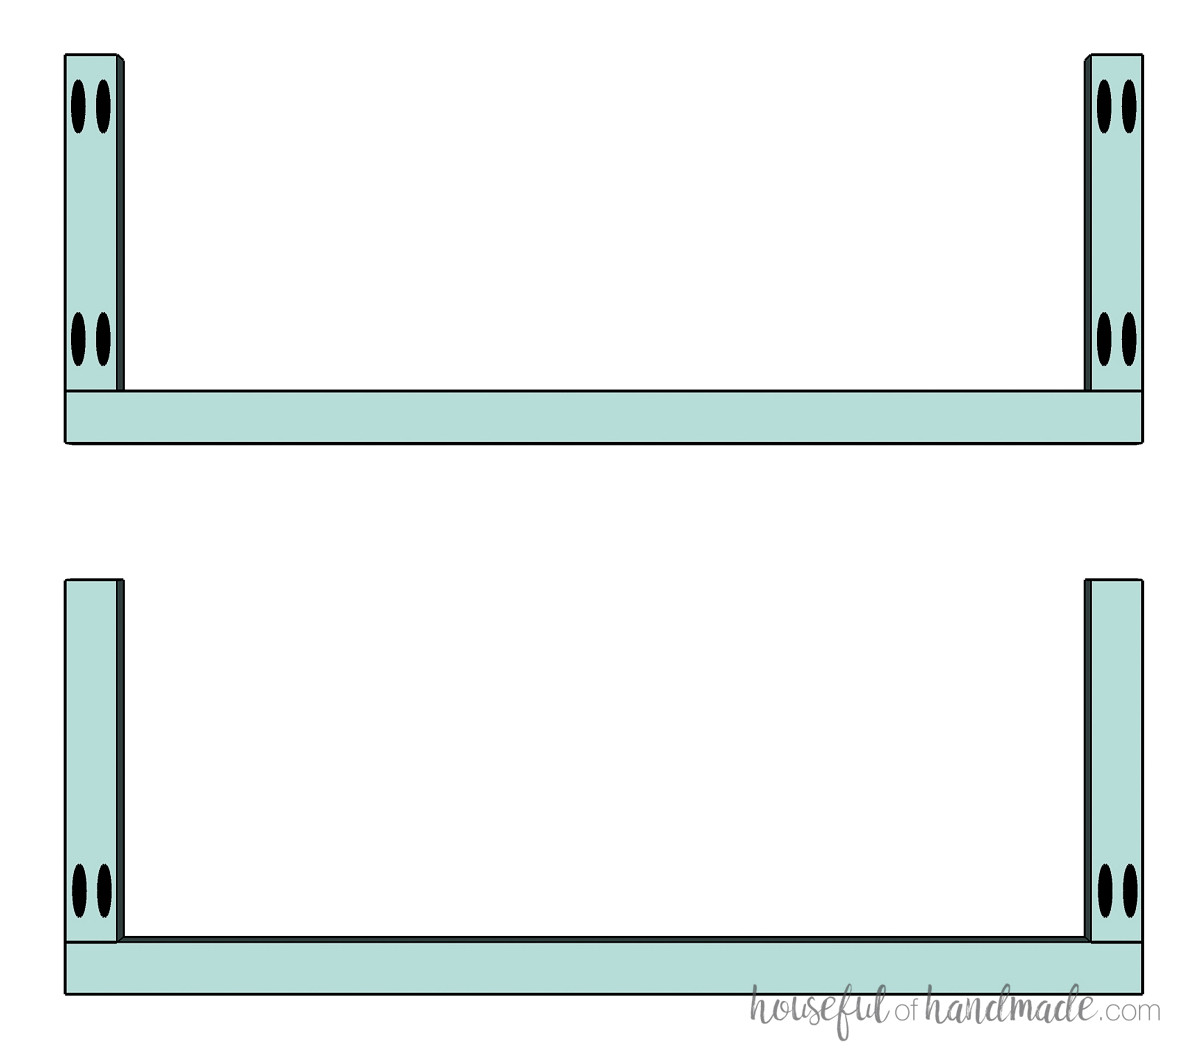
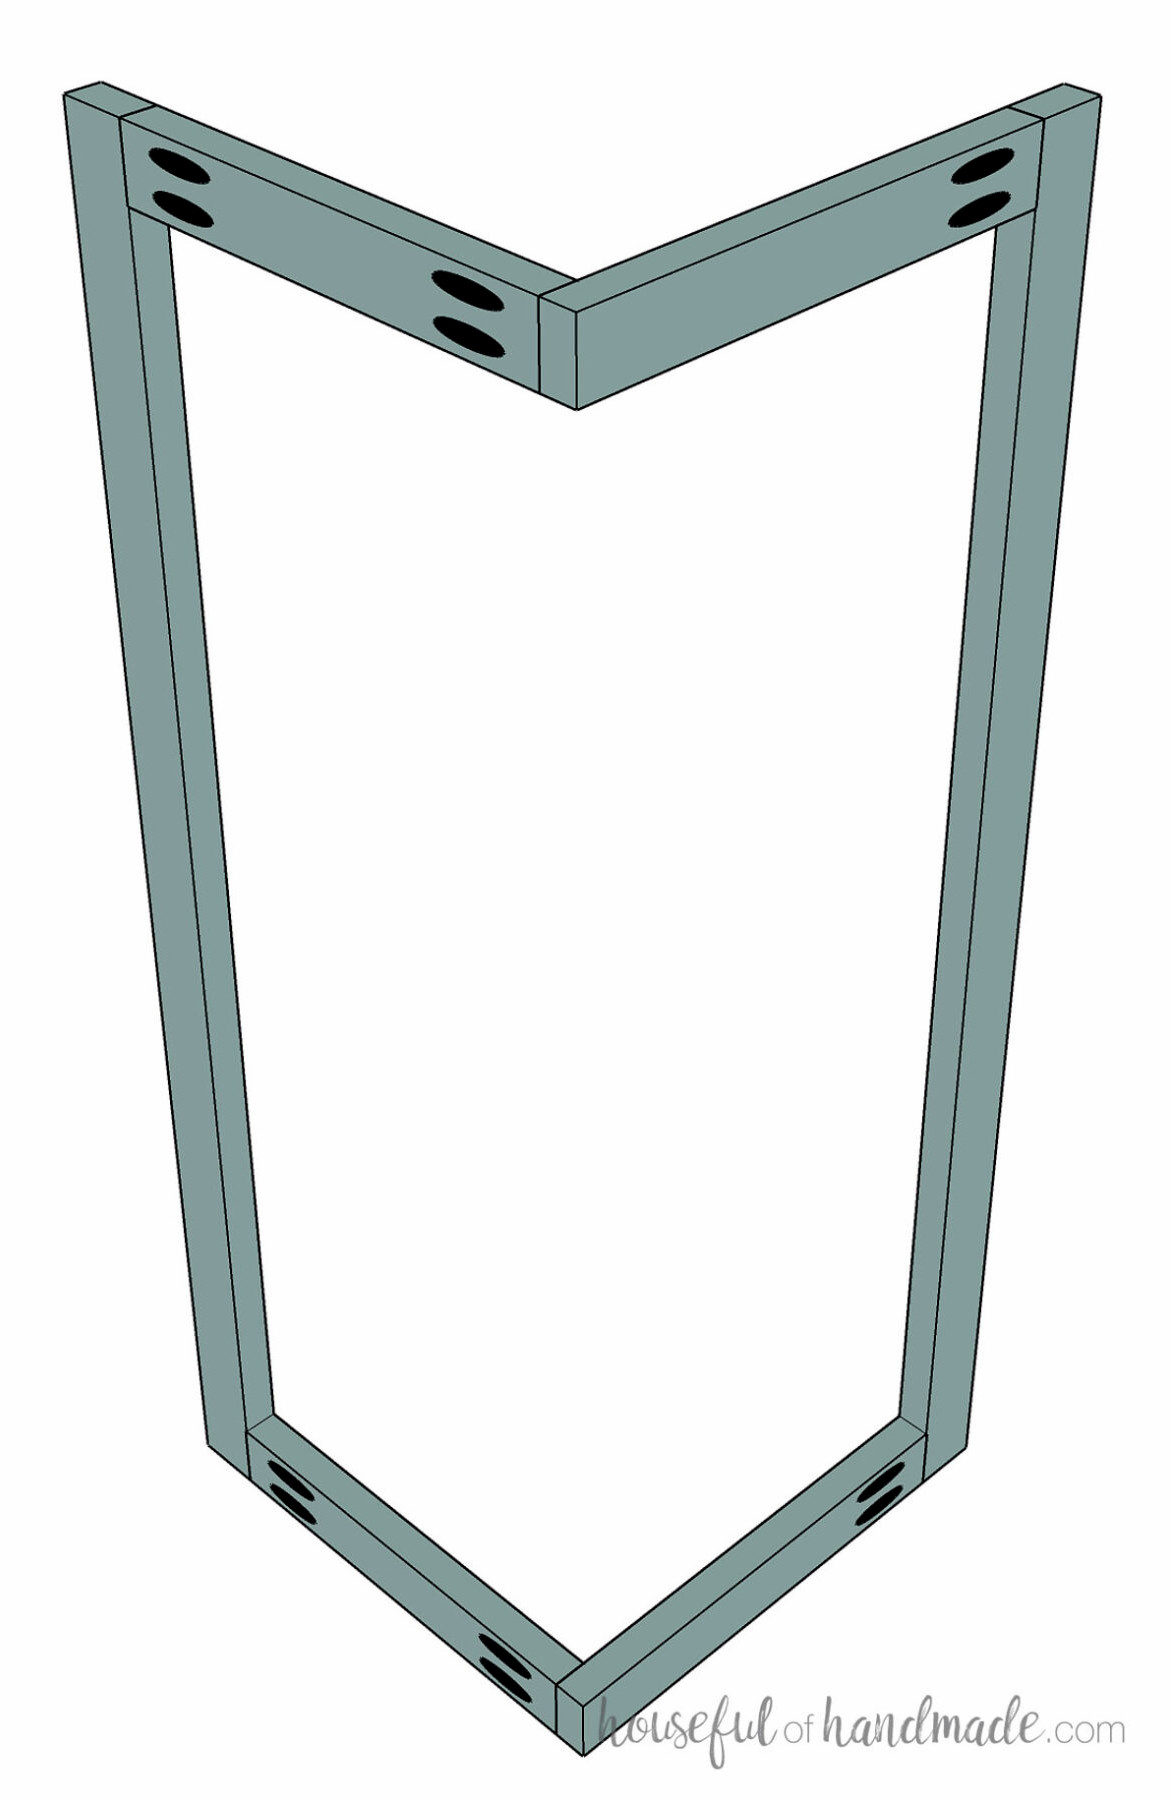
For cabinets with face frames, assemble the frame at a 90 degree angle so it aligns with the notch.
Construct each side on a flat surface. Fasten two matching rails to every stile, keeping them flush.
Use face frame clamps to hold the frames level while attaching them with wood glue and 1 1/4″ pocket hole screws.
Next, join the two face frame sections with 90 degree clamps.
When the face frame is assembled, make certain the pocket holes remain concealed on the rear.
STEP 5- Complete the cabinet
For face frame cabinets:
If the face frame and cabinet box will have the same paint or stain, you can install the face frame at this stage.
When using prefinished plywood, paint, stain, or seal the front and sides of the face frame before installation. Learn how to paint unfinished cabinets here.
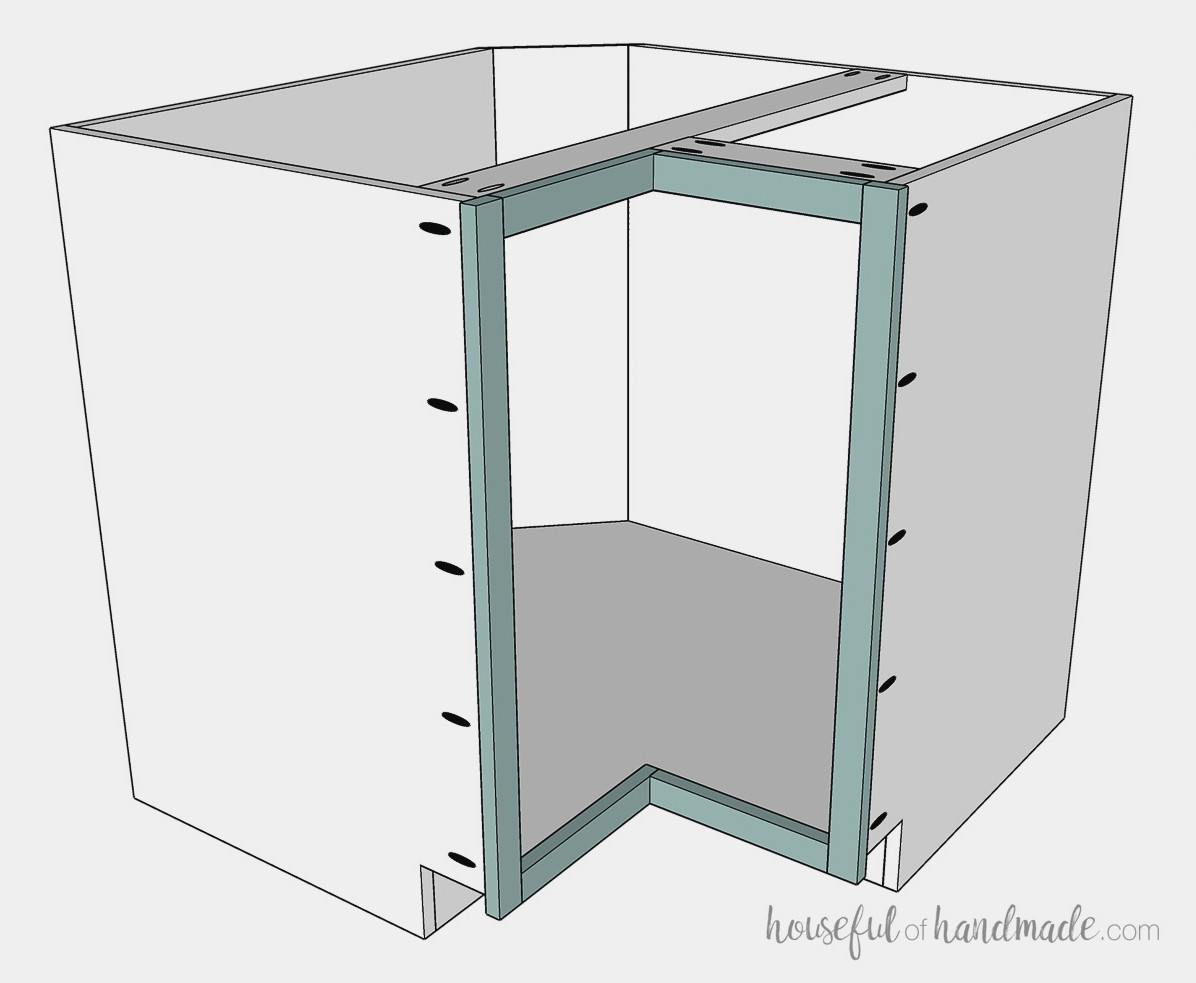
Apply wood glue along the edge of the plywood cabinet carcass to secure the face frame.
Clamp the face frame onto the cabinet box, checking that it is square and extends 1/4″ beyond the edge. Secure it with 1 1/4″ pocket hole screws through the pocket holes already drilled in the side pieces.
For frameless cabinets:
Apply iron-on edge banding to the exposed front edges of the cabinet box. Trim the banding flush with the edge.
You can now paint, stain, or seal your cabinets. Read abouthow to achieve a smooth, professional paint finish here.
To install shelves in your corner cabinet:
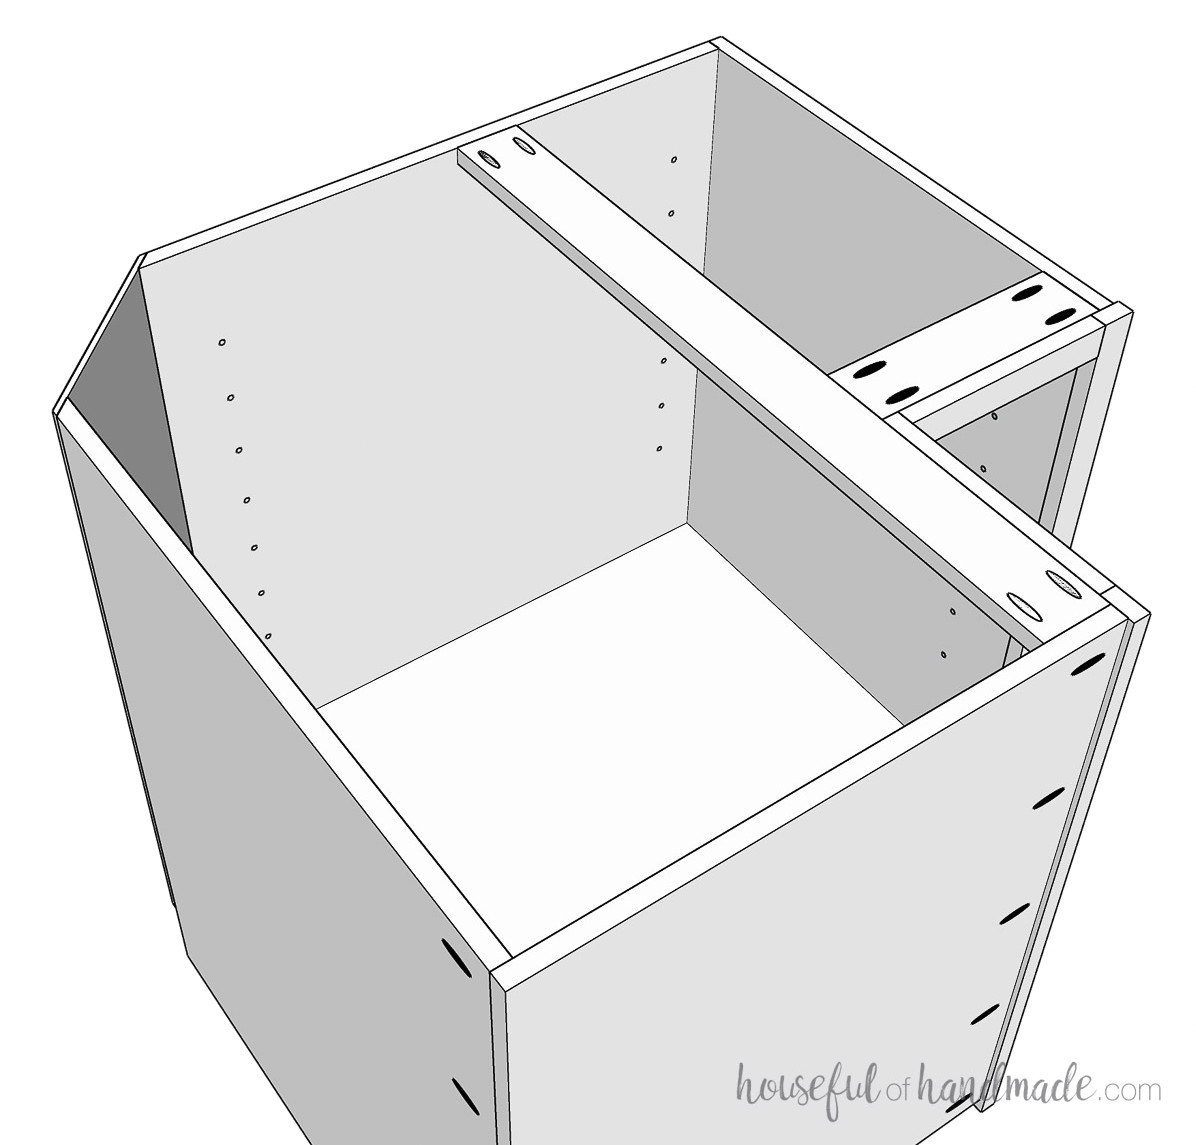
With a shelf pin jig, bore holes in the back and side pieces for adjustable shelving.
I prefer using 6 shelf pins for every corner shelf. Drill the holes along both sides of the back pieces and the front side of the side pieces.
Using only 4 shelf pins, as with a standard cabinet, is not enough because the shelves could tilt.
Your DIY corner cabinet is now ready for installation!
Remember to Download the Printable PDF Plans Here!
Premium cabinet plans feature:
- Suggested Tools
- Materials list
- How to determine the cut list for custom cabinets
- Detailed instructions with 3D renderings
- Plywood arrangement tips and examples
- Cabinet construction tips & techniques
- Useful resources
- BONUS: Cabinet cut list calculator
- BONUS: Cut lists for standard-size cabinets
- BONUS: 3D SketchUp file for a basic cabinet
Installing doors on a bifold corner base cabinet
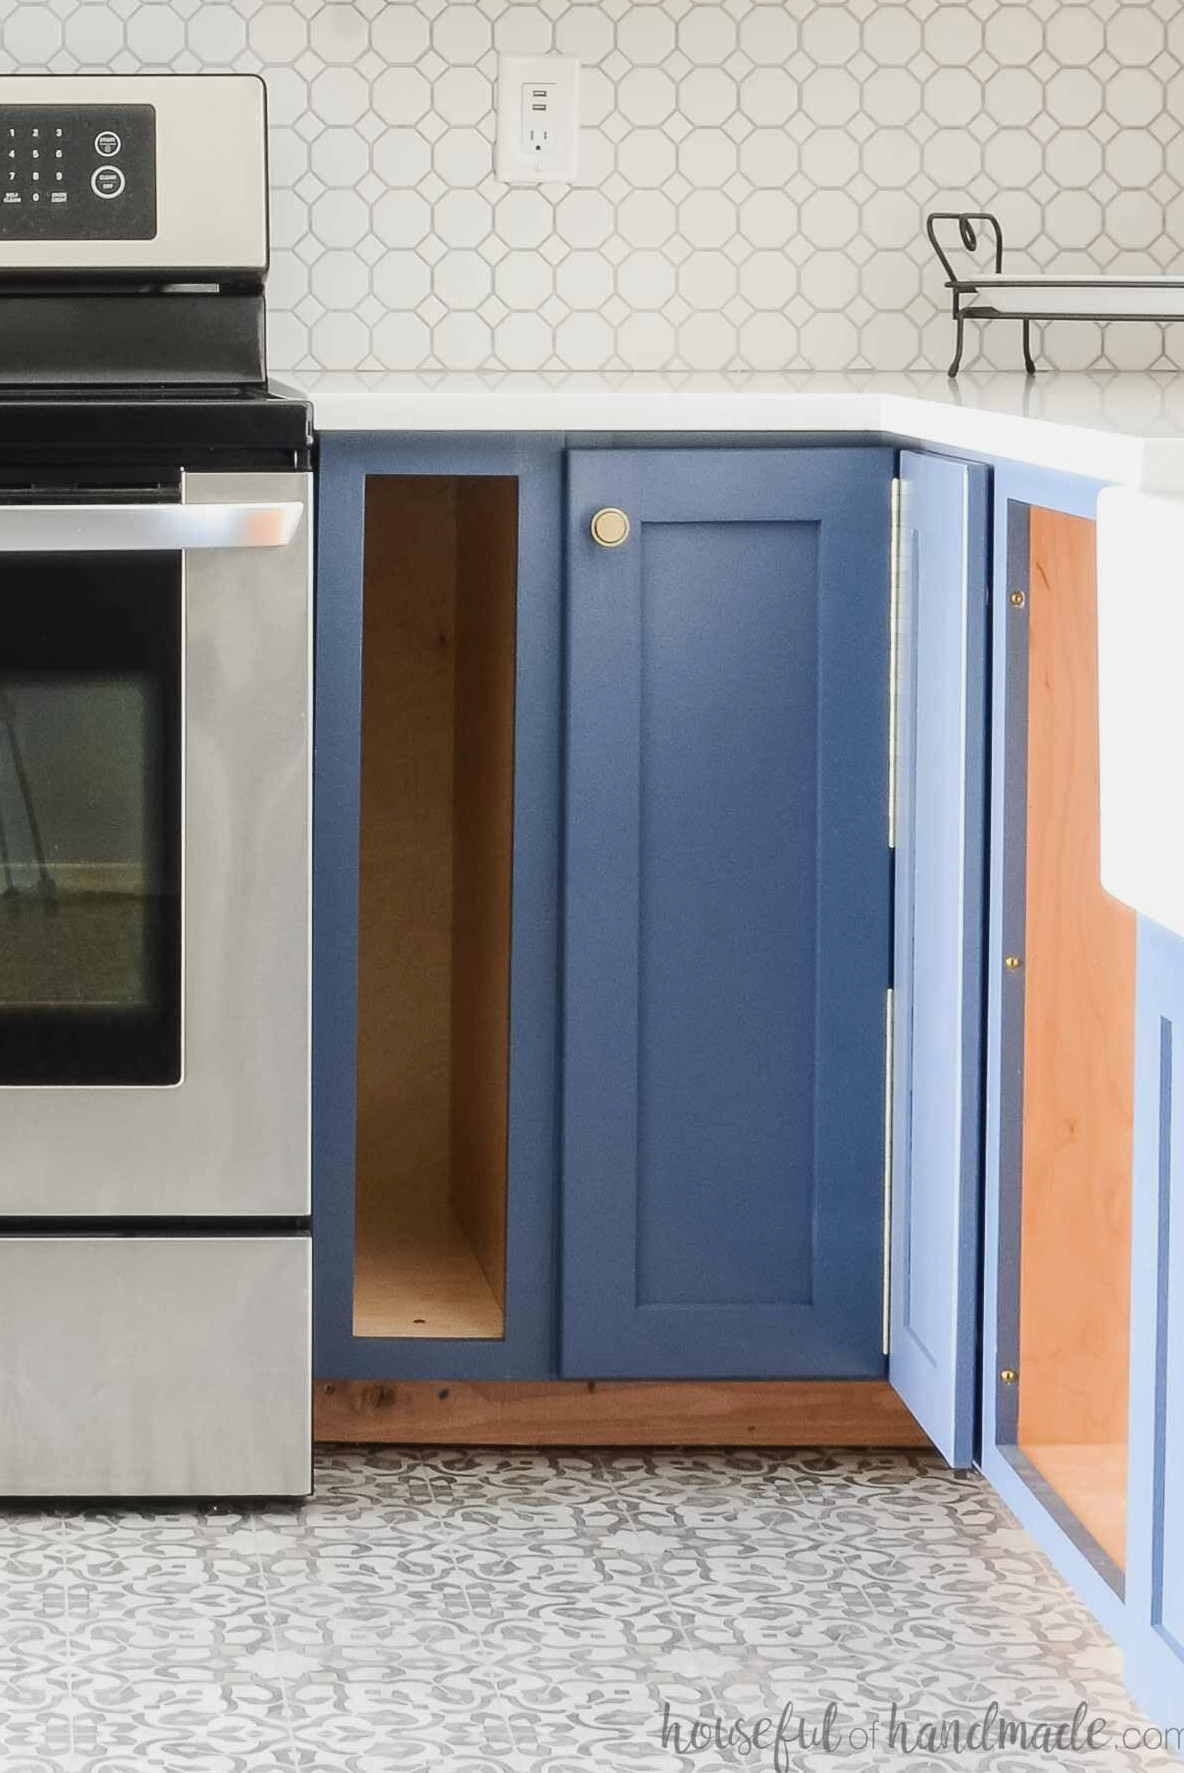
When you are ready to install doors on your bifold corner cabinet, I suggest making 2 doors to span the cabinet opening. Connect the two doors with hinges at the center.
With this setup, the cabinet door can rest flat when opened, providing easier access to the cabinet interior.
For the hinge, choose a basic piano hinge or a dedicated bi-fold hinge. A piano hinge remains visible, while concealed bifold hinges are also available.
In either case, the hinges connecting the completed door to the cabinet should provide a wide opening angle of 170°. This shifts the door farther away from the opening and improves access to the contents.
If you are using a turntable, you can fasten the door to it instead. This creates an inset look for the door.
Learn how inset and overlay doors differ in this post about cabinet door dimensions and hinges.
Verify that the lazy Susan you buy is designed for door attachment. Then fasten the doors together permanently rather than using hinges.
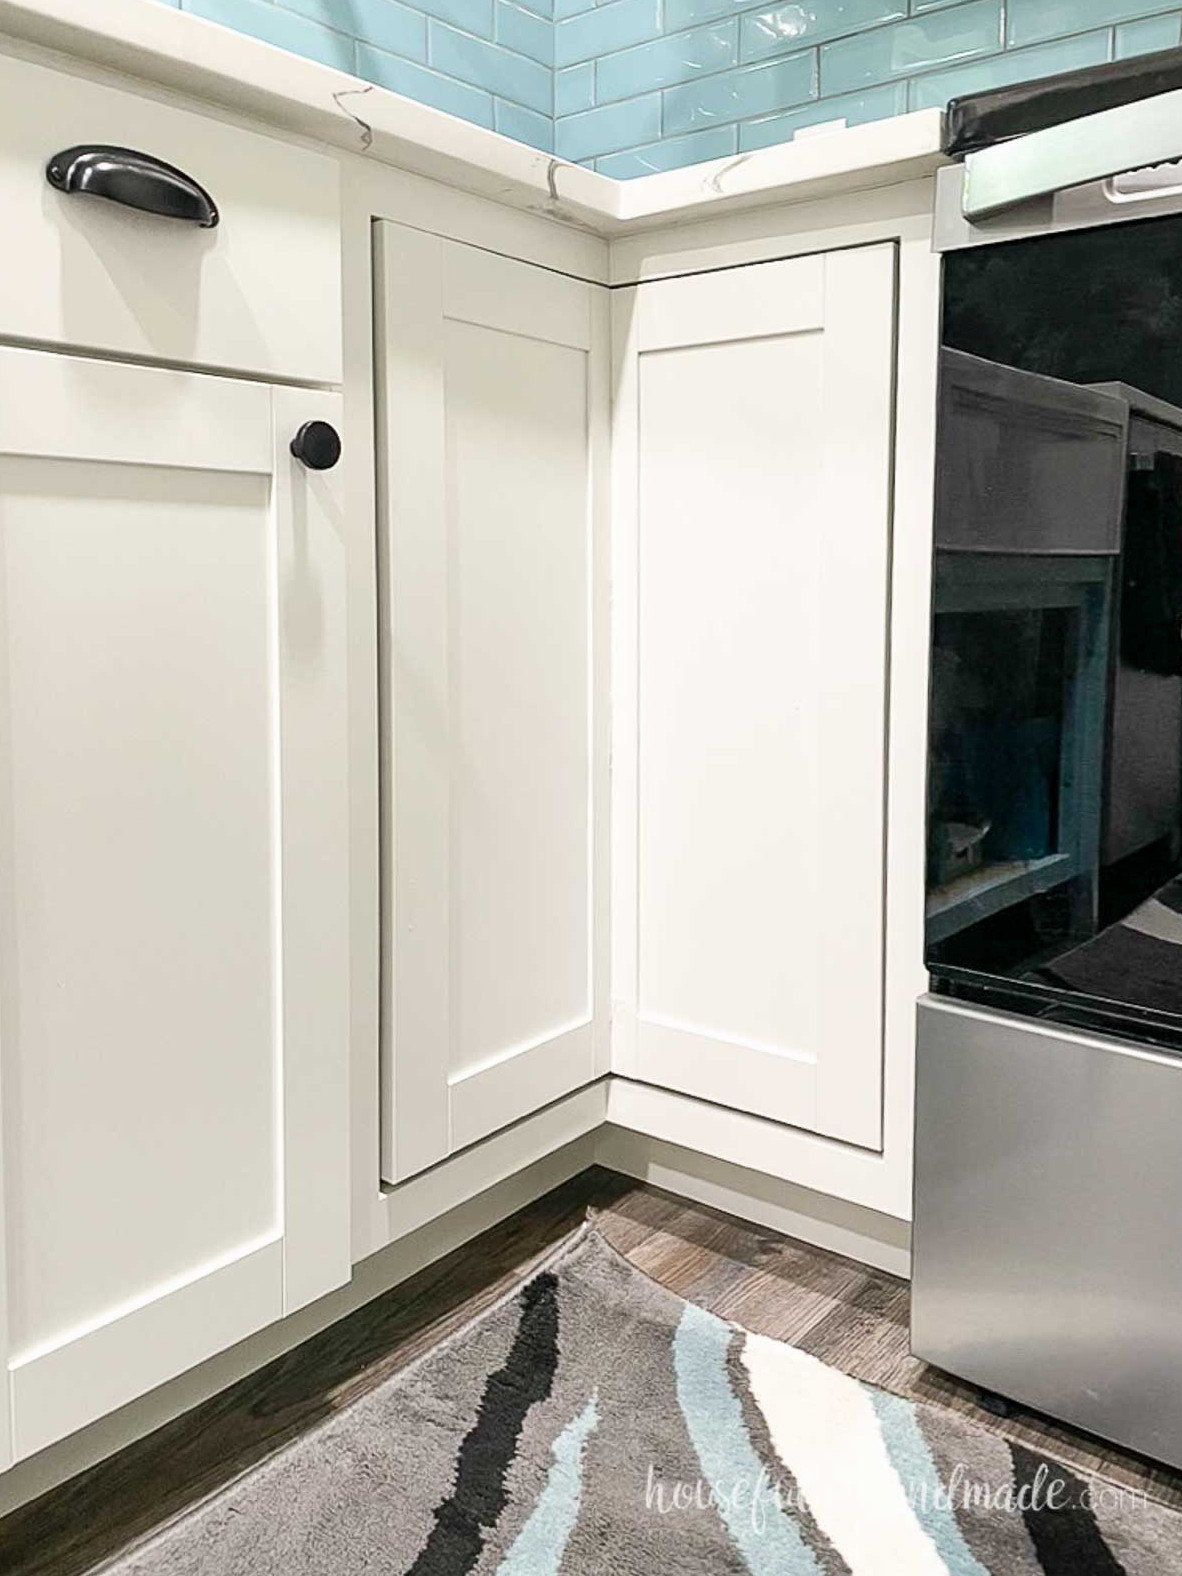
You did it! You built your own bifold corner base cabinet.
Now you can confidently take on other cabinet projects, since this is among the most challenging ones!
Happy building,