Discover how to construct drawer base cabinets for your cabinet project and bring plenty of practicality to your cabinetry.
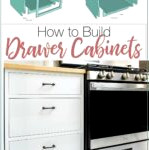
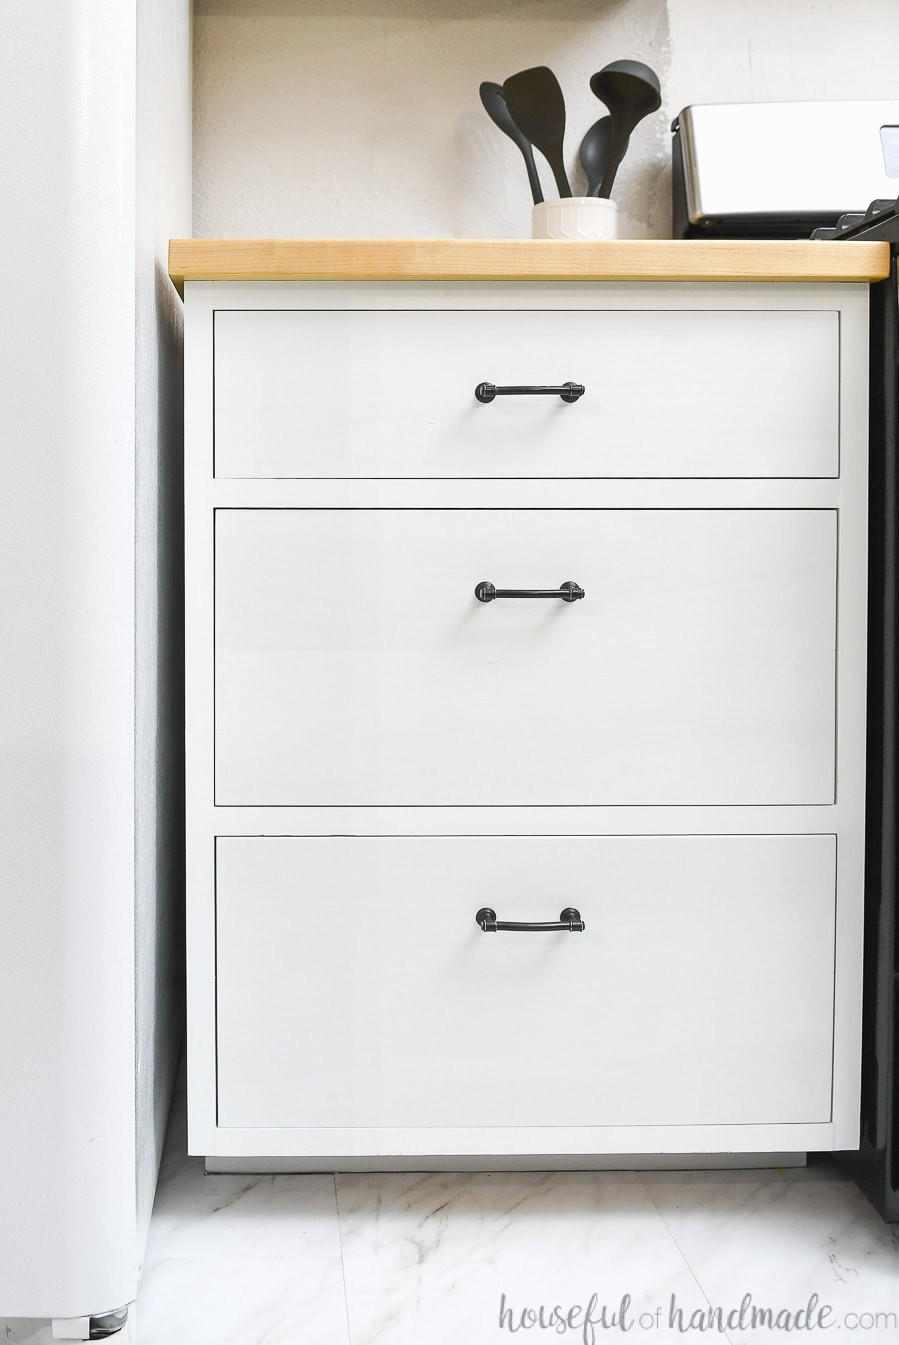
Drawer base cabinets are the kind of cabinets used for constructing lower kitchen cabinets, kitchen islands, and bathroom vanities made up of a series of drawers.
Features that set a drawer base cabinet apart:
- They are divided into sections to accommodate several drawers.
- They lack a top and are instead finished with a countertop.
- They include a toe kick space.
- They are deeper than other cabinet styles.
Be sure to read the general how to build cabinets post here to view the various cabinet styles, the advantages and disadvantages of each, and an overall explanation of cabinet components and assembly. This post focuses on the particular measurements and construction of drawer base cabinets.
Things to Keep in Mind when Building Drawer Base Cabinets
Before drawing up plans for your base cabinets, there are several details to settle when building them yourself. These considerations apply to both standard base cabinets and drawer base cabinets.
I have covered everything to consider in the How to Build Base Cabinets post and How to Build Cabinets post, so be sure to consult them for complete information. Below is a summary of the points to examine and decide before proceeding to the specific details of drawer base cabinets.
- Which cabinet style would you like?
- What height should your base cabinets be?
- What depth should your base cabinets have?
- Which type and dimensions should your toe kick be?
How many drawers should you include in your cabinet?
The number of drawers you can place in your cabinet depends on the cabinet’s dimensions and the depth you prefer for the drawers. Learn how to build simple DIY drawers here.
In a standard kitchen drawer base cabinet, you can install 4 drawers for a shallower arrangement or 3 drawers for deeper storage.
In most kitchens, the upper drawer in a drawer base cabinet corresponds with the top drawers positioned above your other base cabinets. The remaining drawers can then be sized according to your preference.
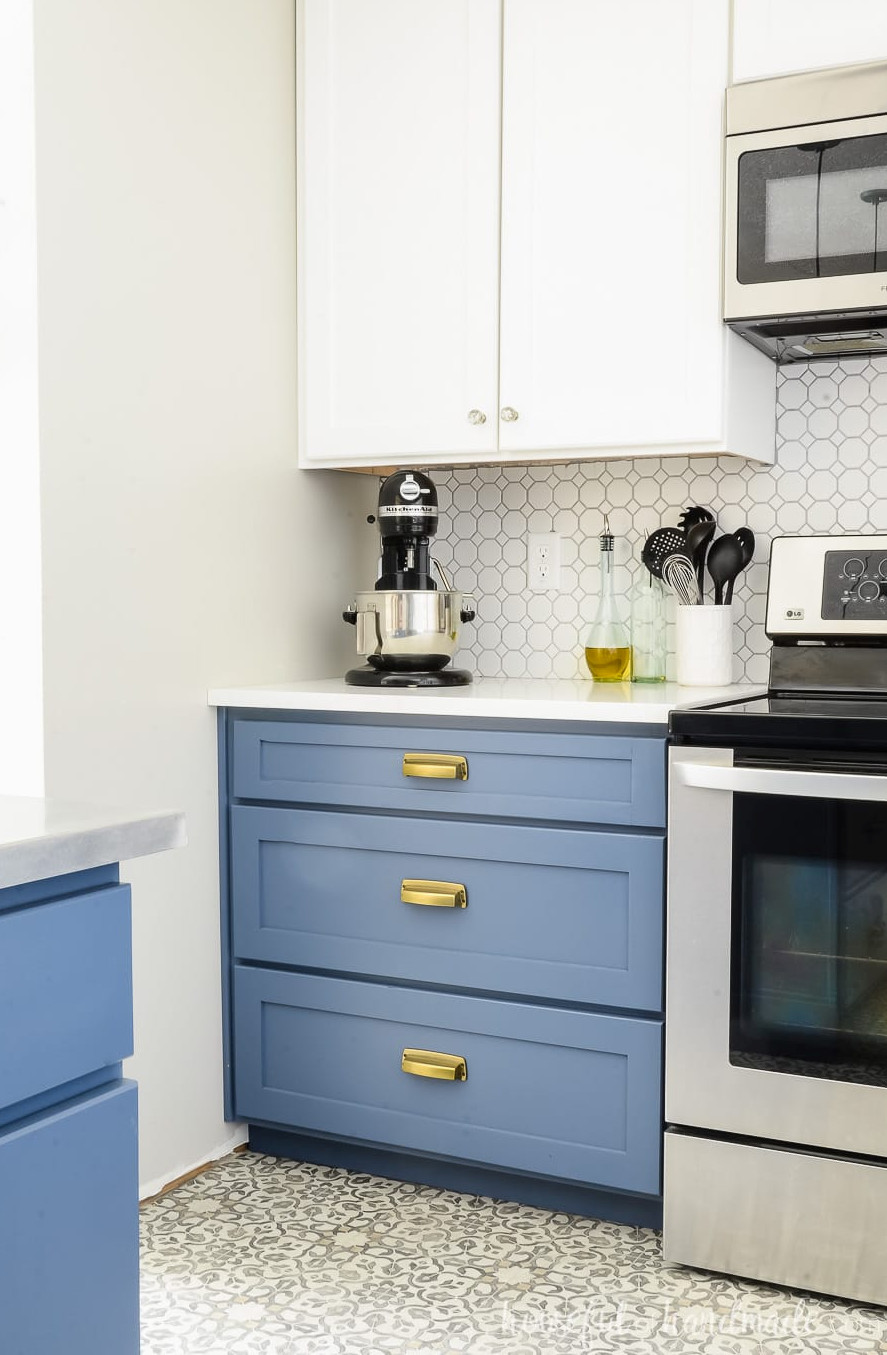
Beside our stove, I chose to use 3 drawers. The upper drawer matched the depth of all the kitchen’s top drawers (I prefer a 6″ drawer opening with a 4 1/2″ deep drawer inside). I then divided the remaining cabinet opening evenly to create 2 additional deep drawers.
These deeper drawers work well for storing pots and pans, plates, and other items.
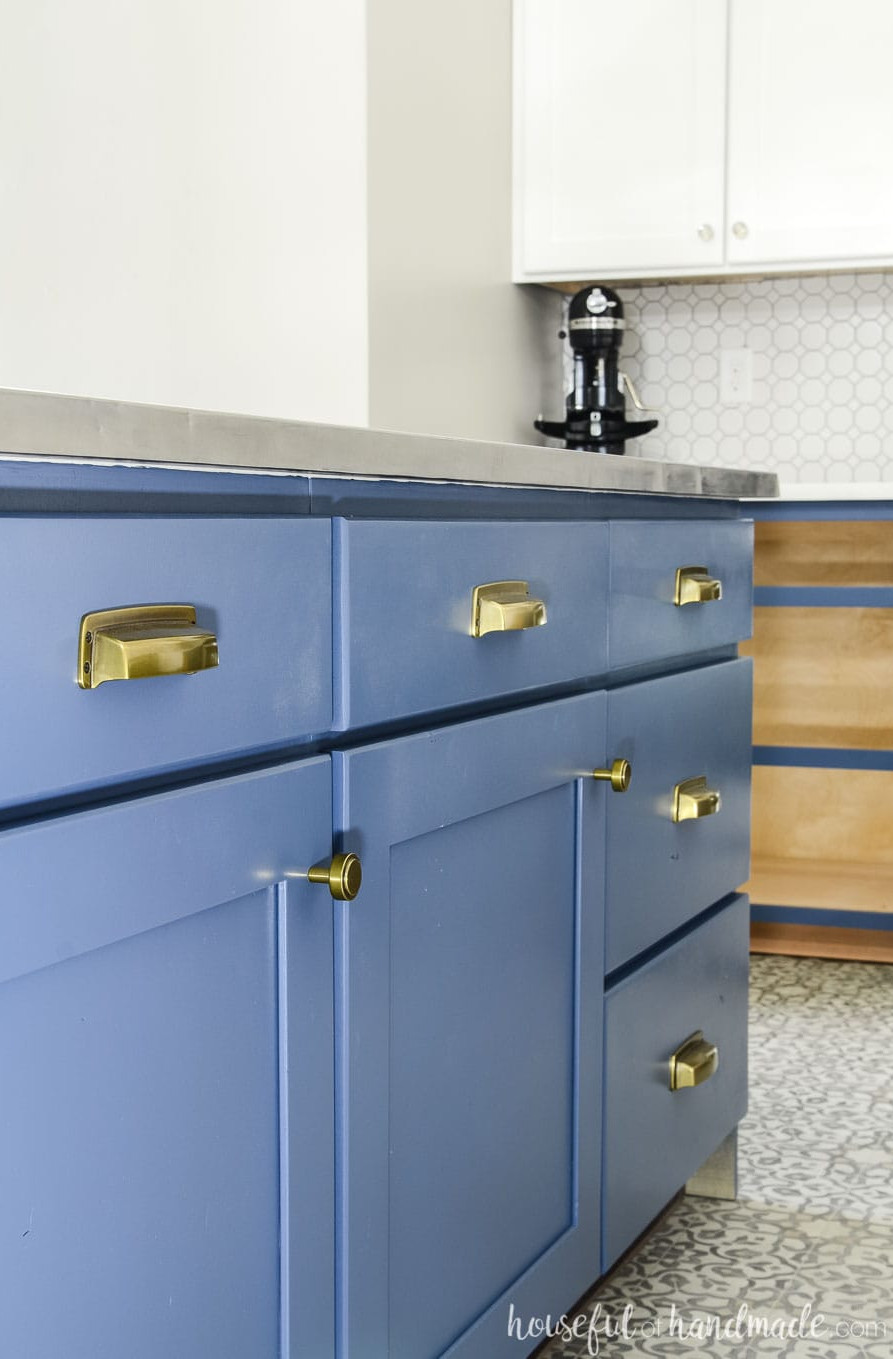
Beside my sink, I prefer 4 shallower drawers. I made the top 3 drawers identical in size to coordinate with the kitchen’s upper drawers. This left a bottom drawer that was somewhat deeper. It is not as deep as the 3-drawer arrangement, but it works very well.
These shorter drawers are ideal for storing utensils, knives, dish towels, storage bags, and similar items.
In addition, every drawer needs a pair of drawer slides and a drawer box. Drawer slides can represent a substantial portion of a kitchen build’s expense, and each drawer box also requires additional lumber.
Therefore, keep your budget in mind while designing your kitchen arrangement. Adding more drawers increases the overall construction cost.
Selecting the right Drawer Slides
Drawer slides are necessary to make your drawers functional. Numerous drawer-slide choices are available, and their prices may range from $5 to $40 or more per pair.
Before buying your drawer slides, the first decision is the extension type. Extension describes how far the drawer projects outward when the slide reaches its fully extended position.
Drawer slides are available with these extension options:
- 3/4 extension
- Full extension
- Over travel
3/4 Extension Drawer Slides
3/4 extension slides are the most affordable option and were commonly installed in older kitchens. Once the drawer is fully pulled out, 1/4 of it will still sit inside the cabinet. Although this might seem sufficient, there are additional factors to think about.
When the drawer front is inset within the cabinet, the drawer begins 3/4″ inside the cabinet carcass. A countertop overhang may also obstruct another 1-2″ of the cabinet box.
With 3/4 extension slides, you may have convenient access to only 1/2 of the cabinet drawer. You must determine whether the frustration of items concealed at the back is worth the lower price.
Full Extension Drawer Slides
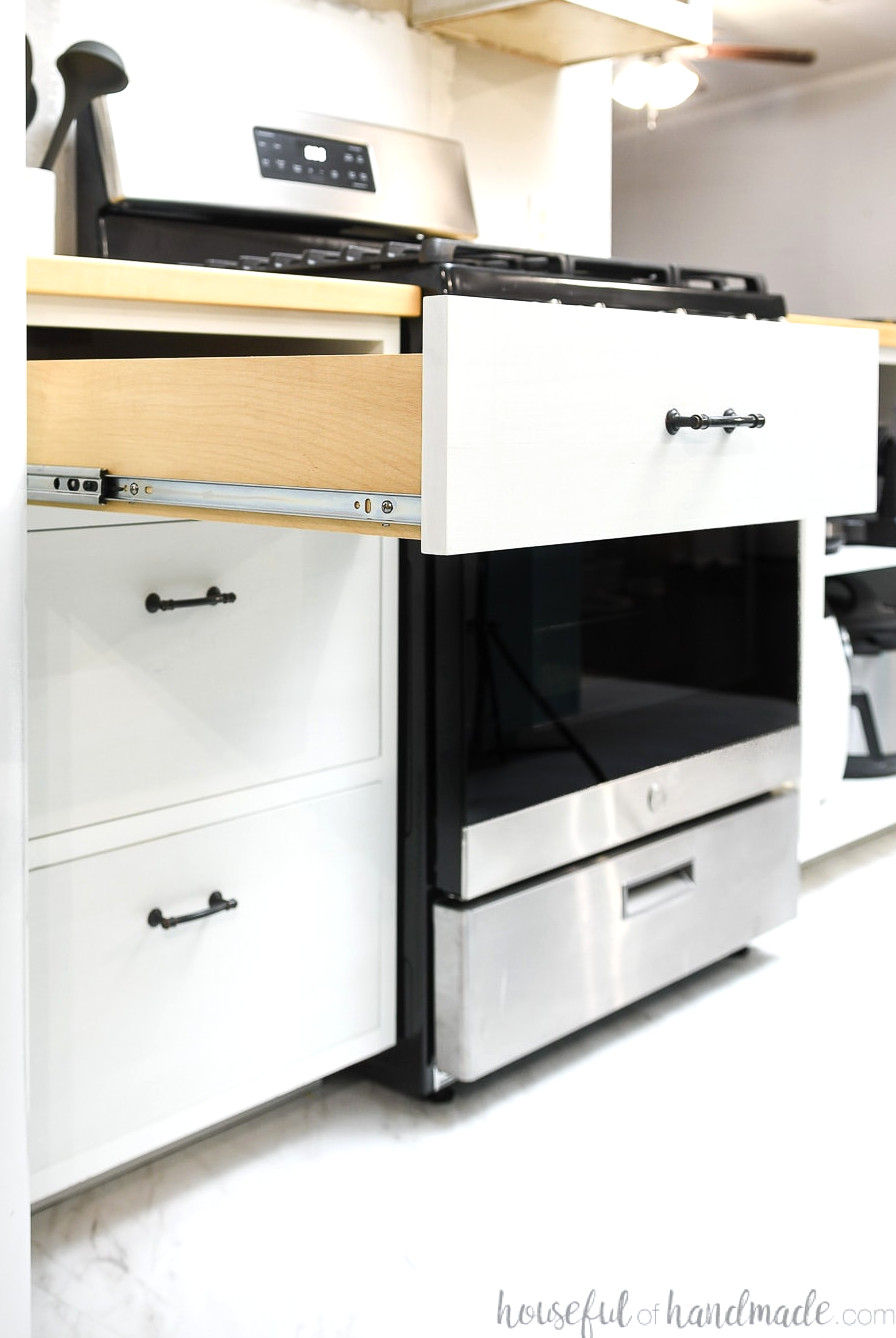
Full extension drawer slides pull out completely, bringing the back of the drawer near the front of the slide when fully extended. With inset cabinet doors, approximately the rear 1/2″ of the cabinet will remain within the carcass.
Full extension drawerslides are featured in most contemporary kitchens since they provide convenient access to every part of the drawer. Drawer dividers can be used to keep everything arranged without having to worry about reaching items stored at the back.
Depending on the slide length and the additional features selected, these drawer slides generally cost between $15-$30 (as explained below).
Over Travel Drawer Slides
Over travel drawer slides let the drawer extend 1-2″ beyond the cabinet carcass. As a result, you can reach the entire drawer easily without being obstructed by inset doors or a countertop overhang.
These slides usually cost a few dollars more than full extension drawer slides. You can determine whether convenient access to the drawer’s farthest sections justifies the additional expense.
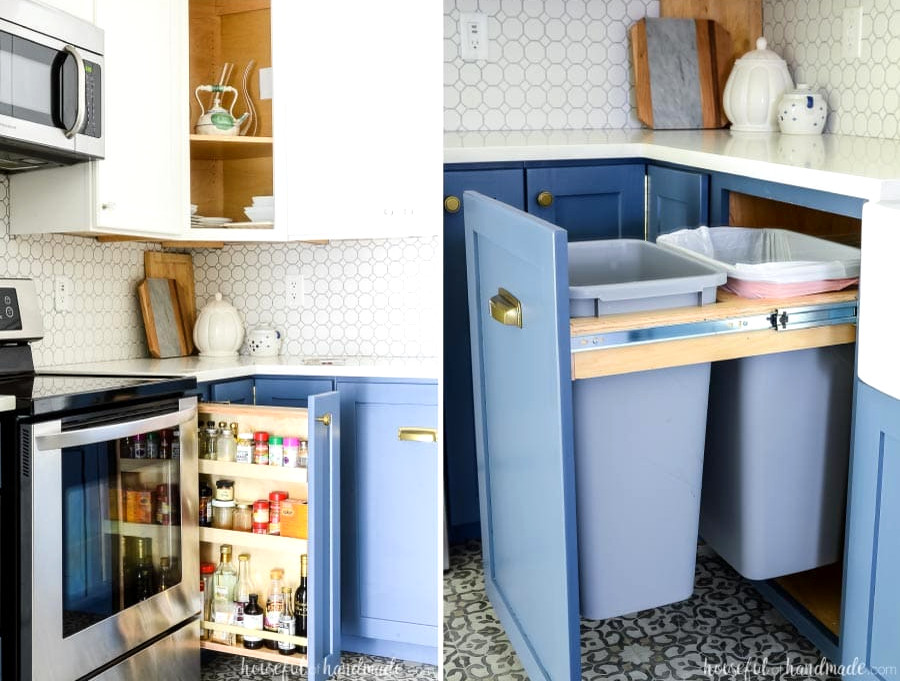
I installed over travel drawer slides on the pull out trash can cabinet in our kitchen, making it simple to take out the trash can whenever necessary. They can also work well for a pull out spice cabinet positioned beside an oven, because ovens are generally a few inches deeper than the surrounding cabinets.
More Drawer Slide Features
Once you have chosen the extension type for your cabinet drawers, you can begin considering additional features. I will not cover these options in complete detail here, but I will discuss them in a later post about building cabinet drawers.
- Soft close
- Weight capacities
- Mounting style (side, center or under mount)
- Finish
These various options can affect the price of your drawer slides, so you should choose the features that work within your available budget.
For additional drawer information, take a look at this post for tips & trick on installing cabinet drawers.
Drawer Base Cabinet Plans
After answering the questions above, it is time to design plans for your own drawer base cabinets! I will guide you through creating plans for custom drawer base cabinets so you can begin construction with confidence.
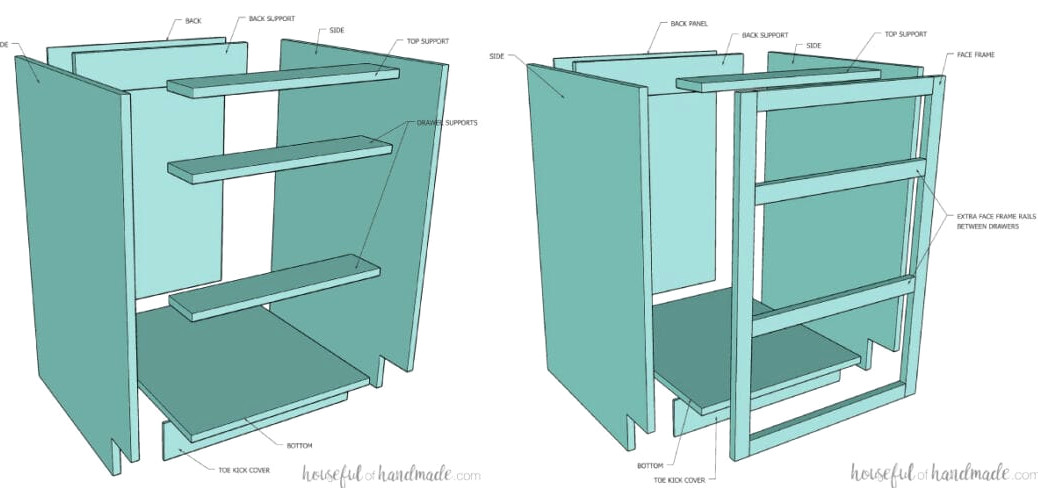
Every drawer base cabinet will include these components:
- 2 side pieces
- 1 bottom piece
- 1 back piece
- 2 support pieces
- Optional: an extra support piece positioned between each drawer for a frameless base cabinet
- 1 toe kick cover piece
- It can be cut separately for each cabinet, or preferably, one long cover can be cut to span the entire toe kick section across each bank of cabinets as a single piece
- Optional: toe kick
- Optional: face frame
- 2 face frame stiles
- 2 face frame rails
- Extra face frame rails placed between each drawer
For constructing drawer base cabinets, use 3/4″ plywood for most of the cabinet box. I suggest using 1/4″ plywood for the back and toe kick cover, which reduces costs and keeps the box lighter.
To complete the exposed plywood edges at the front, you can apply edge banding for a frameless cabinet or add a face frame for a face frame cabinet.
Face frames are commonly made from 1×2 boards (which measure 3/4″ thick and 1 1/2″ wide). For a broader, more prominent frame, wider boards can be used.
Now Available
PDF Cabinet Building Guides
Create Custom Cabinets Easily
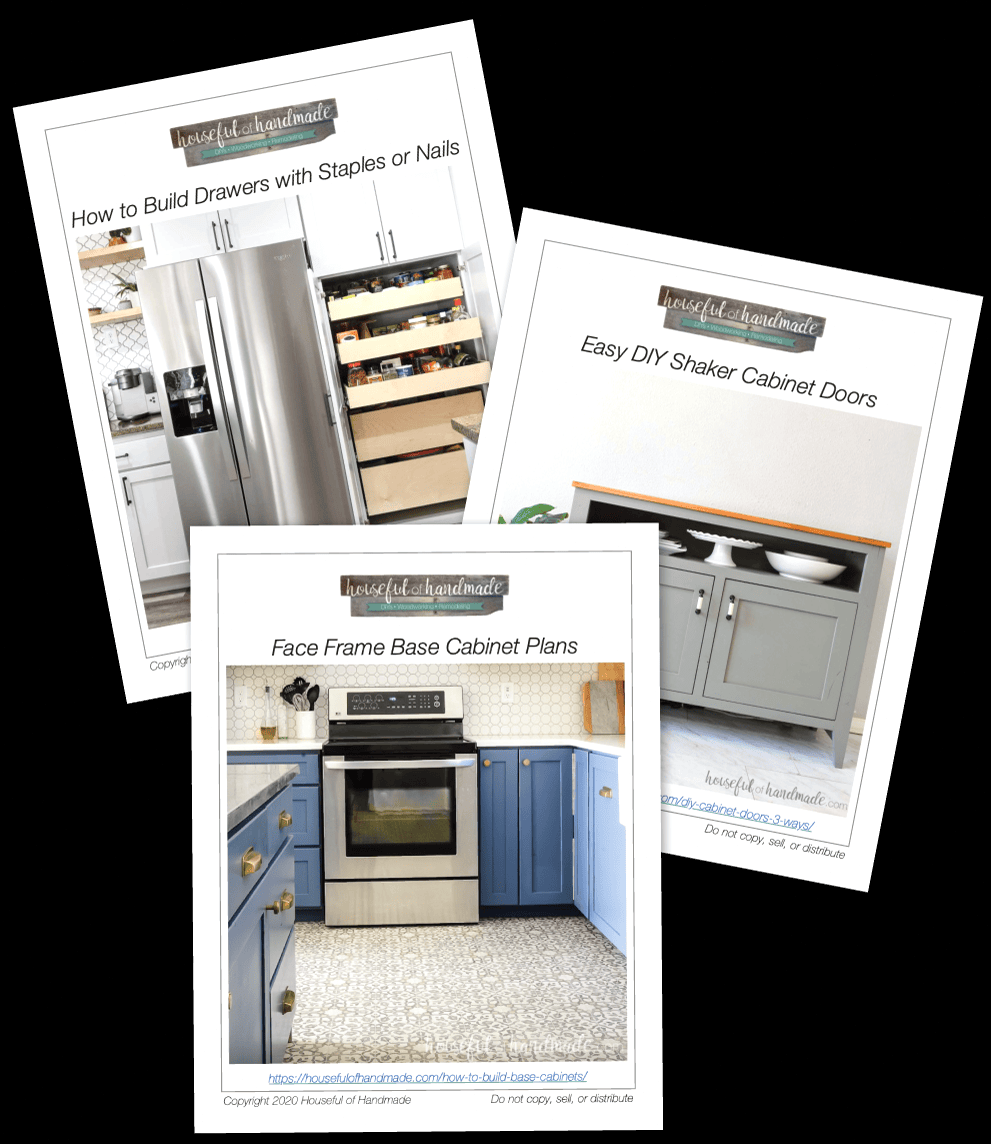
Our cabinet building guides will help you build your own cabinets in any size! PDF guides can be printed or conveniently viewed on your phone or tablet. They include cut list calculations, shopping lists, step-by-step directions, 3D diagrams, plywood layout advice and a bonus SketchUp file!
Face Frame Drawer Base Cabinet Cut List
Refer to the chart below to determine the dimensions of every component in your face frame drawer base cabinets.
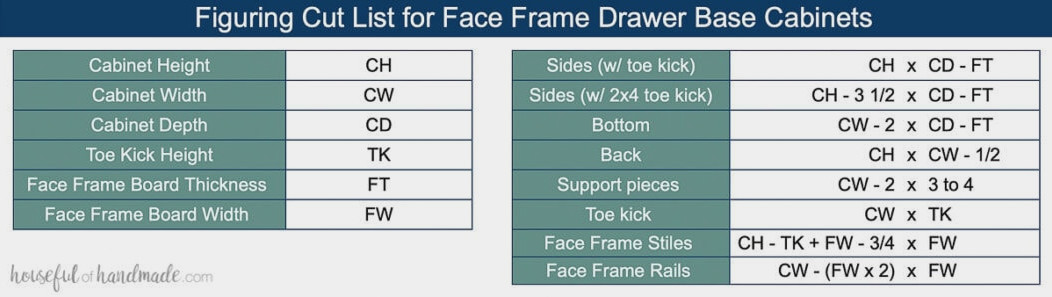
Key notes for face frame cabinets:
- The face frames extend 1/4″ beyond the cabinet sides. This simplifies installation, but when the side of your drawer base cabinet will be visible, you must either add a side panel (use 1/4″ plywood cut to the exact dimensions of the base sides and tack it in place) or modify your measurements to account for the extra 1/4″ onone side.
- The back panel is not fitted into a rear groove; it is simply secured with nails. Since the cabinet is built in, the back panel will only be visible when the side of a cabinet can be seen. Address this by using the panel mentioned above (cut it 1/4″ deeper so it covers the back panel), or rout grooves and modify the back panel dimensions so it fits within them.
After determining the measurements for each piece, you will need to cut them out.
Frameless Drawer Base Cabinet Cut List
Refer to the chart below to determine the measurements for every component of your frameless drawer base cabinets.
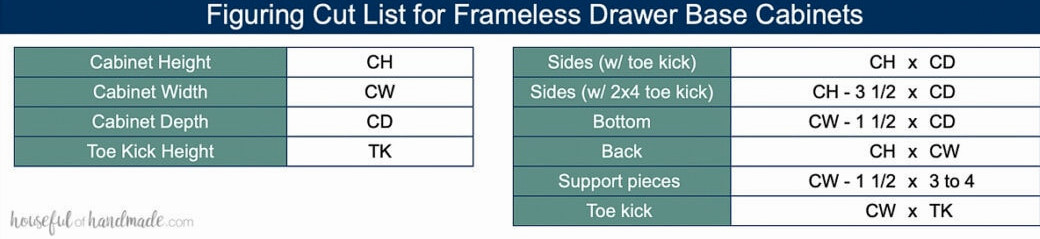
Key details for frameless cabinets:
- Plywood is not truly 3/4″ thick; it is usually a little thinner. Also, plywood thickness can vary between sheets. I suggest pressing two pieces of the plywood you plan to use firmly together and measuring them. Replace the 1 1/2″ deduction for the bottom and support pieces with this measurement. This will provide more precise cabinet widths.
- The back panel is not fitted into a rear groove; it is simply nailed in place. Because the cabinet is built in, the back panel will only be visible when a cabinet side is exposed. If your cabinet sides will be visible, rout grooves and alter the back panel dimensions so it fits inside them.
How to Build a Drawer Base Cabinet Box
Tools & Materials
STEP 1- Cut out the Pieces
Cut each component according to the cut list you calculated above.
When constructing drawer base cabinets with a toe kick, use a circular saw or jig saw to cut the toe-kick notch into the front of both side boards.
If you are using a 2×4 base for the cabinets, the sides do not need notches. Instead, cut the sides 3 1/2″ shorter so the cabinet can rest on top of the 2×4 base.
Rather than building several small 2×4 bases, I prefer constructing one large base for all adjoining cabinets.
STEP 2- Assemble the Cabinet Box
For useful advice, be sure to read the Tips for a Perfect Cabinet Box section in this post.
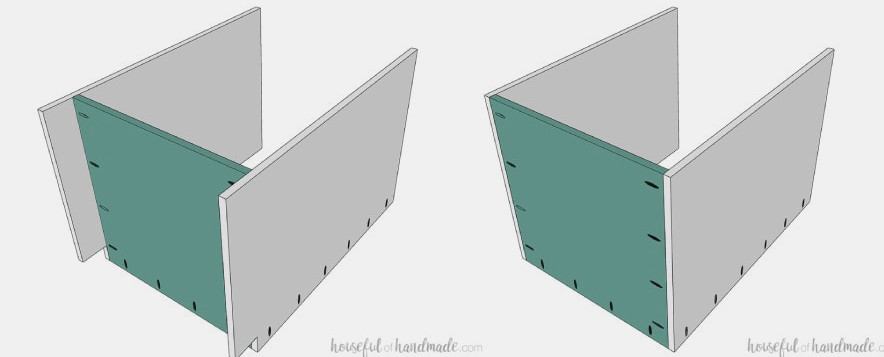
Drill pocket holes configured for 3/4″ material into the sides of the bottom piece for your drawer base cabinet. For sturdy cabinet boxes, place the pocket holes about every 5-6 inches.
With face frame cabinets, you will also need to drill pocket holes along the front of the bottom piece and in both side pieces so the face frame can be attached later.
Position the bottom piece flush with the top of the toe kick (or with the bottom of the side board if using a 2×4 toe-kick base). Fasten it with wood glue and pocket hole screws. Use corner clamps to ensure the joint forms a 90 degree angle.
Do the same on the opposite side.
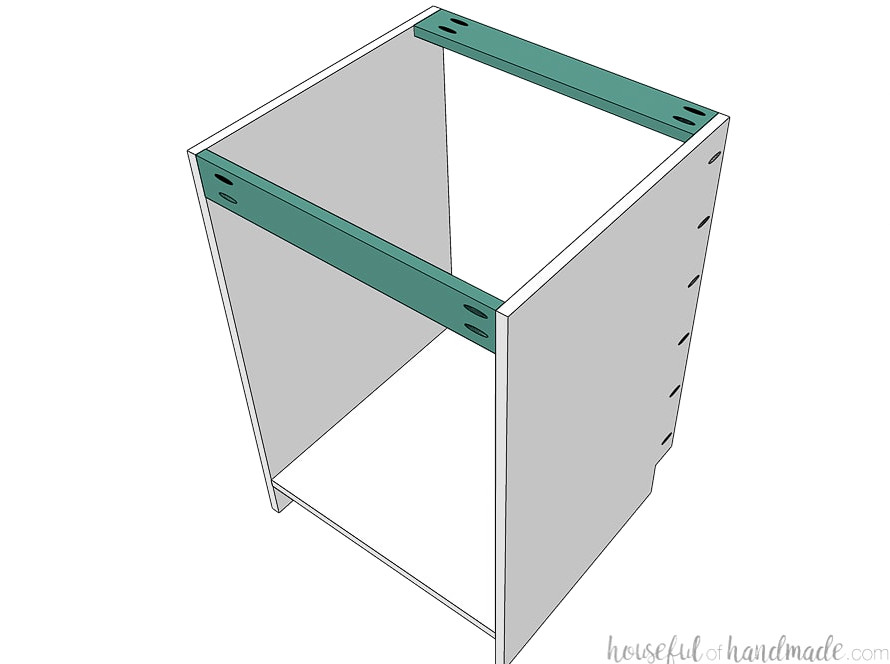
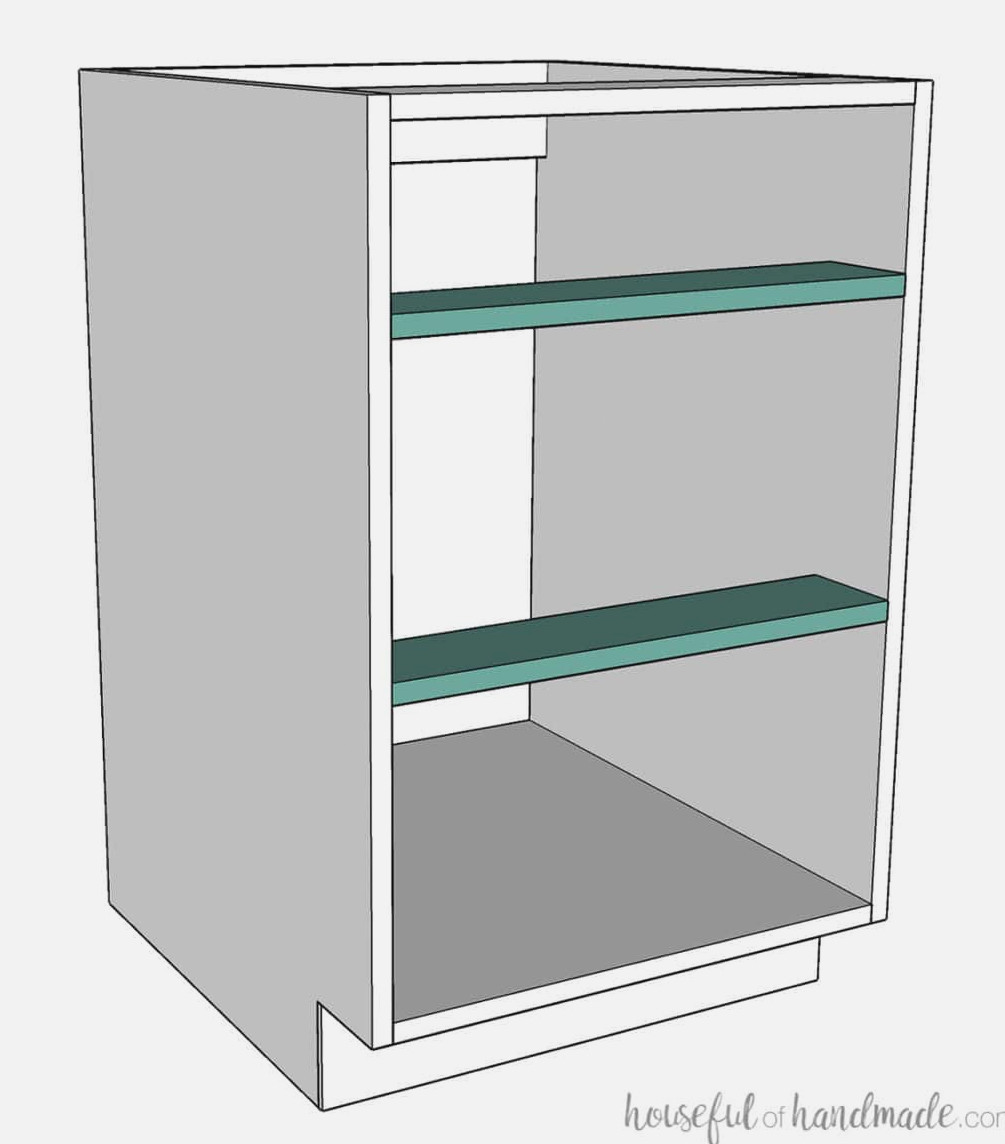
Install 2 support pieces to keep the box square and provide additional stability.
Cut these from plywood scraps remaining after trimming the side and base pieces. They should be 3-4 inches wide.
Place one support piece across the top of the box and the other along the upper back. Secure both with pocket holes and 1 1/4″ pocket hole screws.
When building a frameless cabinet with drawers, add more support boards to divide the individual drawer boxes.
The drawer can be made as deep or shallow as desired, but the drawer area must be at least 1/2″ taller than the drawer box.
I like allowing 1″ of additional height above the drawer size. This gives items inside the drawer extra clearance if they extend above the drawer box, preventing them from catching and stopping the drawer.
For example, if you want a 4 1/2″ deep drawer (approximately 4″ of usable space after the drawer base is installed), position the drawer support piece at least 5″ below the upper support, though 5 1/2″ is preferable.
Continue installing the remaining supports until the entire base has been divided into drawer compartments.
Secure the back panel with wood glue and finishing nails.
If the cabinet sides will be exposed, consider routing a groove in the back so the panel can sit inside it. Another option is to make a side panel slightly larger so it covers both the sides and the back panel.
You may also cut and install the toe kick front at this point, or cut one oversized piece to cover a complete row of cabinets.
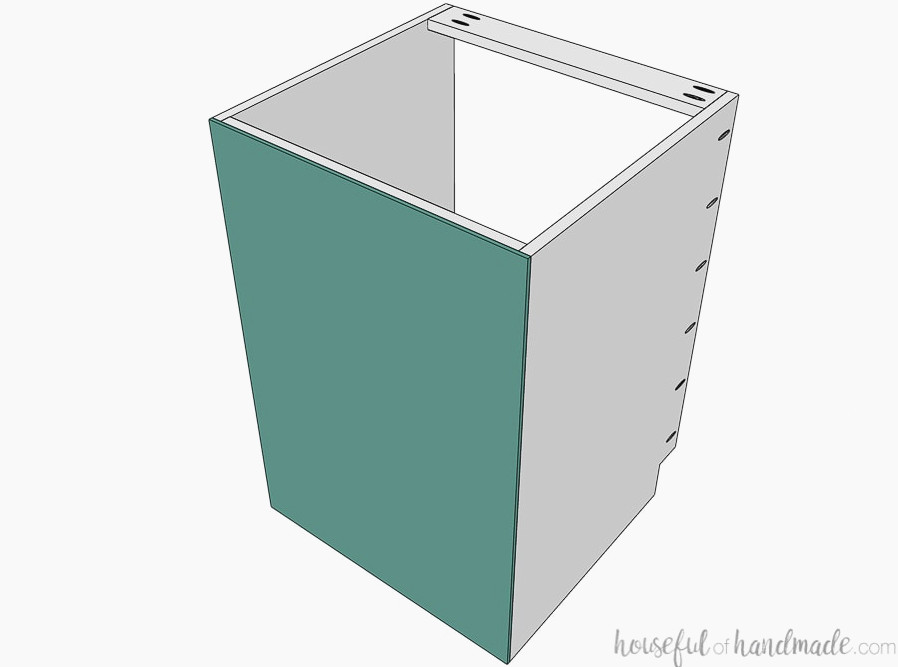
Your drawer base cabinet carcass is now complete!
For frameless cabinets, apply edge banding to the exposed front edges of the plywood.
If you are making face frame cabinets, continue with the following steps.
STEP 3- Assemble the Face Frame
Cut the rails and stilesfor your face frame. Drill the holes for 3/4″ material into both ends of the rails.
Position the rails between the stiles, keeping them flush with either the top or bottom. Apply wood glue, then fasten them with 1 1/4″ pocket hole screws.
While securing the pieces, use a face frame clamp to hold the front of the frame flush and firmly in place.
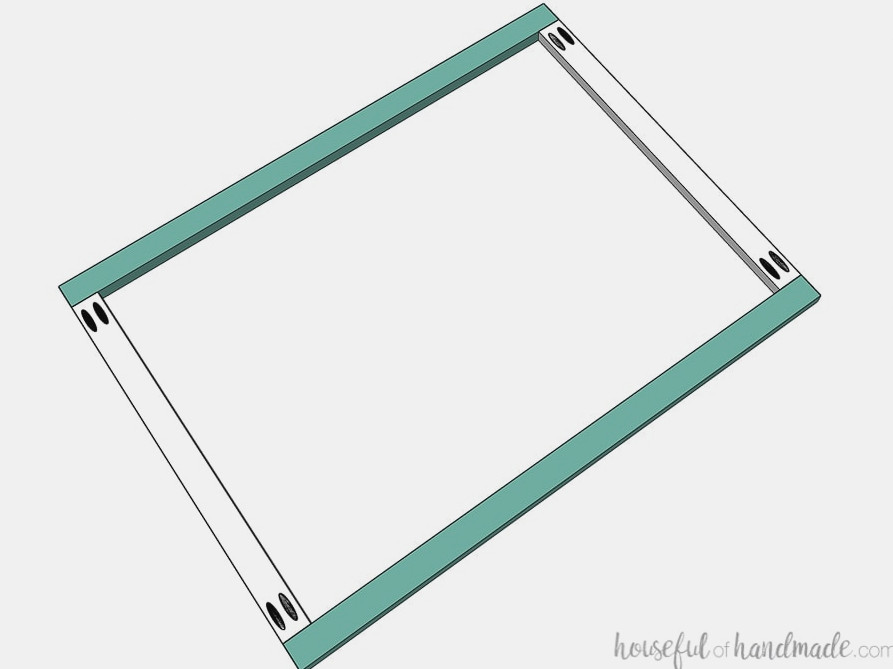
When making a face frame base cabinet with a drawer, cut a third face frame rail and attach it using the same method as the upper and lower rails.
The drawer can be as deep or shallow as you prefer, though the drawer area must be at least 1/2″ taller than the drawer box.
For example, if you want a 4 1/2″ deep drawer, providing about 4″ of room after the drawer base is inserted, place the drawer rail 5″ beneath the top support.
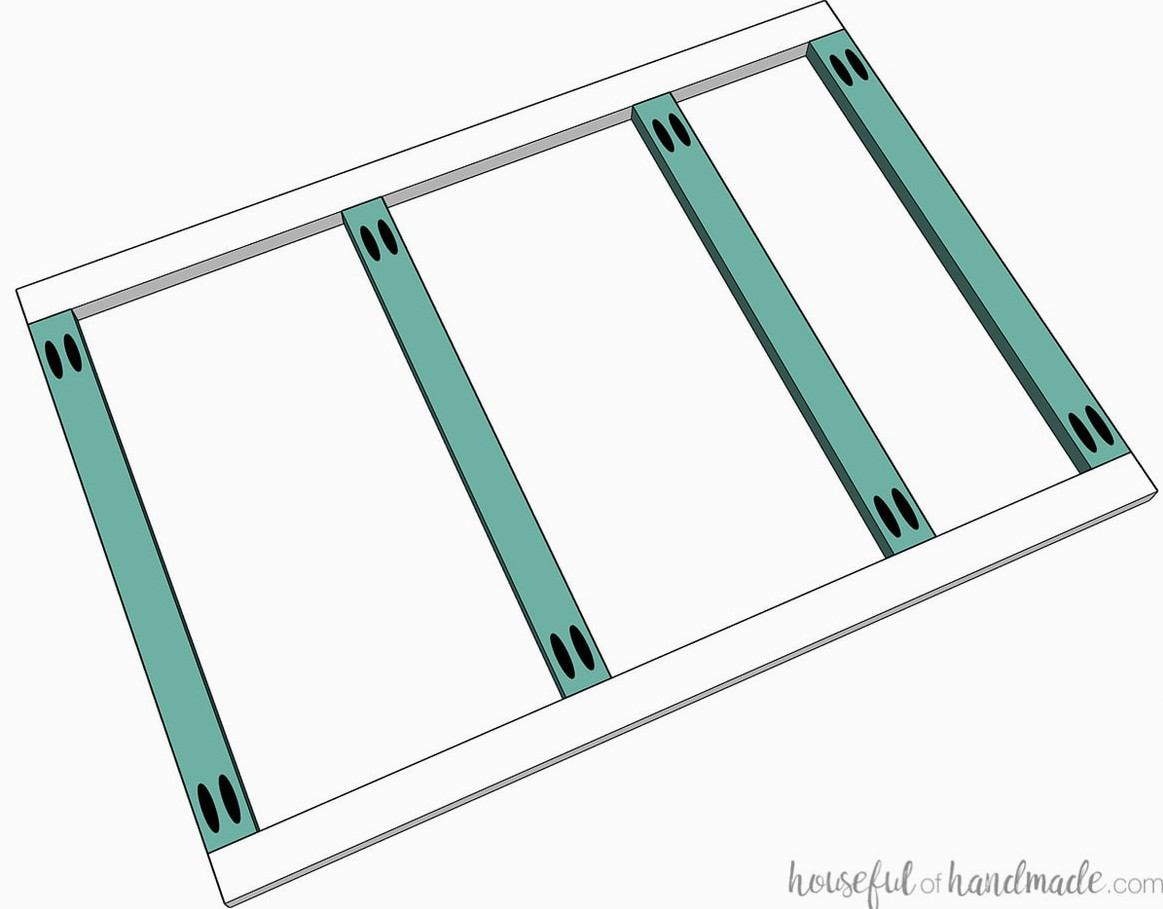
At this point, the face frame is prepared for attachment to the front of the cabinet box.
Position the face frame so it extends 1/4″ beyond both sides of the cabinet. Confirm that the top aligns with the cabinet box, and that the upper edge of the bottom rail is even with the cabinet bottom.
Spread a small amount of wood glue across the plywood front, then fasten the face frame using the pocket holes previously drilled into the cabinet sides and base.
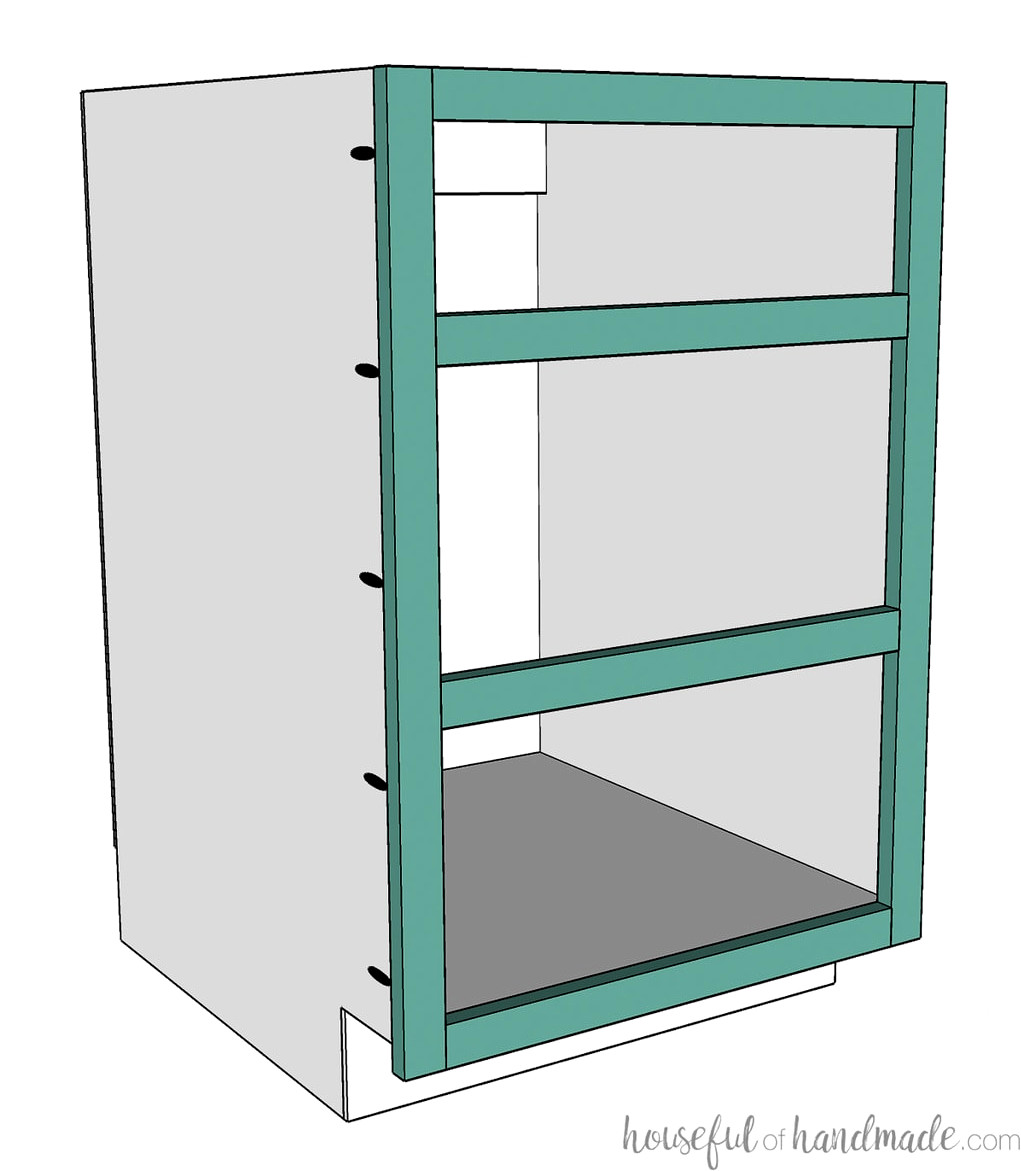
STEP 4- Install drawers and drawer fronts
I prefer making my cabinet drawers from 1/2″ plywood. Because plywood stays straight and is easy to cut to any dimensions, it works especially well for drawers.
Here are 3 simple ways to make DIY drawers. They do not require complicated joinery, yet each option is exceptionally sturdy.
Next, learn how to install cabinet doors here.
You will need a drawer front to cover the front of your drawer. Make these fronts coordinate with your doors. Learn how to construct your own DIY shaker style cabinet doors or simple slab cabinet doors using plywood.
Finally, learn how to install drawer fronts here.
Your cabinet is complete and prepared for installation.
Tips for a Professional Cabinet that are Easy to Install
1- Use a router to add small chamfers along the side edges of the face frames. This makes imperfectly flush cabinet installation much less noticeable.
2- For cabinet sides that will be visible, cut 1/4″ panels and use them to cover the sides. They conceal the pocket holes and bring the face frame side level with the cabinet.
3- Rather than cutting separate toe kick panels for each cabinet, make one panel that spans the entire cabinet section. This removes an additional edge that must be aligned precisely.
4- Construct the cabinet box from pre-finished plywood so the only remaining step is painting or finishing the face frames before installation. See how we painted our unfinished cabinets here.
5- For wide base cabinets, include a center stile to strengthen the middle and simplify cabinet door installation, since the center reveal does not need to be adjusted as carefully.
If you have questions or notice anything I missed, leave a message and I will try my best to respond. I want you to feel confident building your own cabinets as well!